Let's deepen our understanding of events. We can learn a lot about event commands and other related functions
by editting some already existing events or creating our own.
The Transfer Player Event we created in the previous chapter was a "Quick Event".
These quick events are all templates of commonly used events.
Therefore, by looking at the "Contents" in particular, we can understand how to make a basic event.
Let's begin by creating a quick event, then we can break it down and analyze it to learn the basics of how it works.
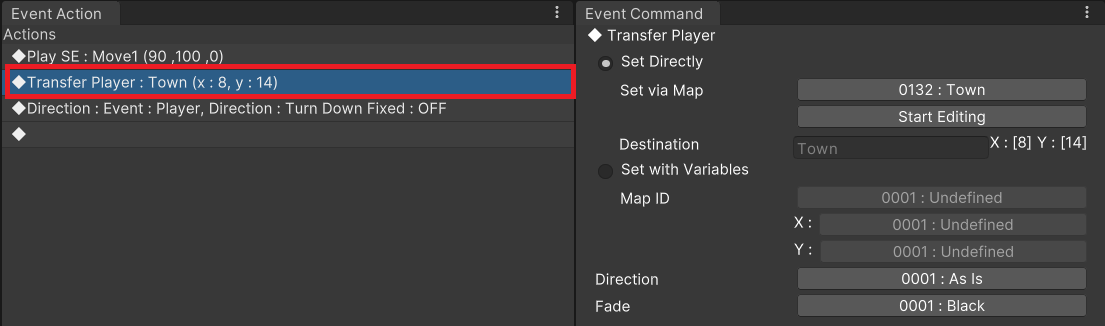
To begin, let's check what makes up the "Transfer Player" event we made in the last chapter.
Here we can see there's been a "Transfer Player" event command added.
Transfer Player can be selected in Event Commands under Character > Movement > Transfer Player.
There are two other event commands set up in the Transfer Player event we made.
By setting an event command, another window will appear where you are able to set the details of the currently selected command.
Going forward, we'll learn more while actually making an event.
Switch to Edit Event Mode, right click the coordinates where you would like to place a treasure chest, and navigate to Quick Event > Chest.
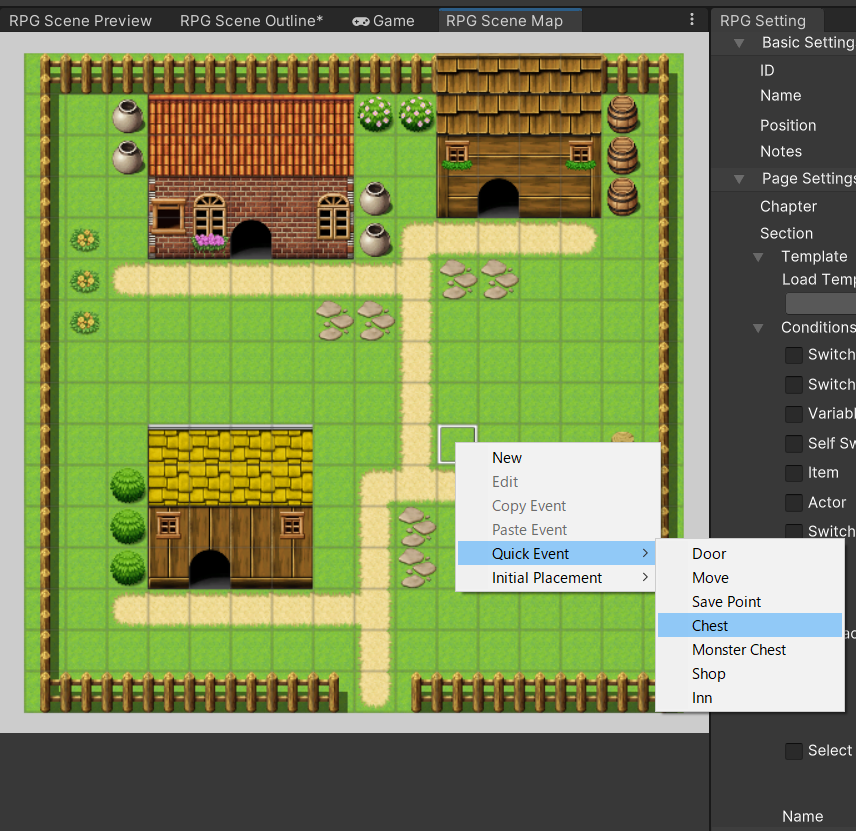
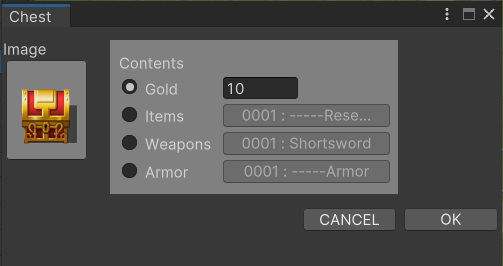
Here, the first thing we can do is set the appearance of the treasure and its contents.
Now we've placed a treasure chest on the map.
● Page 1
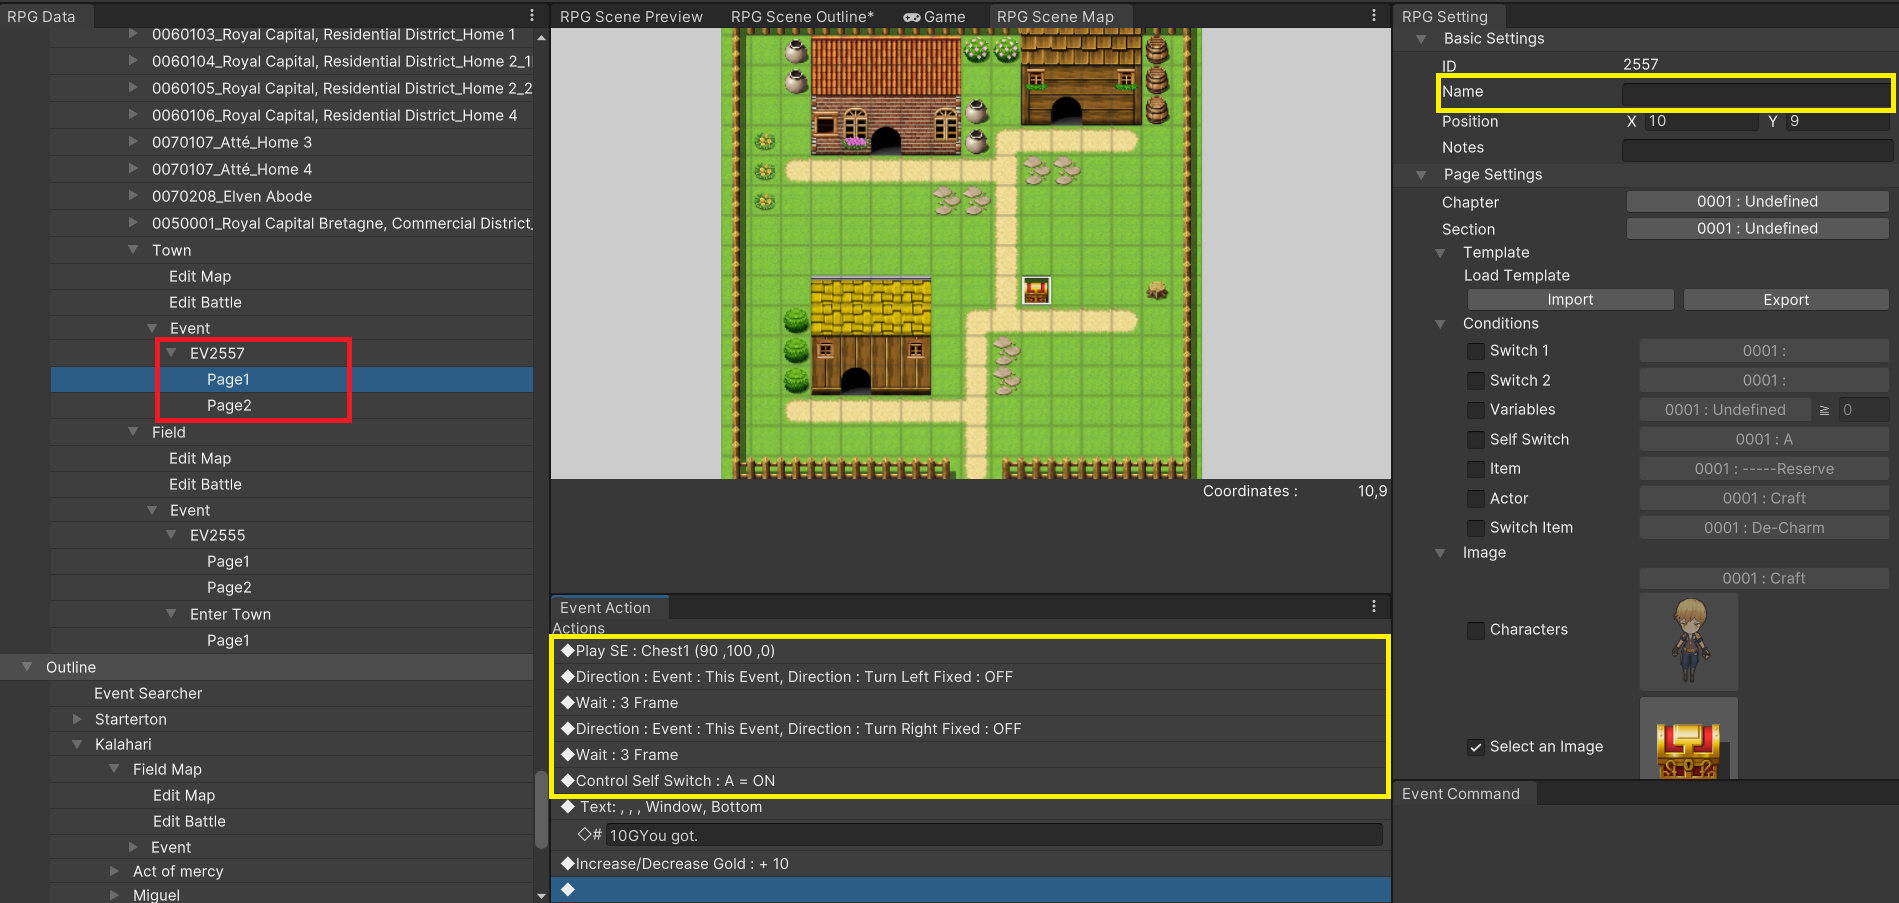
A new event will appear (indicated by the red outline above) in the RPG Data Menu under (Map Name) > Events.
Notice that this is a 2-page event. In this case, page 1 is before the treasure is opened, and page 2 is after it's been opened and is empty.
At this stage, the event doesn't have a name. Give it a name like "Treasure 1" in the area outlined in yellow.
Let's look at the event contents of page 1. Outlined in green is an animation that plays whenever a treasure chest is opened. It does this by changing the treasure chest sprite's "direction", which makes it look like the chest is opening.
The general rule when creating treasure chest sprites is to have one image of a closed chest, then three more images showing the chest open to different degrees. These images are then assigned a direction in the order of up, down, left, right (the same way character sprites work). The image of the treasure chest isn't actually changing direction, this is simply how you use the code to reference the different sprites.
After that, you'll see an item called "Control Self Switch". We will cover Self Switches later.
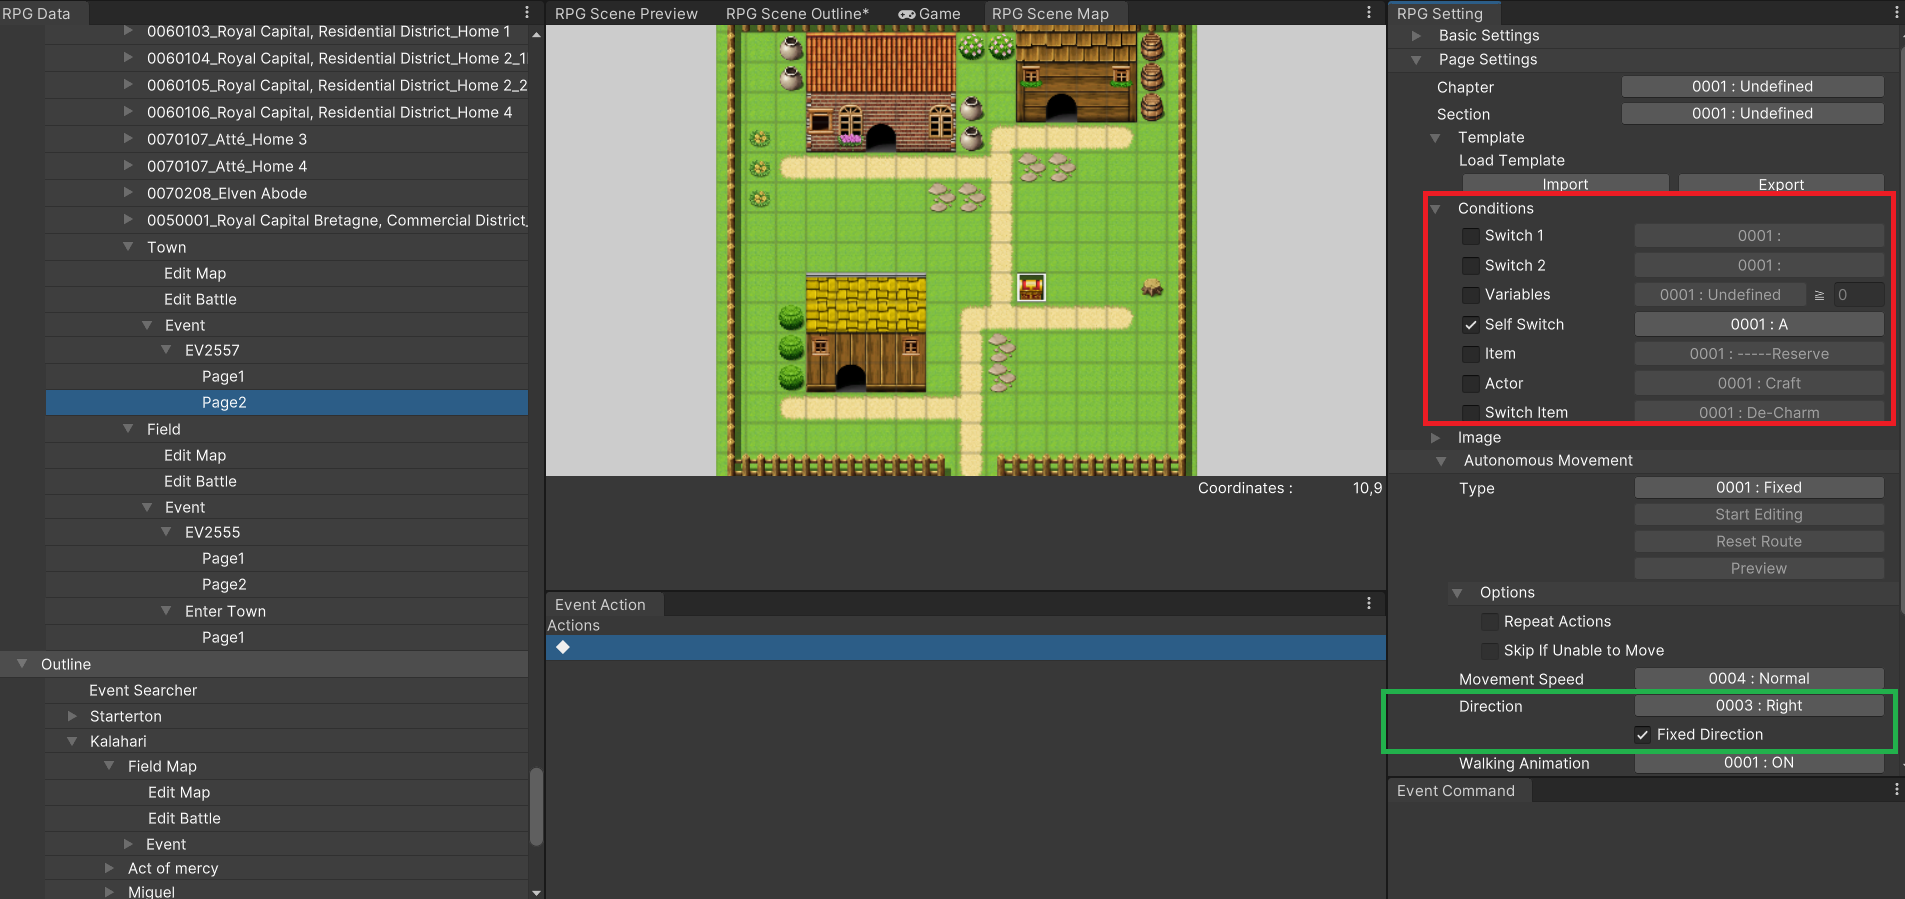
● Page 2
The conditions on page 2 are for Self Switch A. Therefore, the appearance will be changed to the image on page 2 (that of an opened treasure chest).
The main thing to pay attention to here is that only the image has been changed. The event will continue until the page's content has been fully executed.
The same applies in situations such as when conditions change during execution or when changing a map.
For example, even if another event's execution conditions are fulfilled, those contents will not be performed until the current event has completed.
Self Switches are switches that are only referenced within a specific event. They are used when there is no need to reference them in other events.
Normally, as the number of in-progress projects grows, the number of switches in use inevitably increases as well.
On the other hand, self switches are completely independent of normal switches, making them easy to manage.
They are useful for minimizing the number of switches in use. Treasure is perhaps the greatest beneficiary to this logic.
Four self switches, A through D, are available for a single event. In most situations, this is more than enough.
In the case of treasure, we only need to know whether or not it has been opened, so we can accomplish the job using only switch A.
Let's go over some other event commands.
"Play ME" was a parameter in the first line for the treasure chest event created with Quick Events.
ME is short for Music Effect. Music Effects temporarily stop the BGM to play a sound.
Once the sound has played, the BGM will begin playing again automatically.
This is often used for fanfares and the like.
Next, select "Inn" from Quick Event.
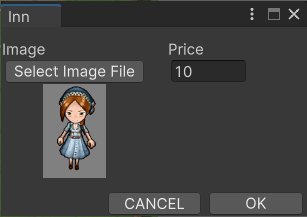
The following screen will appear. Input a character image and the inn fee.
Let's take a look at the content of the event we placed.
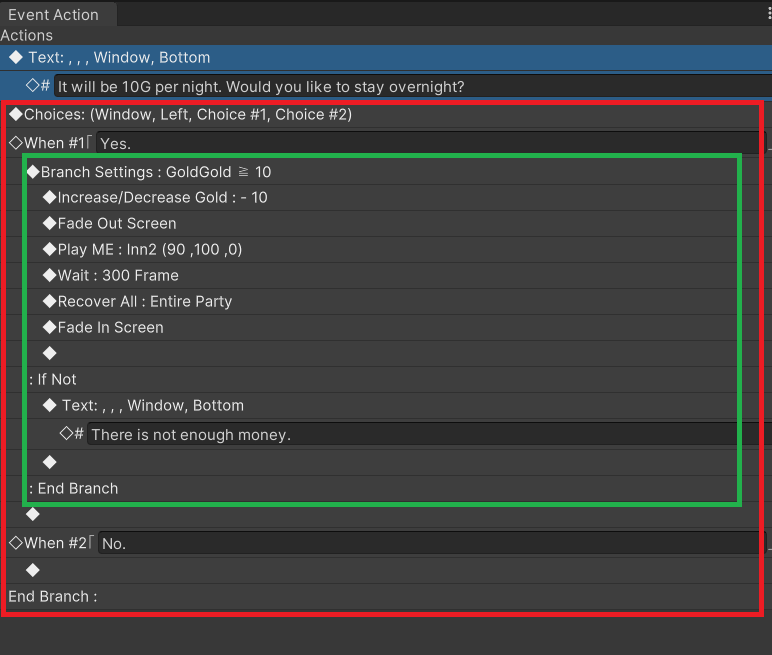
This can be found in the section outlined here in red. This will display a selection on the game screen, asking the player to make a choice.
Here we have two choices, "Yes" and "No". These choice names can be changed. We can also implement a number of other functions, too.
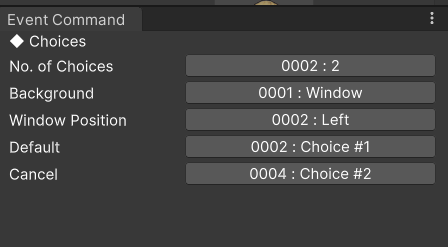
This is the section outlined in green in the image above. At this inn, the branch checks whether or not the party has enough gold to stay at the inn. There are many other branch conditions that can be set as well.
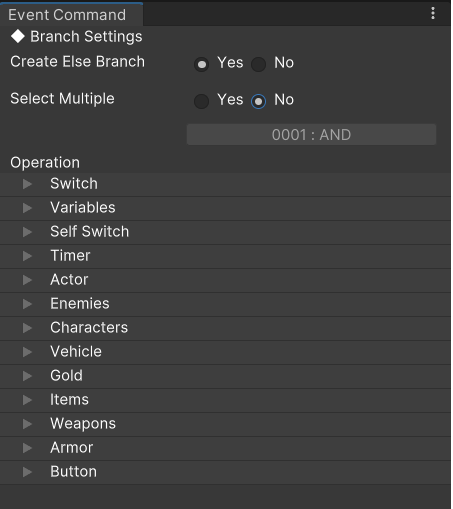
It is possible to determine whether conditions have been met by referencing a variety of game data within the game. Here are some examples:
Configure the Show Text options here. It's possible to show up to four lines of text in a single message window.
It's also possible to display a window showing the speaker's name.
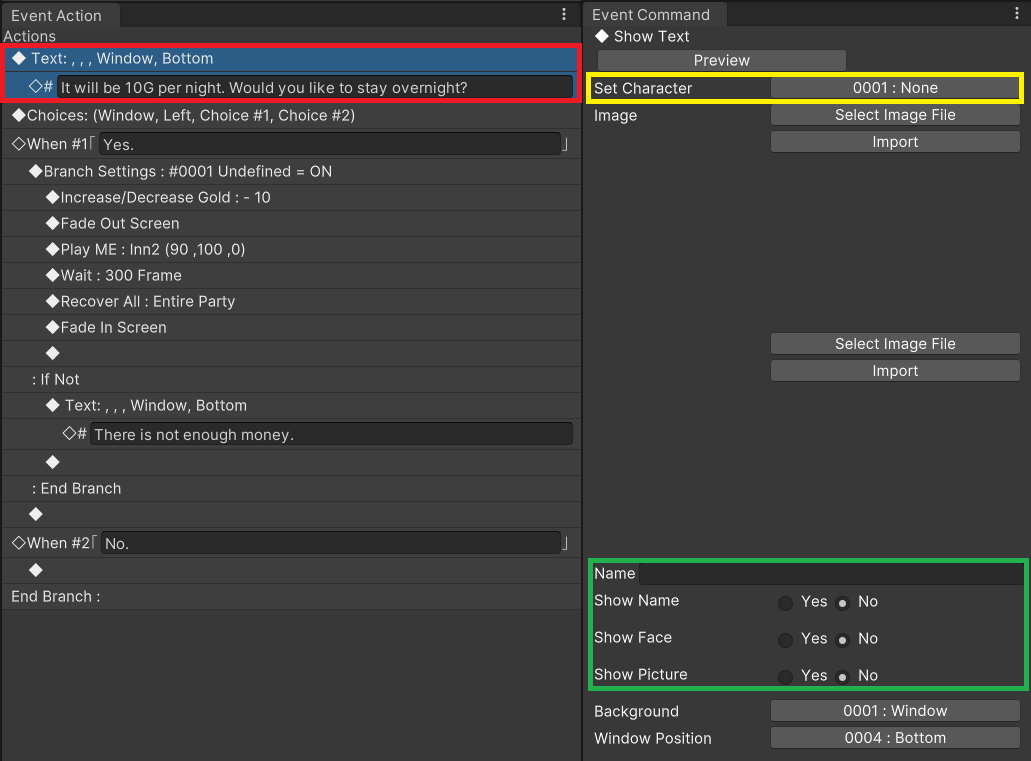
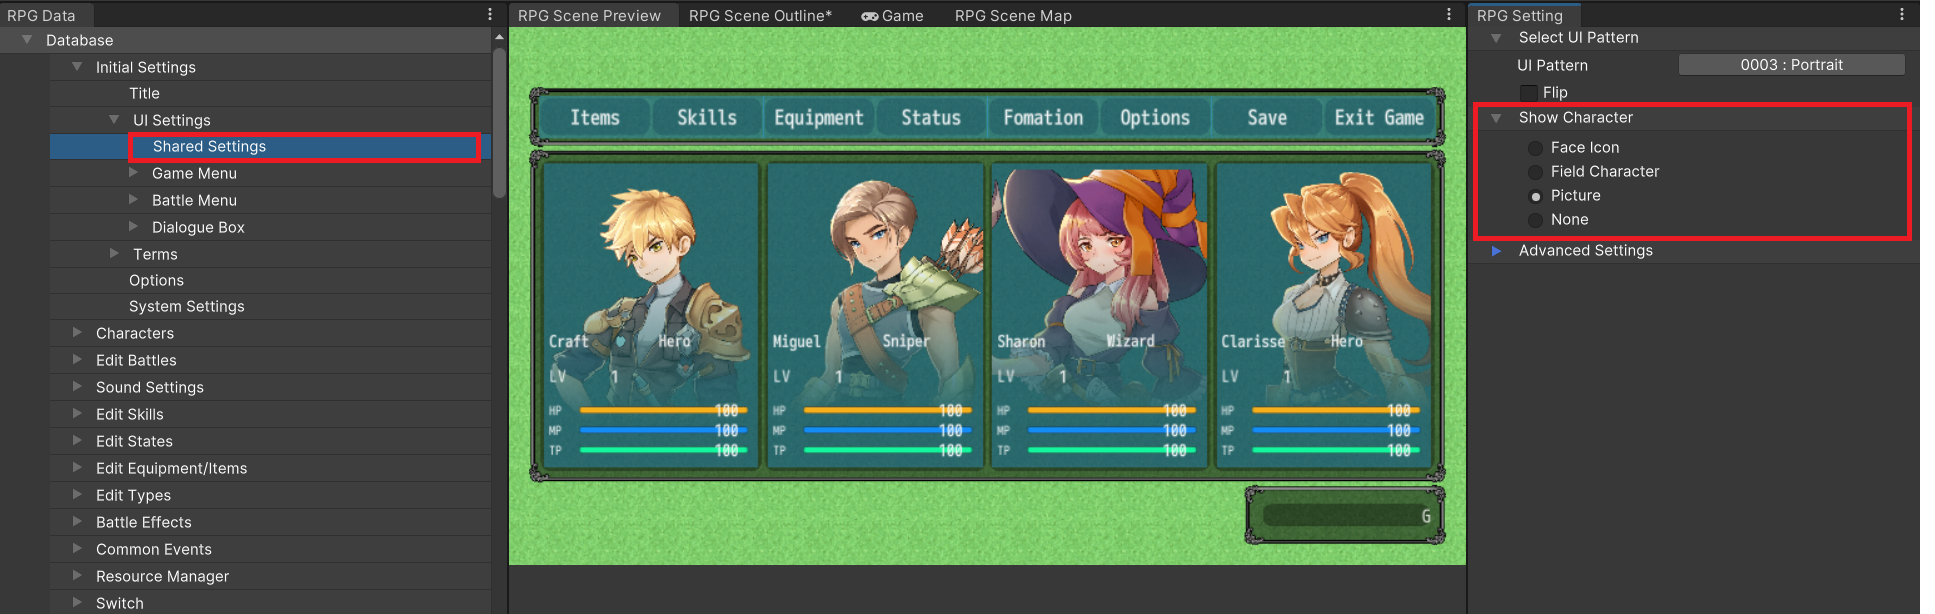
Let's take a look at the "Show Text" event in the RPG Setting, outlined above in red.
In the part outlined in green, you can see selections for "Name" and "Show Name". Notice it is possible to choose whether or not to show a face icon or a picture here as well.
These are required settings, but in most cases it is possible to automatically configure them.
By inputting Control Characters before text, it is possible to ornament text, make a display dynamic,
or to automatically substitute in-game information.
| \V[n] | Displays the value of variable n |
| \N[n] | Displays the name of actor n |
| \P[n] | Displays the name of party member n |
| \G | Displays the currency unit |
| \C[n] | Changes the subsequent text to the color n |
| \I[n] | Displays icon n |
| \{ | Increases the text size by 1 step |
| \} | Decreases the text size by 1 step |
| \$ | Displays Gold Window |
| \. | Creates a 1/4-second pause when displaying text |
| \| | Creates a 1-second pause when displaying text |
| \! | Wait for button input when displaying text |
| \> | Display remaining text on same line all at once |
| \< | Cancel the effect that displays text all at once |
| \^ | Do not wait for input after showing text |
| \\ | Display a backslash (or yen symbol) |
| \PX[n] | Adjusts text position on a line n pixels horizontally |
| \PY[n] | Adjusts text position on a line n pixels vertically |
| \FS[n] | Changes font size to n |
In some situations, the "\" symbol may appear as the full-width "\" character, or the half-width "¥" character.
Try to remember that these two symbols appear differently depending on the situation, but they are treated as exactly the same symbol.
The screen fades out with "Fade Out Screen", and is returned to normal with "Fade In Screen".
In the inn event, a sleep ME is played while the screen fades out, and five seconds (300 frames) later, the screen returns to normal.
Here are some other prominent use examples.
Now you should have a basic understanding of events and their fundamental elements.
Let's try actually making an event and editing it to deepen our understanding even further.
Create a new event, setting it up from scratch.
First, like last time, right click on "Edit Map" in the RPG Data Menu, select “New Event", and enter Edit Map Mode.
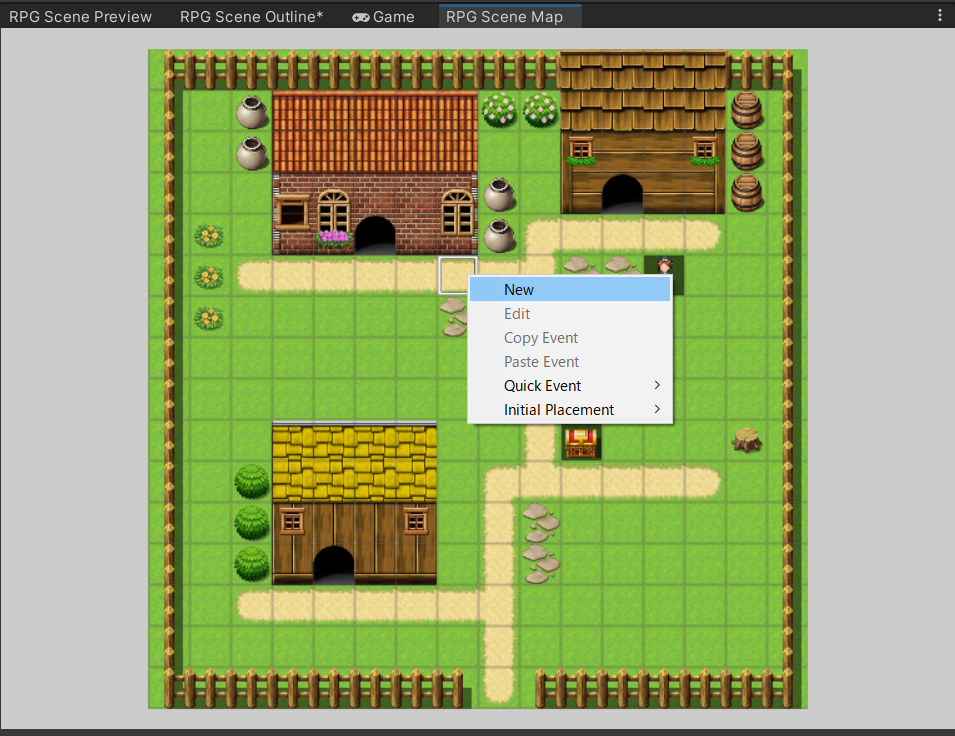
Now, right click the location on the map where you would like to place your event and select "Create New".
Let's check the RPG Setting for Page 1 of the event we created.
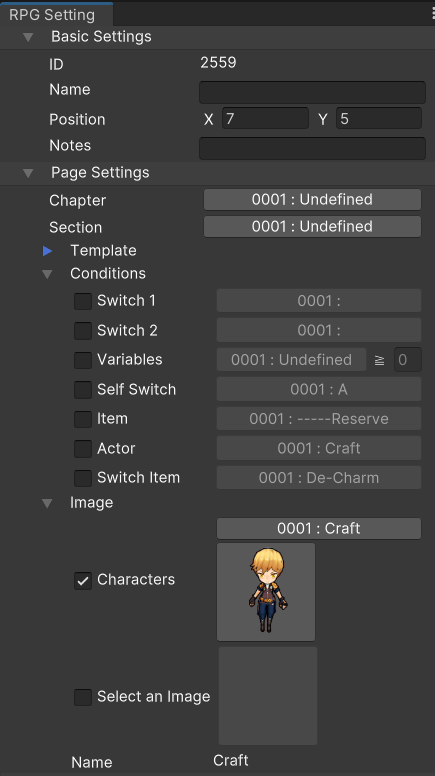
Some of the main elements are explained in Event Basics.
Here we'll cover the other elements not covered there.
Let's edit some of the events we've created above.
We'll create a character that displays a message when spoken to.
This time, we'll make an event where the player character speaks to another character, so the event position will be set to somewhere the player can access (i.e. a passable tile).
If you would like to change the coordinates, navigate to the event's page at Basic Settings > Position and change the coordinates there.
This time, we'll set the "Character" in "Image" to 0002: Miguel.
Now we'll create the event without changing any of the other initial settings.
Let's make sure the trigger is set to 0001: Action Button.
To add event commands to "Event Contents", right click and select "New Event".
Furthermore, if Event Command is selected while inserting an event command between multiple others,
a new event command will be created above the selected one.
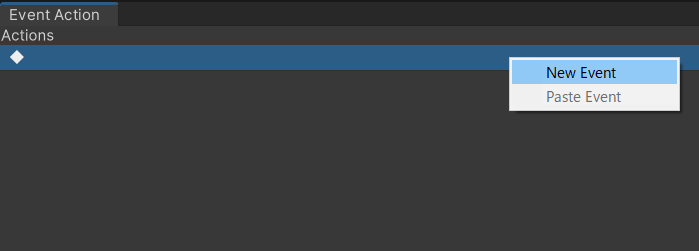
The event command list will be displayed, so select an event command and configure it.
Here, we'll select Message > Show Text.
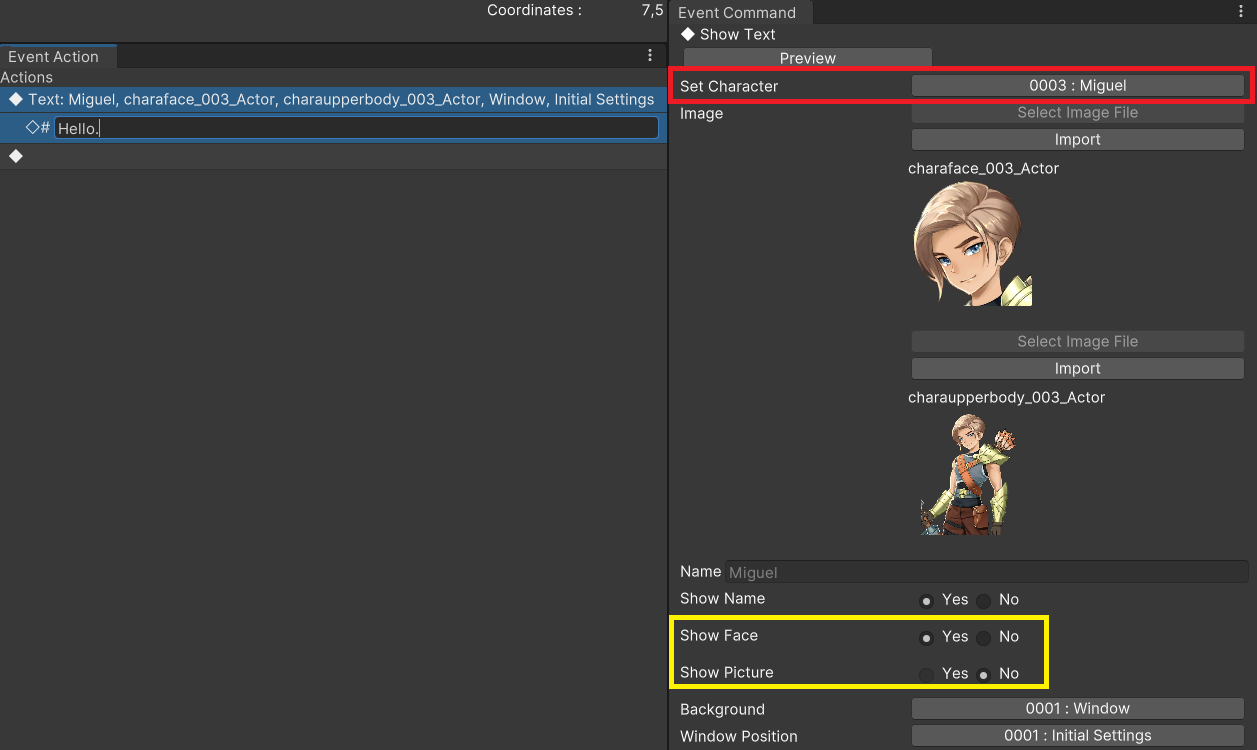
A command will be added to event contents, and a detailed settings window for "Event Command" will appear.
This time, we've set the event character to Miguel, so we'll select 0003: Miguel from "Character Designation", outlined here in red.
Now the name, name window, and face icon/picture display will be set automatically.
Highlighted in yellow, you can choose between "Show Face" or "Show Picture". Select the former. It is not possible to use both options simultaneously.
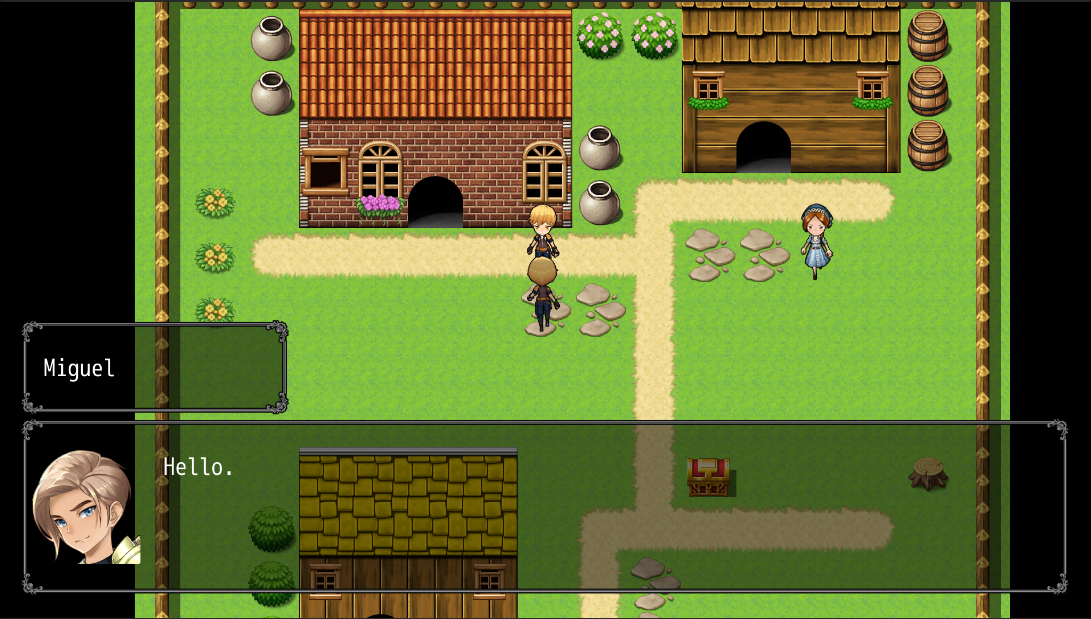
In the event contents under "Text", we can see that a message is displayed that says, "Hello."
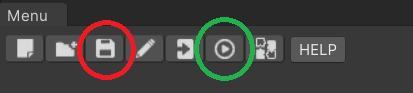
Save the project by clicking the icon circled in red in the upper left corner of the screen, then click the Playtest icon circled in green to begin a playtest. Talk to the event character we created and see if the proper text is displayed.
Next we'll edit the "Quick Event" treasure chest we created before.
It's possible to insert event commands at certain positions. Select the event command immediately after the position where you want to insert the new command and select "New Event".
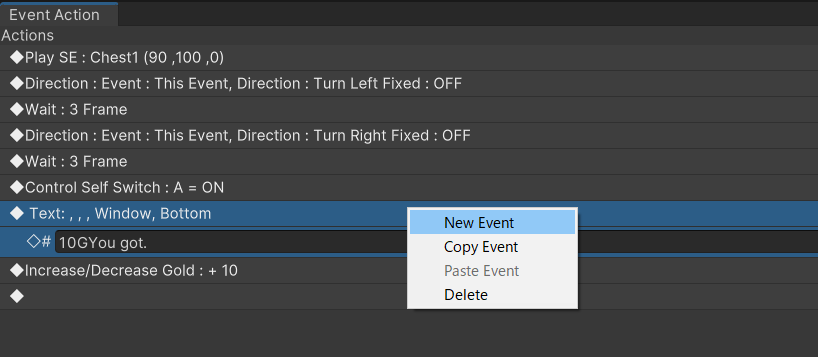
First select "Text", then right click and select "New Event".
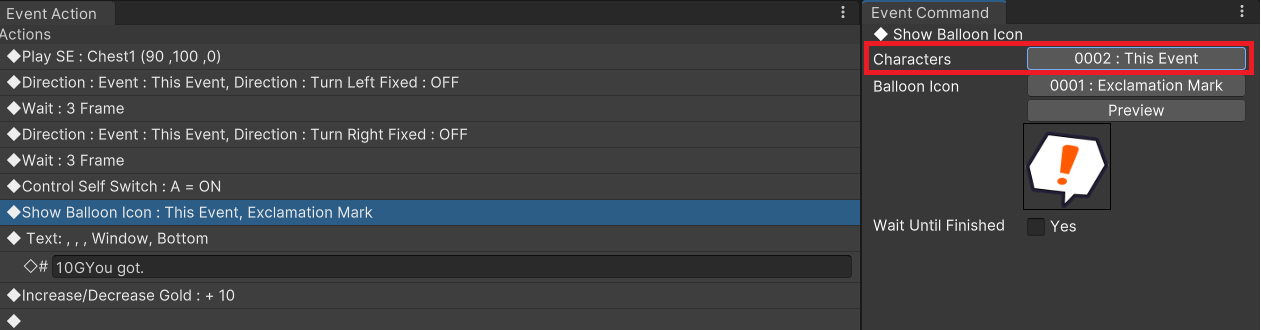
Select Character > Show Balloon Icon to add the position from event commands.
In the event command RPG Setting, the character field outlined in red will change to "This Event".
This is mainly useful for showing a specific character's emotions when creating a series of event scenes.
Another way to use this is to display a speech bubble above a speaker before "Show Text" so the player can easily see who is speaking on a map.
Let's change the amount of gold received from treasure to a random amount.
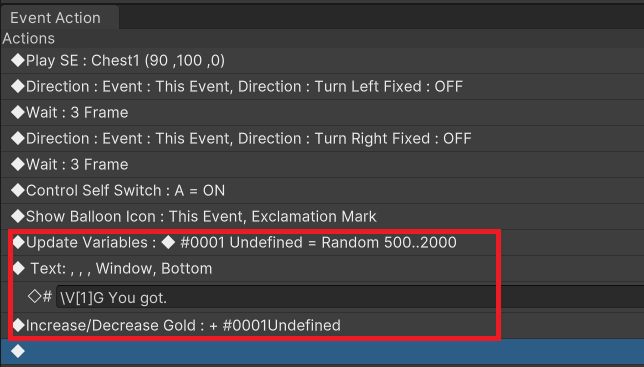
We will be changing the settings outlined in red in the image this time.
With that finished, let's conduct a playtest and try opening the treasure chest.
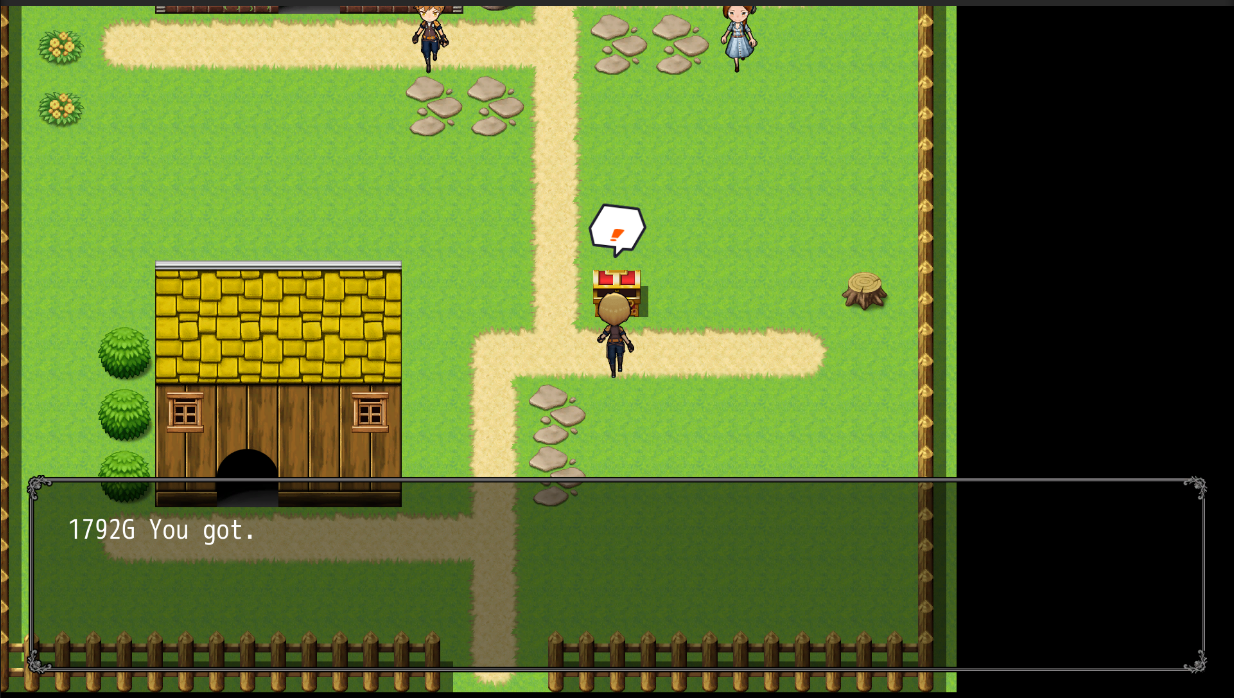
● A gold amount between 500 and 2,000 will be acquired each time this event occurs.
It's possible to input a variety of values to variables. The most frequently used values are fixed numbers or substitutions for other variable values. Here are some other examples:
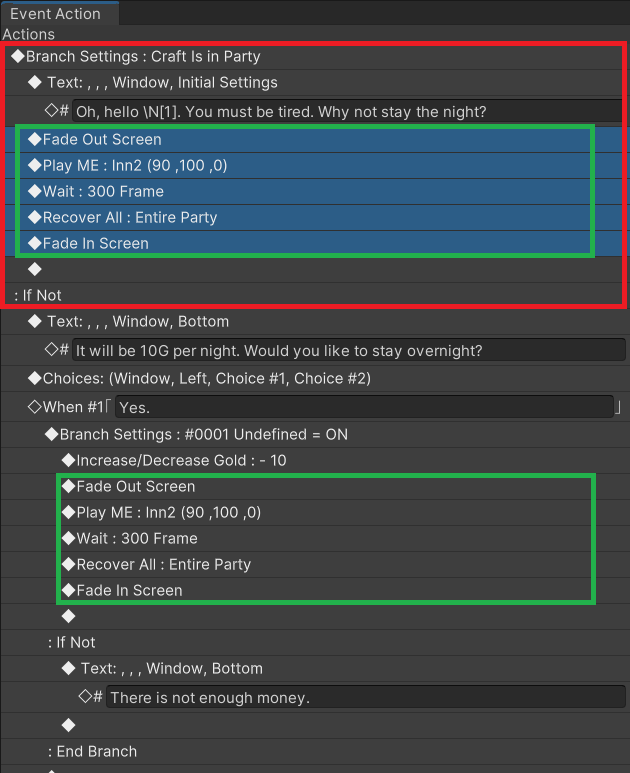
Now with what we've learned here, let's add a function to the inn. We'll make it so that when a specific actor is present, the party can stay for free at the inn.
Once the above steps have been completed, conduct a playtest.
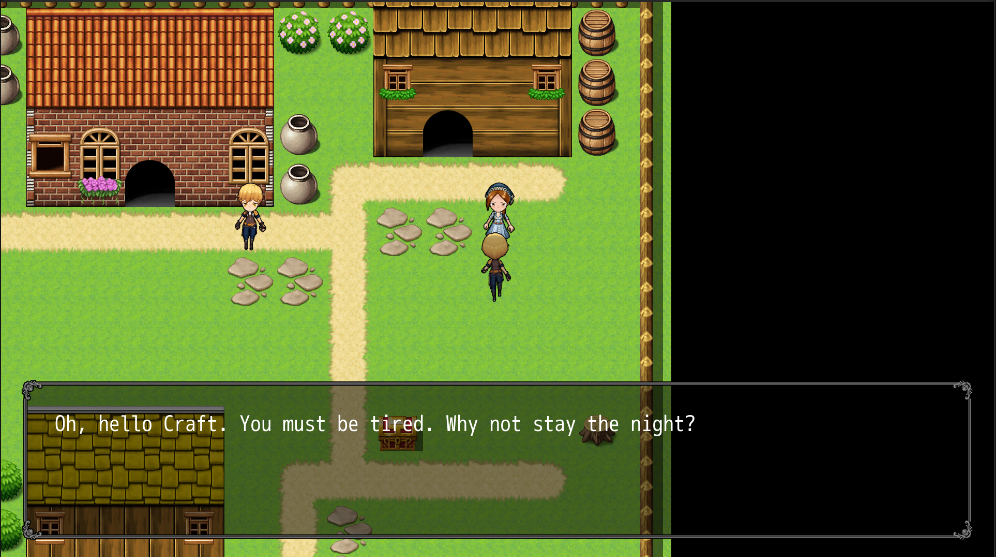
Check to see if you can stay at the inn for free when the actor with ID #1 is present.
Running this command will stop the current event without launching the remaining "Event Contents".
However, when common events (discussed later) are invoked from events, and "Exit Event Processing" is done during a common event, the invoked event will return to processing and continue.
It's possible to copy a series of event commands and paste them to an event.
Select the event command, right click and "Copy Event".
You can press and hold the Shift key to select multiple event commands.
The event commands you select can be pasted to any event with "Paste Event".
It's also possible to paste them to common events, which we'll go over later.
Now, let's try making a variety of events.
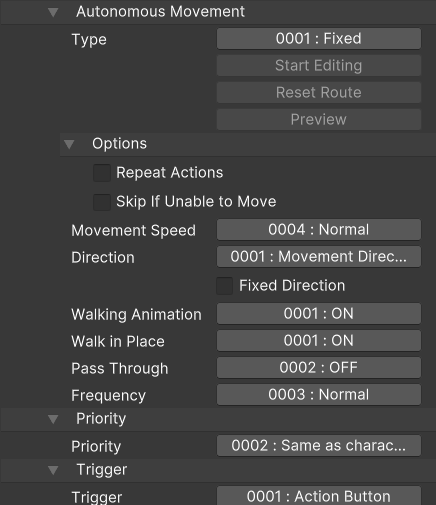
Forced movement of events or the player character can be done through event commands at Character > Movement > Set Movement Route.
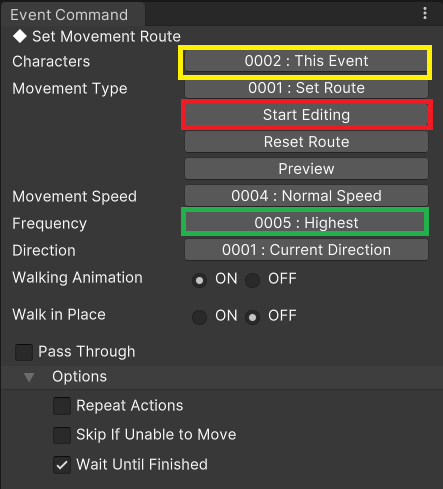
The RPG Setting for "Set Movement Route" should look like this.
First, set "Movement Type" to 0001: Set Route.
"Frequency", outlined in green here, should be set to 0005: Fastest. Other settings would cause the actor to wait after taking each step.
When actually setting a movement route, we'll select "Start Editing" outlined in red here.
Select "Start Editing" and a red bar with the text "Setting Up…" will appear below the map. Now, let's click the movement route in the order we want the character to move.
Values starting with 1 will show on the movement route to be taken.
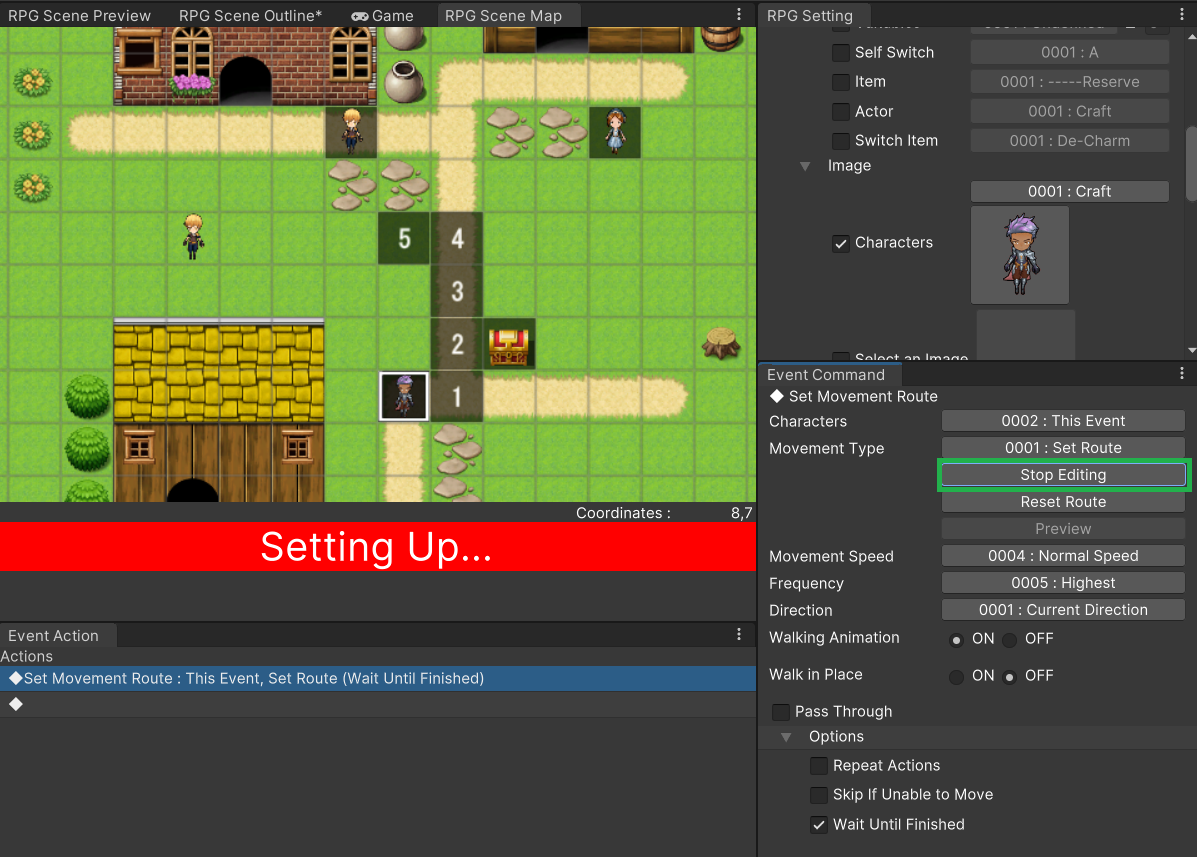
Here, we'll set a route that goes 1 right, 3 up, 1 left. Once we're finished setting the route, select "Stop Editing" outlined in green here.
If we conduct a playtest here, the character should move along the set route when spoken to from below.
You may have noticed during a playtest that if the event is spoken to again from below, it will take the same route
In other words, movement routes set in-game are not definite (tied to a specific coordinate), but relative (e.g. 1 right, 3 up...) in their execution.
More specifically, if a separate event were to specify this event's movement route, it would utilize coordinates relative to this event.
So what about player movement routes? In this case, it would specify the relative position from the event coordinates recalled by the event.
Let's add a movement route with the player as a target to the event we just created.
Create a new event command with "Set Movement Route", set the character to 0001: Player, and the Frequency to 0005: Fastest to create a movement route.
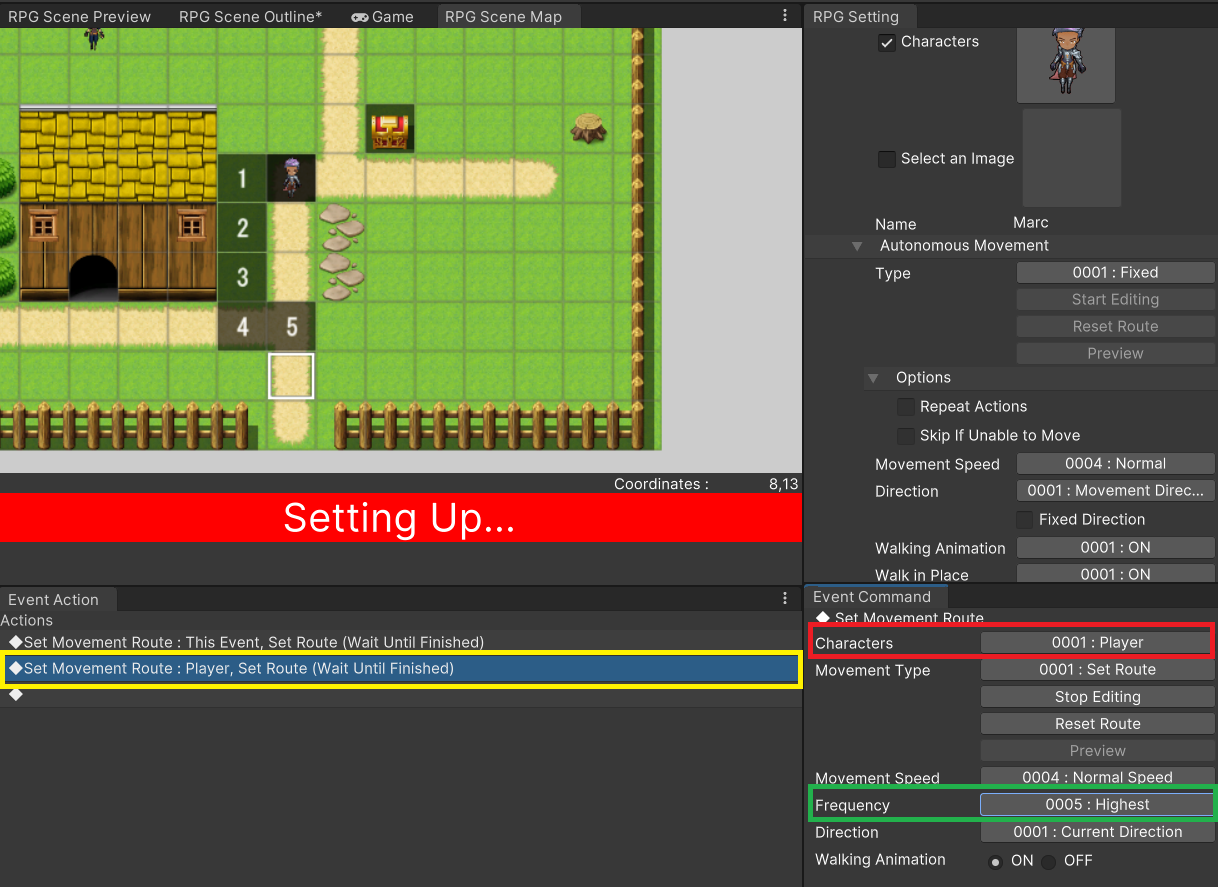
Now let's conduct another playtest. If the event is spoken to from below, you'll notice that first the event movement will occur, and afterwards the player character will move 1 left, down 3, right 1.
It's possible to move multiple events at the same time. To do just that, let's create a new event 2 steps above our current event and name it "Townsperson 2".
Then we'll use "Set Movement Route" to target this new event from the event we first created.
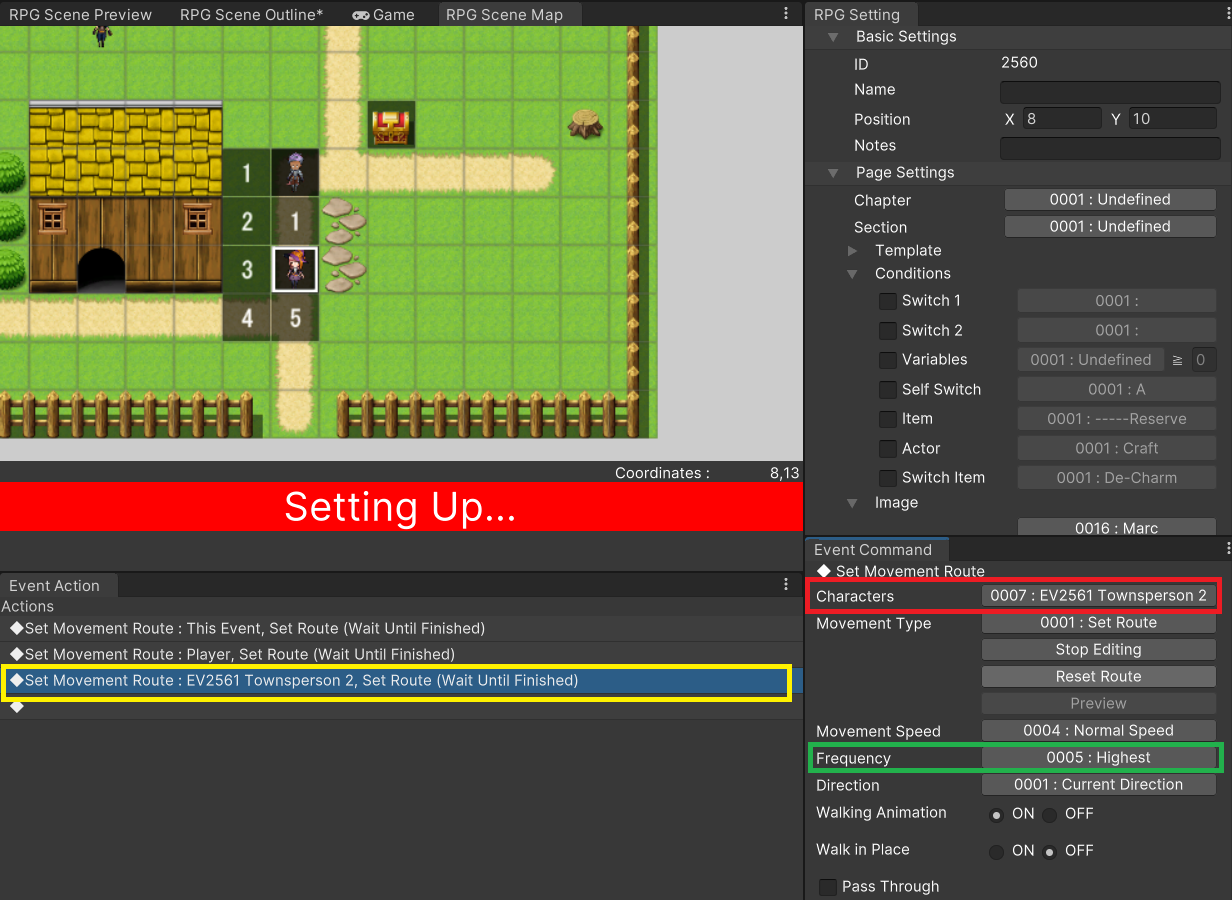
Here we'll set up two events and a player movement route. To make sure everything will move simultaneously, uncheck the "Wait for Completion" option from the top two events.
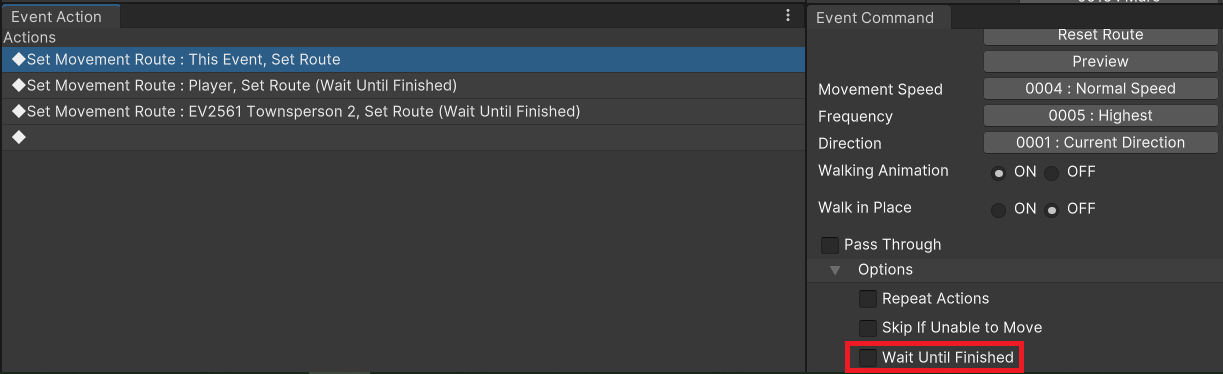
This completes preparations. This time, try speaking to the first event (the bottom townsperson) from above. You'll notice that all three characters will move simultaneously.
If we use "Custom Movement", which will be discussed later, we can increase the freedom of movement available to us.
However, it's not necessary to use custom movement for events with only simply movement.
Let's go over the types of movements available without using custom movement. All can be selected from Character > Movement
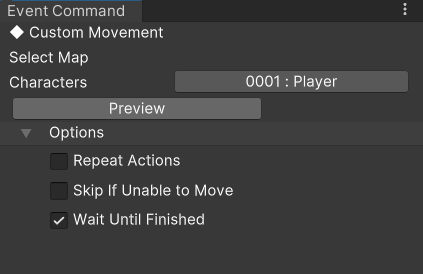
The event commands under Character > Movement > Custom Movement are a group of event commands that begin with character movement.
It's possible to do a number of things for specific events or the player, including adding wait time between steps for normal movement, playing SEs, or displaying a balloon icon, etc.
The biggest advantage to custom movement is that it can be used to move multiple events and/or the player simultaneously.
If we just want an event to move, the previously mentioned "Set Movement Route" does the job well enough. However, if we want to play a SE or add a wait time between steps, for example, using custom movement is necessary.
This is an effective event only usable with "Custom Movement". Unlike the conventional "Set Movement Route", this sets a direction for every step during movement.
Other than the four movement directions, you can select from "Move toward Player", "Move away from Player", "Jump" and other options.
For normal event commands in Character > Action > Jump, the jump destination coordinates are set to a relative distance from the event.
On the other hand, using "Jump" with custom movement does not utilize a relative distance, but instead specifies an absolute coordinate. Try to use each accordingly.
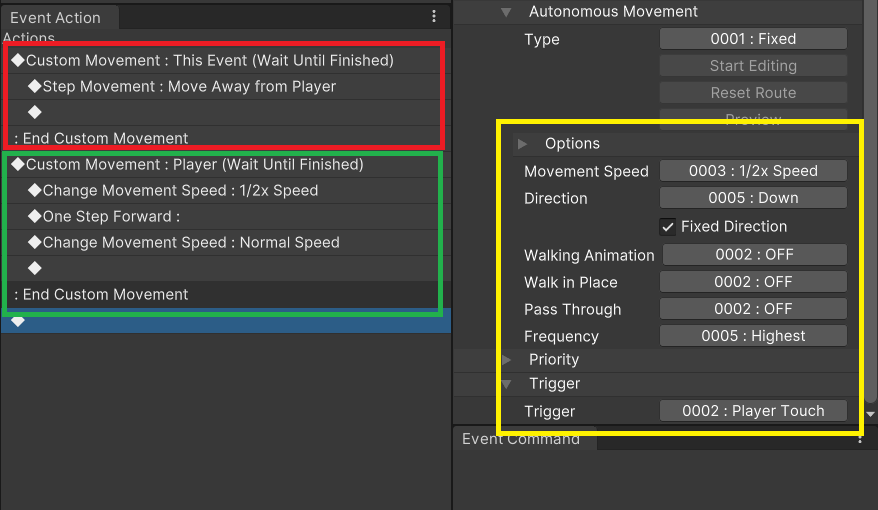
As an example of how to use custom movement, let's create an event consisting of a boulder that will move when pushed by the player.
We'll set the boulder's trigger to 0002: Player Touch and set it to move at the same time as the player when the event is put into play.
The contents outlined in red are for the boulder, while the parts outlined in green are for the player's movements.
Once you've created an event like the one in the image, conduct a playtest and try seeing if you can move the boulder.
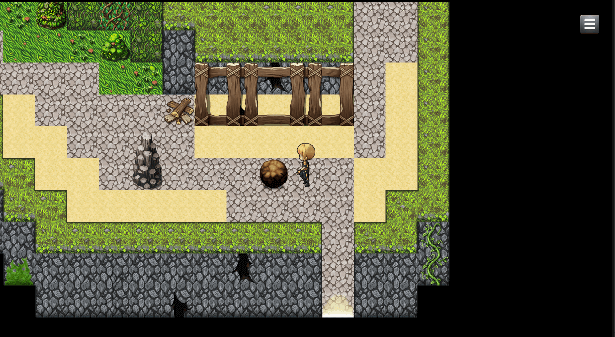
● Moving a boulder in the direction pushed
These are but a few examples. Custom movement can be used in a wide variety of event commands.
There are a variety of screen effects in Unite. We will unfortunately omit a discussion of them here, but it is possible to make rain or snow fall using event commands with Screen > Set Weather Effect.
Instead, we'll be going over some other representative examples.
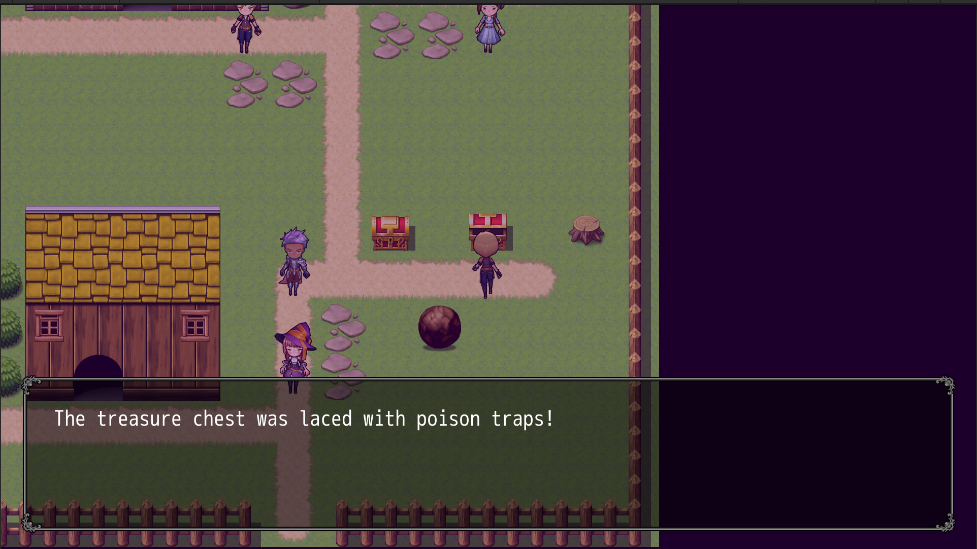
First, we'll create a treasure chest with a quick event. Change the settings on the first page to match those outlined in red here.
The treasure chest is set with a poison trap that poisons the entire party when opened.
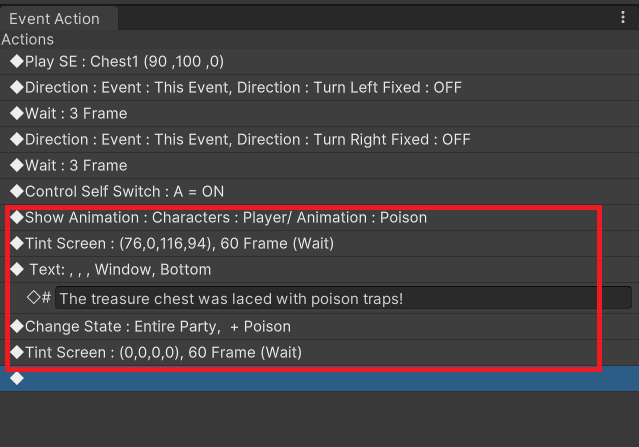
Let's look at the event commands used in this event.
In Unite, it's possible to play animations on the map screen and during battles. An animation will play around a selected event or player.
In this example, we'll have the animation 0061: Poison play around the player.
This changes the color tone of the screen. Since the setting is for poison gas this time, let's set the RGBA values to (76, 0, 116, 94) to give the screen a purple overlay reminiscent of poison.
And so that it returns to normal after a set time, we'll set the later values to (0, 0, 0, 0).
It's also possible to specify the number of frames (1 second = 60 frames), making the color tone change gradually over time. This time we've set everything to 60 frames.
Since Unite uses Unity as its base, the settings for tinting the screen differs from previous RPG Maker titles, and is now set by specifying RGBA values. The normal RBGA values are (0, 0, 0, 0).
There are a few template color tones already available, such as "Sepia" or "Sunset", but here we'll cover a few more examples.
One example of an important trait with events is having them return to their original position when changing maps.
If due caution is not paid here, it could lead to unforeseen issues.
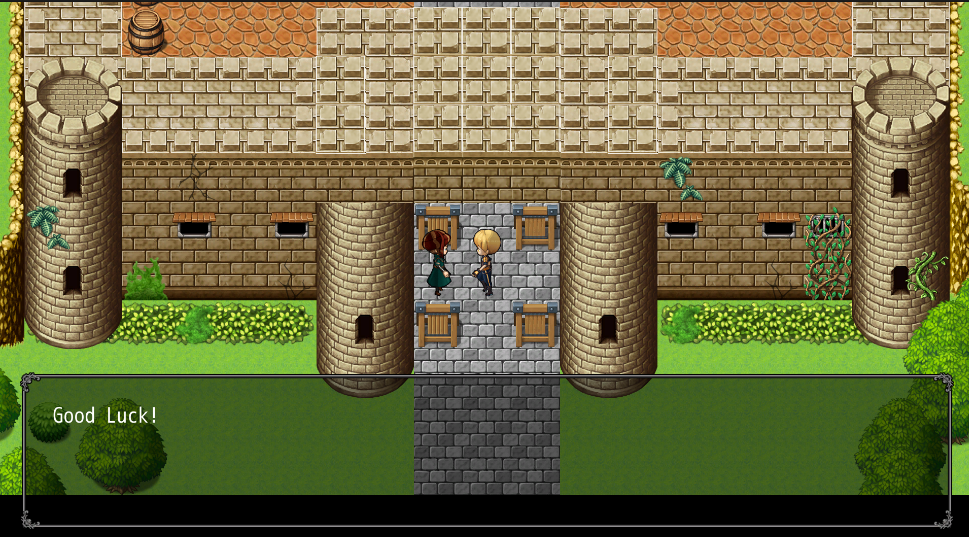
Let's consider, for example, a soldier who has let the main character pass through a checkpoint. The soldier moves out of the way with a transfer player event, and says the line "Good luck."
However, in this case, if we leave the map and come back, the soldier will be blocking the path again.
If the player speaks to the soldier now, he will say "Good luck," but will not move, making it impossible to progress through the game.
One way to solve this problem is to create two different events: one for before the soldier moves, and another for after he moves, which we will go over here.
First, take a look at the following image.
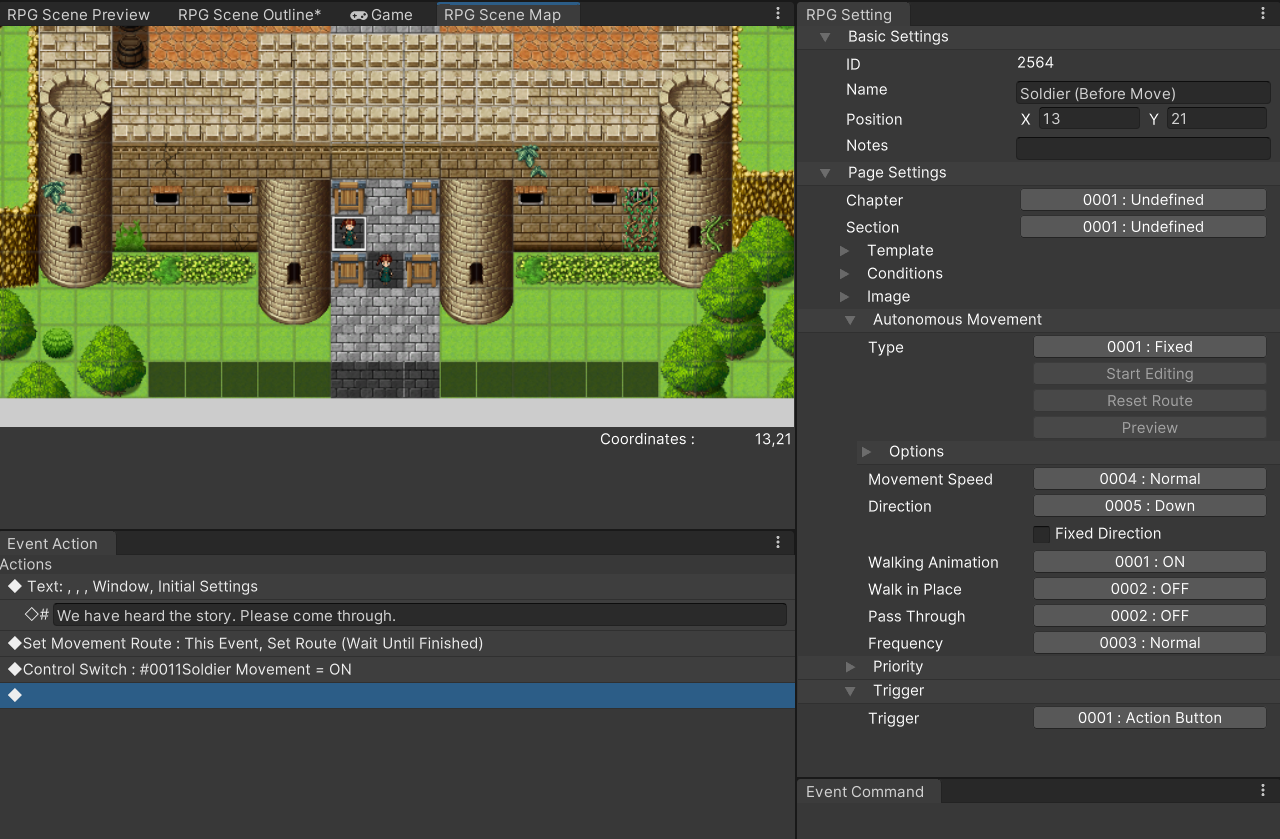
● Soldier (pre-movement) Page 1
You can see two soldiers, one that hasn't moved and is still blocking the path, and another after he moves and allows the player to pass. At this stage, the post-movement soldier does not have its conditions met, and will thus not be shown.
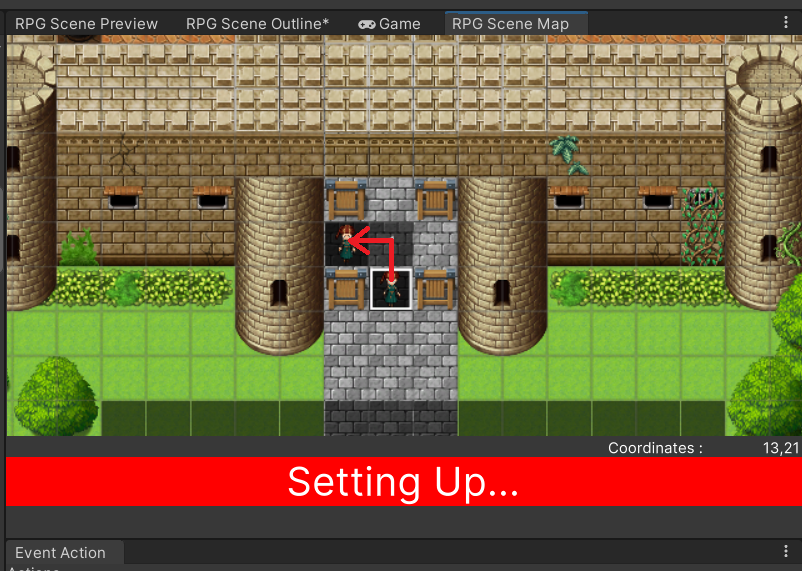
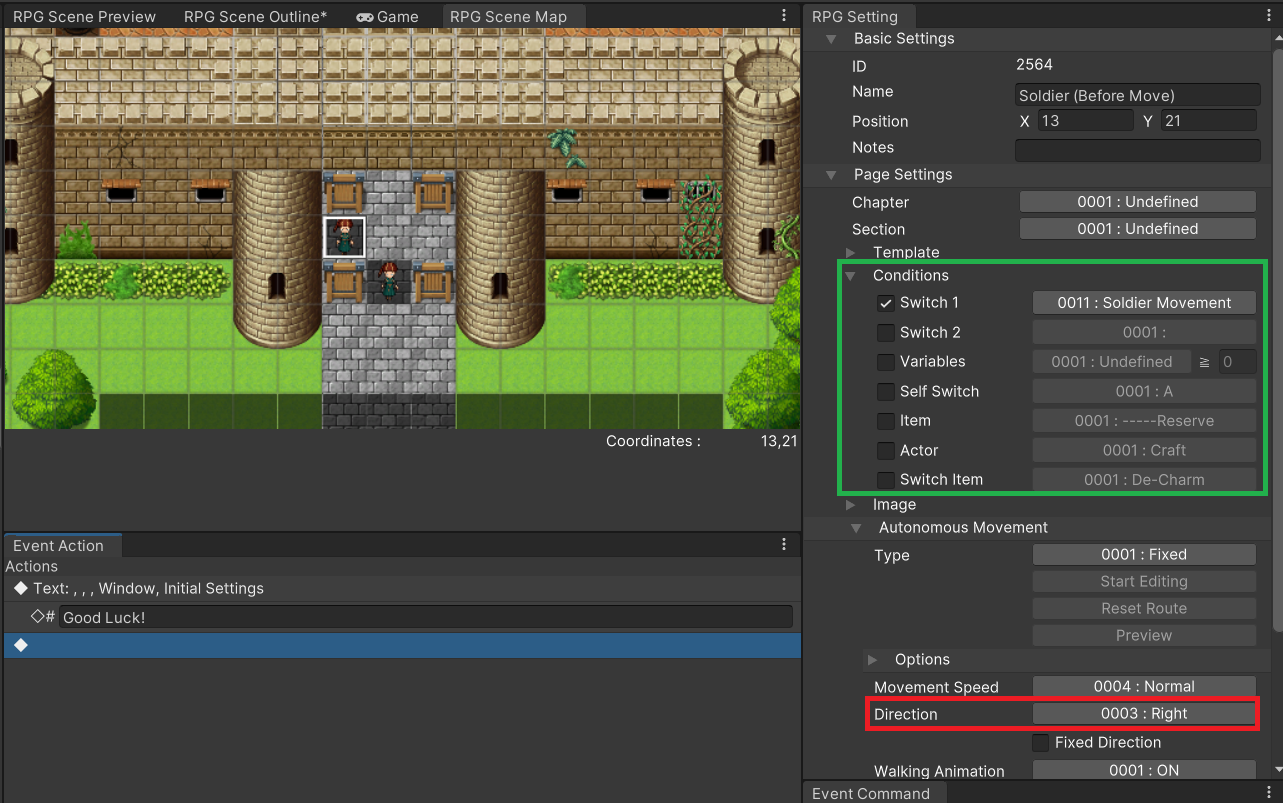
● Soldier (post-movement) movement route
After the soldier moves along the route shown by the arrow, a specific switch will be turned ON. Here we'll use the #11 switch.
Note that it is best to set the "Frequency" here to 0005: Fastest when specifying a movement route.
First, let's take a look at page 2 of the pre-movement soldier.
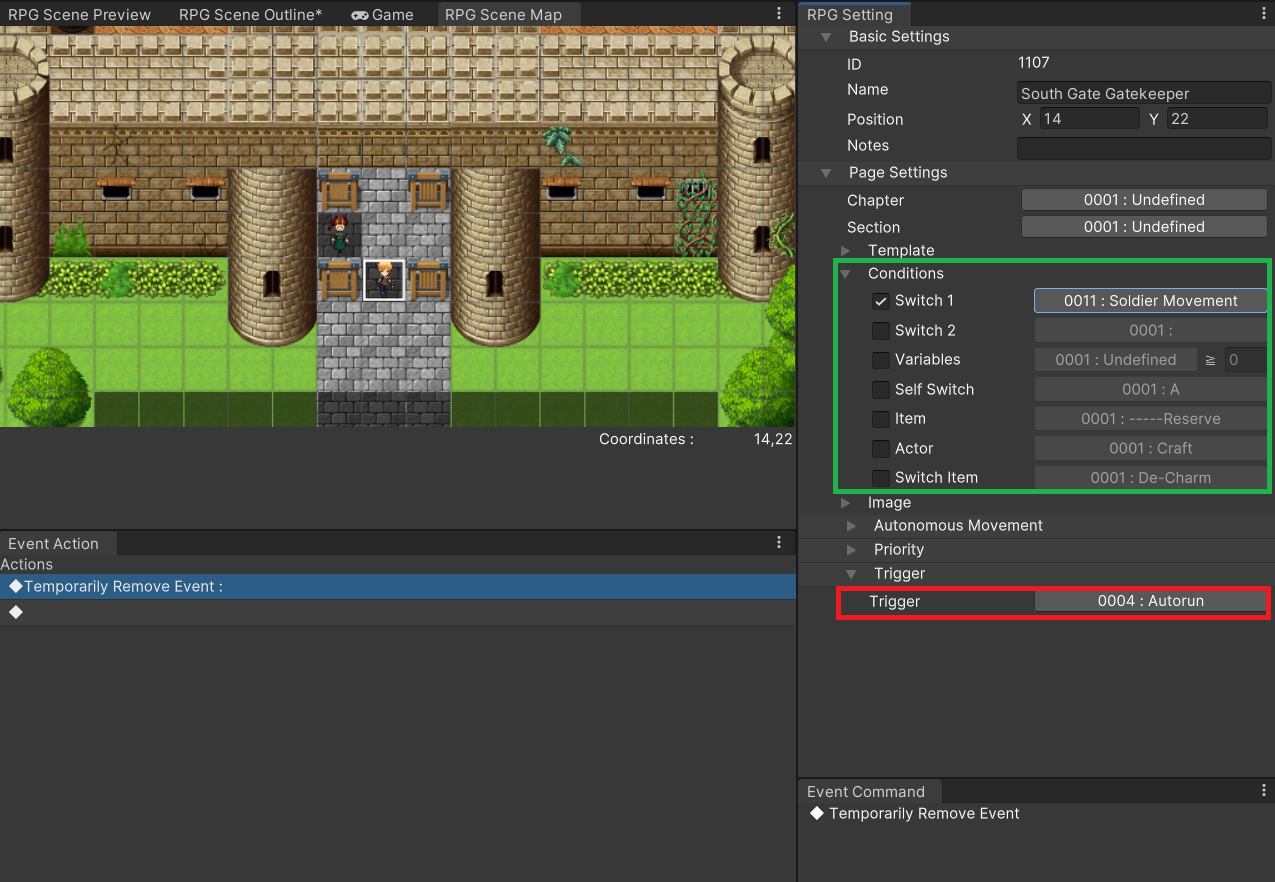
● Soldier (pre-movement) Page 2
The conditions outlined in green have been met, so the pre-movement soldier will change to Page 2. Here, perform the event command Event > Temporarily Remove Event with Autorun,
causing it to be erased immediately no matter its coordinates.
Now let's take a look at the post-movement soldier.
● Soldier (post-movement) Page 1
Since the conditions have been met, the soldier will now be shown.
● The soldier doesn't return even if the map is changed
This erases an event. The event won't reappear until it's been reloaded by changing the map etc.
This requires somewhat less processing than preparing a blank page, so we recommend erasing events that will not need to appear again.
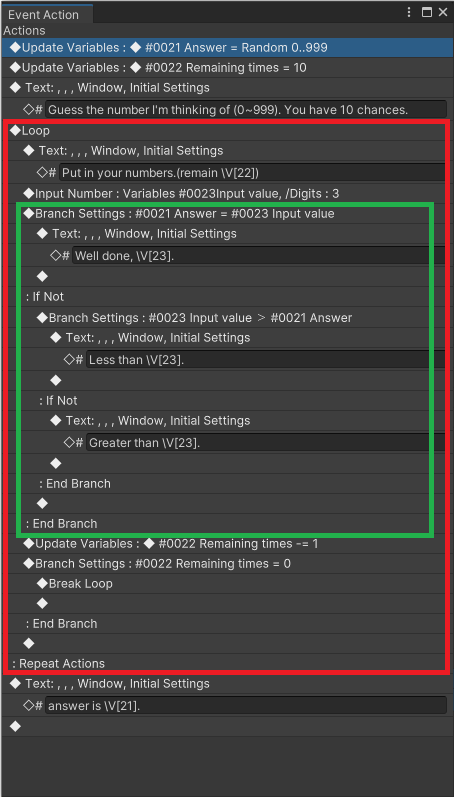
Next we'll create a number guessing game where the player has to guess a randomly selected number between 0 and 999.
Let's see how this will play out. First, set variable #21 to be random.
The part outlined in red above will be looped. The beginning of the loop will prompt the player to input a number, which will be judged in the section outlined in green.
If the answer given is correct, the player will be informed and the event will stop with "Exit Event Processing".
The number of tries remaining will be controlled with variable #22. The initial value is 10, but will decrease with every answer.
If the value reaches 0, it will exit the part outlined in red with "Break Loop", the player will be told "Too bad" and told the correct value.
This specifies the number of digits, and urges the player to input a number. The input number will be substituted with the specified variable (in this example, #23).
When placing a loop, Repeat Movements will be added below it, and the event between them will be repeated.
To exit this loop prematurely, we'll use "Break Loop".
Like in this example, we can exit the loop even if the event itself has been ended with "Exit Event Processing".

● A correct answer after guessing several numbers
Common Events can be found in the RPG Data Menu.
The events thus far have been Map Events. These are events that are not launched unless the player is on the map.
On the other hand, common events can be called from any map.
Common events can be launched by calling them with the event command Flow Control > Common Events, or when conditions are met for switches, for example.
Let's go over a single example now. The rest will be covered later, after a discussion on database settings.
Frequently used events should be made into common events when possible.
Here, we'll turn a save point that fully recovers the party into a common event.
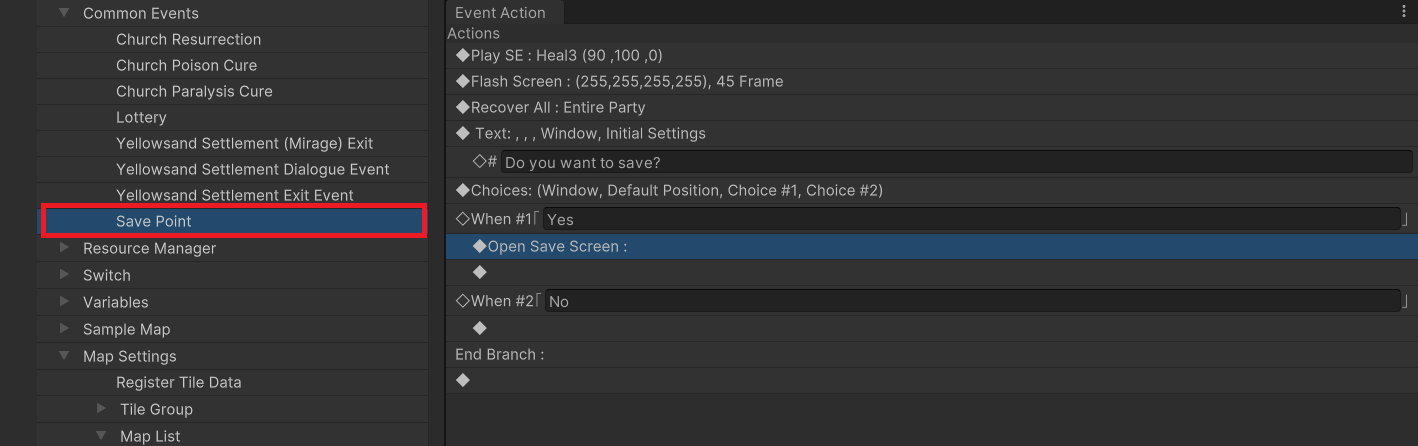
Now the contents of the event will be located under Flow Control > Common Events, and can be recalled with one line through common events.
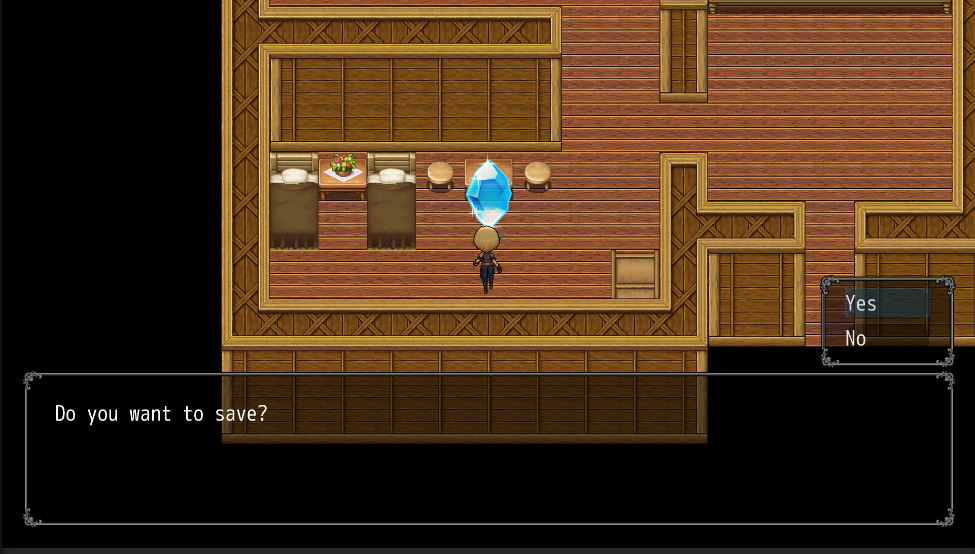
● It will function the same way when copied to multiple locations
If you place an event that will be used multiple times on many maps without making it a common event,
then if you discover a setting error later that you need to address, you will have to go through and edit every instance of that event individually. This is inefficient.
However, by making it a common event, you will only need to fix the problem in the one command event to have it reflected across all instances of the common event.
When saving using the event command Scene Control > Open Save Screen, the event contents at that time will also be saved.
Therefore, if an event's contents continue after "Open Save Screen", that will also be saved.
If that event is then loaded after being overwritten, the event command will continue from before the changes were made.
To avoid this, try not to add any important processing after "Open Save Screen".
This concludes the tutorial on creating and implementing events. We hope this has deepened your understanding of how events are made.
We'll go on to create even more practical events later, but first we'll learn about the database, as that knowledge will be required for creating the events going forward.