Let's take a look at some unique items of some features.
We can't possibly cover every single detail here, so we've singled out some of the more important
or difficult-to-understand items.
In Maker tools, actor and class settings are usually configured together.
This is because an actor has to belong to a class,
and much of an actor's essential data can only come after their class has been configured.
Therefore, you can and should check the data defined in both the actor and their class
at the same time.
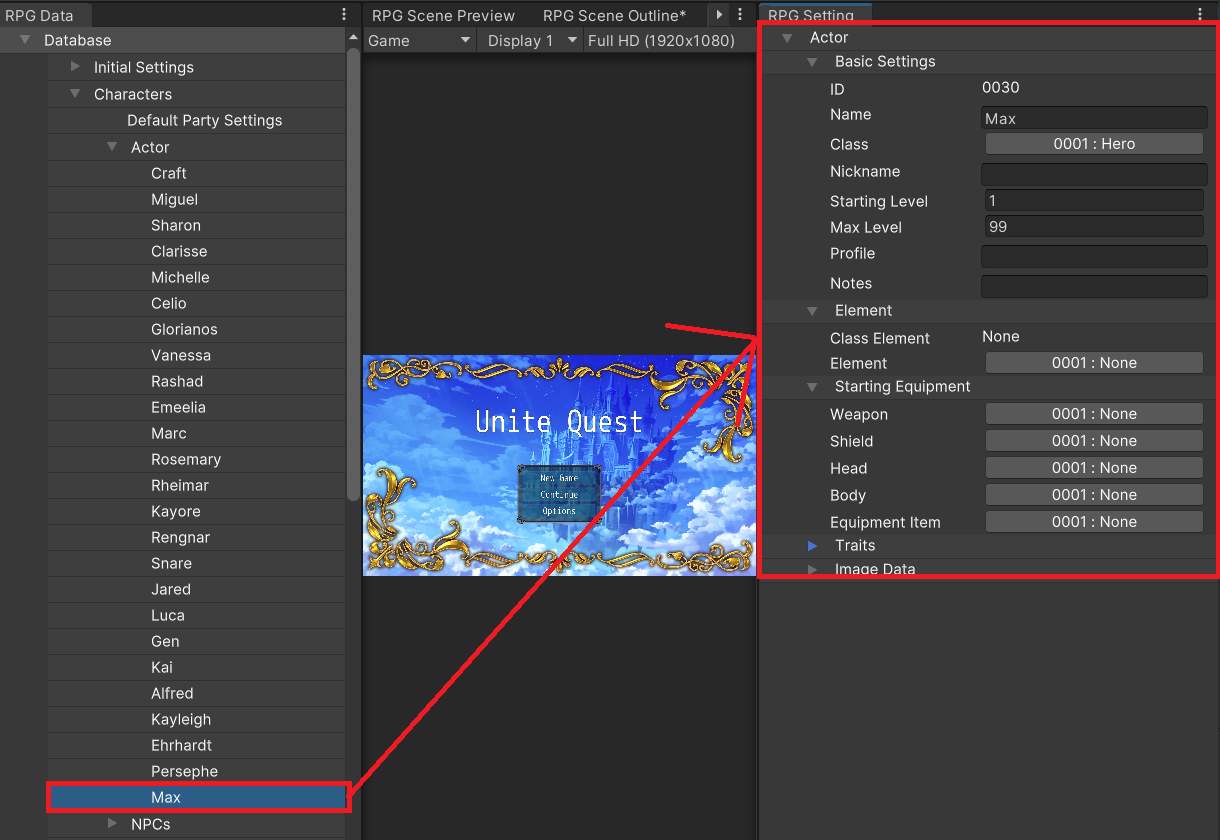
The main elements to configure for an actor are:
Name, Class, Element, Initial Equipment, Traits, Image Data
Besides what was already mentioned, the following items are also available for configuration:
Essential parameters for battle-related processes are configured in "Class".
These are available in "Actor" as well, although the settings in "Class" will be prioritized.
The actor's elements are configured here. It's usually fine to leave this as "None",
but if you have an actor who is a fire fiend or something like that, you can set their element as "Fire".
The available elements here are defined in Edit Type > Elements (explained later),
where you can also configure how strong or weak they are against other elements.
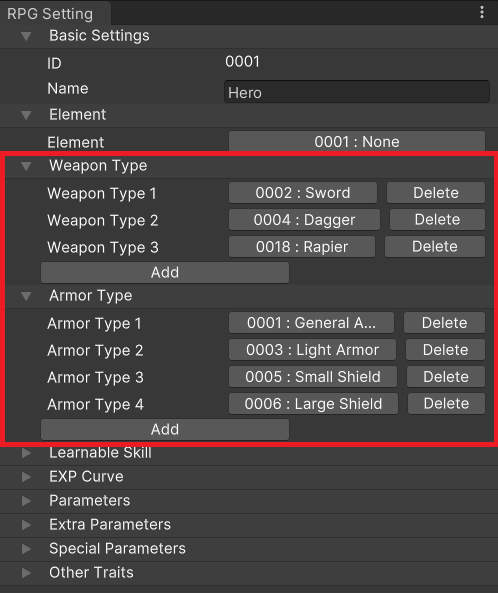
Specify which types a particular class can equip.
Each weapon and armor will have a weapon type or armor type.
Examples of weapon types are sword, spear, and bow. Examples of armor types are general armor and heavy armor.
Add "sword" to the weapon type here to allow actors of this class to equip sword-type weapons.
Assigning multiple weapon or armor types is allowed.

Skills can be magic spells or special moves. Here is where you set the level the actor must reach to learn that skill.
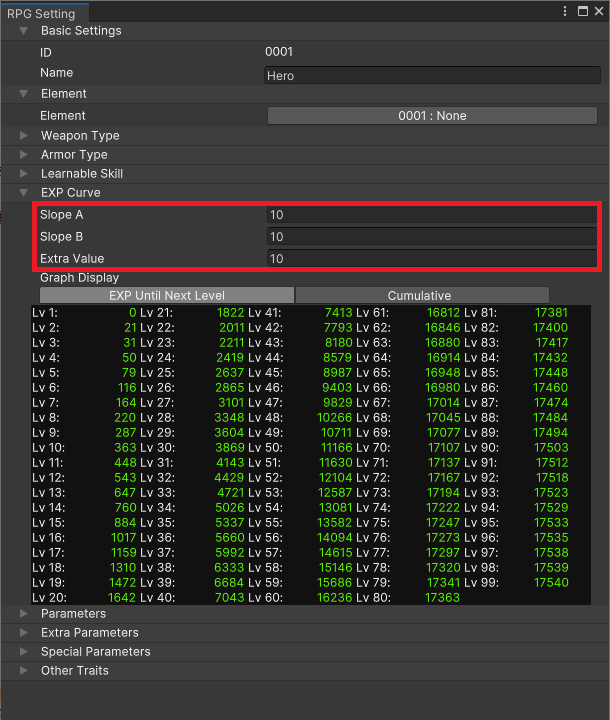
This sets the amount of EXP needed to reach the next level.
The numbers change according to the values in "Trend A", "Trend B", and "Offset".
You cannot manually enter the amount of EXP needed for each level.
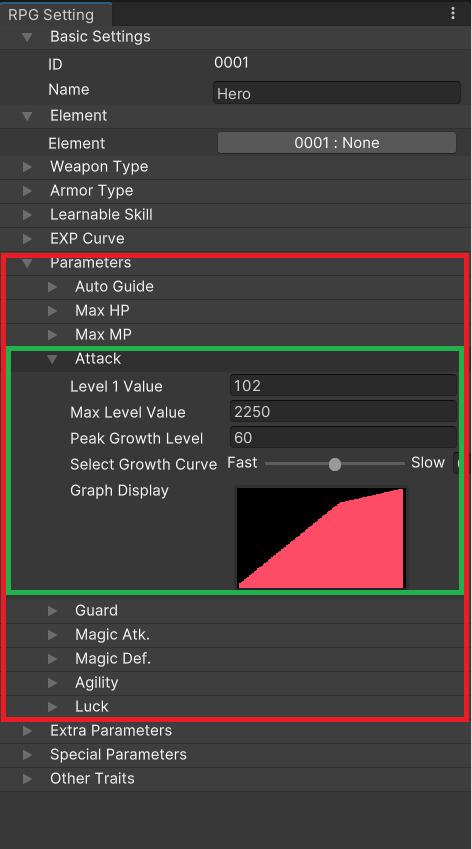
Each actor has the following eight parameters:
Max HP, Max MP, Attack, Defense, M.Attack, M.Defense, Agility, and Luck.
These can be configured in the area indicated by the red frame in the image.
Some of these values will be automatically adjusted by the Autoguide based on a few settings.
This will be explained in detail later.
As an example, the items in the green frame are used to configure the settings relating to attack power.
Configuring these values allows you to visualize the level curve as a graph.
The important part here is the "Peak Growth Level" setting.
Once the player passes this level, the speed of their growth will slow down.
Traits can be configured from the actor side as well
but they are usually configured from the class side.
To access this, navigate to Character > Edit Class > Shared Settings in the RPG Data Menu.
This is where you can configure each actor's Assumed Game Clear Level, Maximum Level, Maximum EXP, and Maximum HP.
These are important values the Autoguide (explained later) will read from to configure parameters automatically, so be sure to set them up.
If you won't be using the Autoguide, you only need to configure the "Maximum Level".
If you do use the Autoguide, the only change is the addition of a "Cleared Level".
If you have no specific preferences for the other items, you can leave them as they are.
Create a unique actor by adding "Other Traits" to a class. Some examples are:
Make this actor strong against fire and weak against water.
While this can also be done in "Elements", here is an example of how to do it in "Traits":
This actor should draw attacks and be difficult to damage.
Make an actor who only joins the party for a short period of time in the story, and so their equipment cannot be changed and they move on their own during combat.
To make an actor capable of wielding two weapons, you only need to add one trait.
As explained in the previous document, skill and item effects can be configured using the same method.
There are some additional settings to configure outside those which have already been mentioned.
As a reminder, you may access skills under the RPG Data Menu's Edit Skills > Custom Skills section,
whereas items can be found in Edit Equipment /Items > Items.
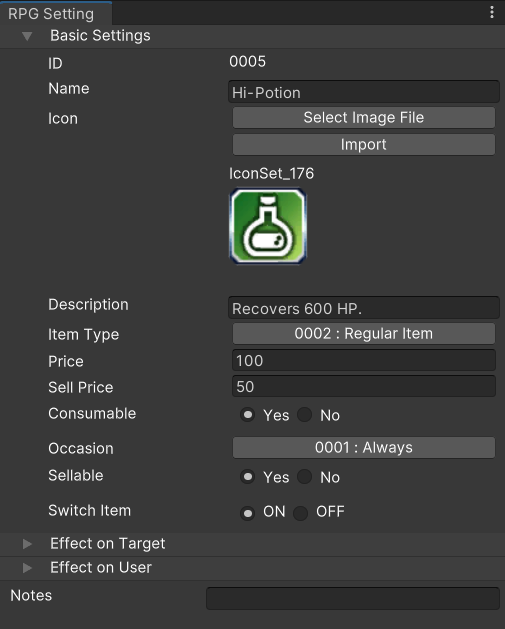
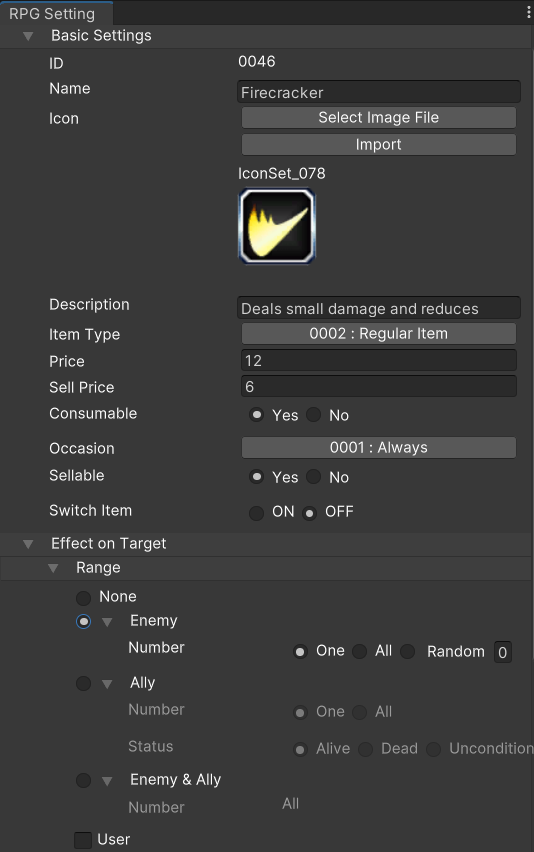
You'll quickly realize items need the following details:
Below are a couple of other necessary items to configure as well.
An item can be a regular item, key item, hidden item A, or hidden item B.
Regular items and key items are shown in different categories on the menu's item screen.
Key items are shown in a different category from regular items in the menu.
Hidden item A and hidden item B do not appear on the menu screen.
This assumes they will be used in the Select Item event command (explained later).
The event will appear if the party has the designated equipment item or if it's equipped to a party member.
"Switch Item" must be set to ON in the settings of a weapon or piece of armor to use it as a switch item.
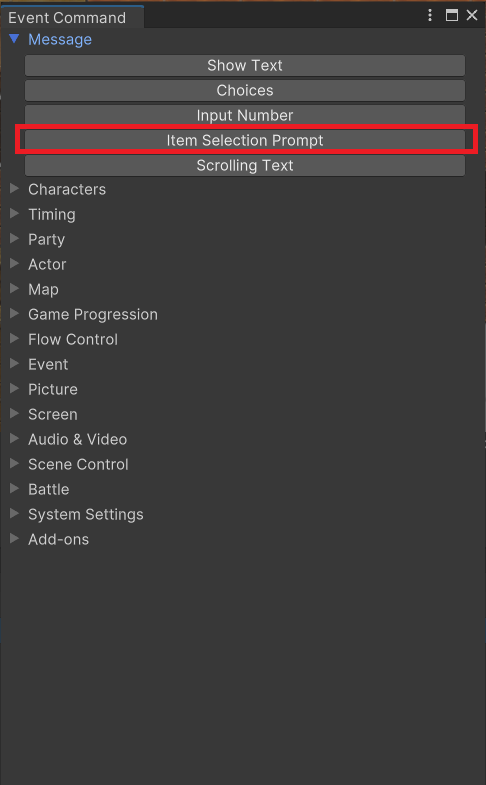
This command prompts the player to select an item from a list of items of a specific item type
in the party's inventory.
The ID of the selected item will be assigned to a designated variable.
If this is canceled, the variable value becomes 0.
This is mainly used for prompting the player to select an event item from a list of key items
to use or hand over to an important character during the story.
You can also use Hidden Item A and Hidden Item B to create special events.
For example, you can turn a password or key phrase into a hidden item and,
depending on the item the player chooses, draw out information about that phrase when talking to a key character.
You can also turn a place name into a hidden item that moves the party to a specific location when selected.
Basically, teleportation!
There are already plenty of items entered into the database.
Let's try adding a few items with new effects.
Let's call it something like "Philosopher's Stone".
We'll use "Potion", an already existing item, as its base and edit its properties.
Click on the item that was added to the end of the item list.
Right-click "Item" and select "Create New Item".
Click on the item that was added to the end of the item list.
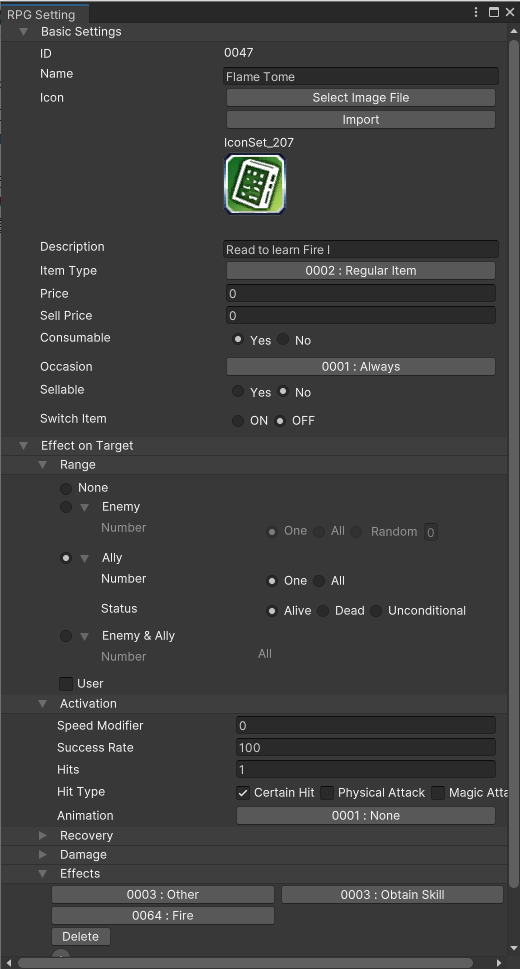
Let's create an item that players can use to learn the Fire skill.
Right-click "Item" and select "Create New Item".
Click on the item that was added to the end of the item list.
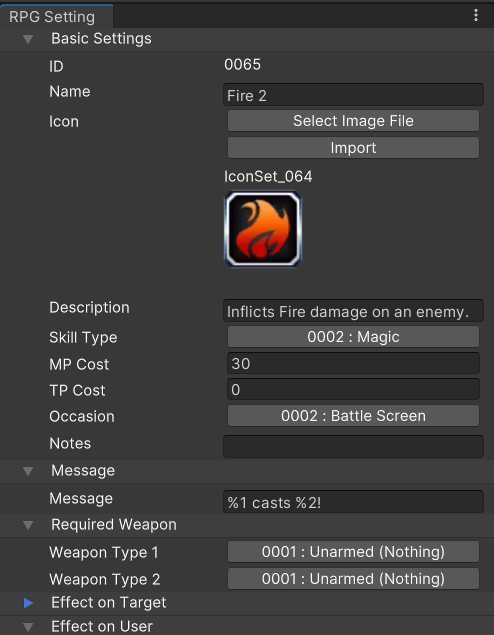
The following items are also available for configuration in Basic Settings:
Choose whether the skill is Magic, Special, or something that doesn't show up as a skill (for example, normal attacks), in which case you can select "None".
You may also add in an entirely new skill type. This is done in the list of skill types under the "Types" section that will be discussed later.
However, if you'll be using the Autoguide, note that only types under None (normal attack), Magic, and Special will be taken into consideration by it.
Specify what message to display when used in battle.
For example, "%1 invoked %2!", "%1 unleashed %2!", or something along those lines.
The %1 here will be substituted with the user's name and %2 refers to the skill name.
Use this section if this item can only be used when a certain weapon type is equipped.
This was designed for the purpose of setting up special skills which are weapon-specific.
For example, if you wanted to make it so the sword-specific move "Double Jab" can only be used when equipped with a sword or greatsword,
you can set that by using the Weapon Type 1 and Weapon Type 2 options. If only swords can execute this move, then set Weapon Type 1 and leave Weapon Type 2 empty.
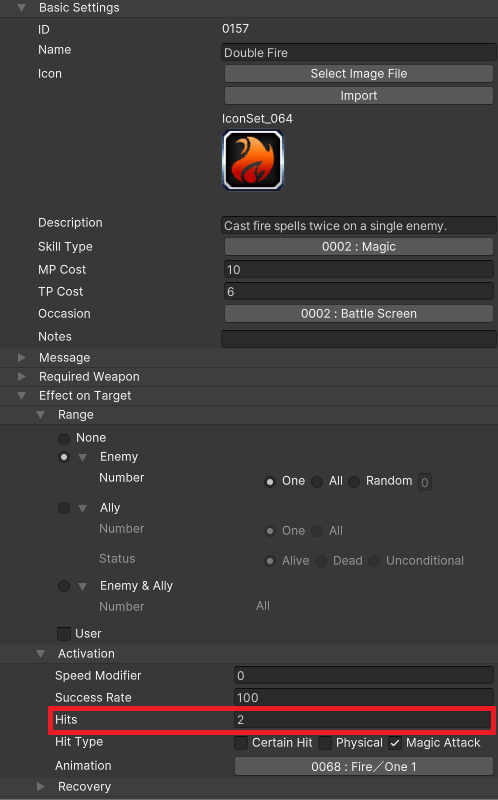
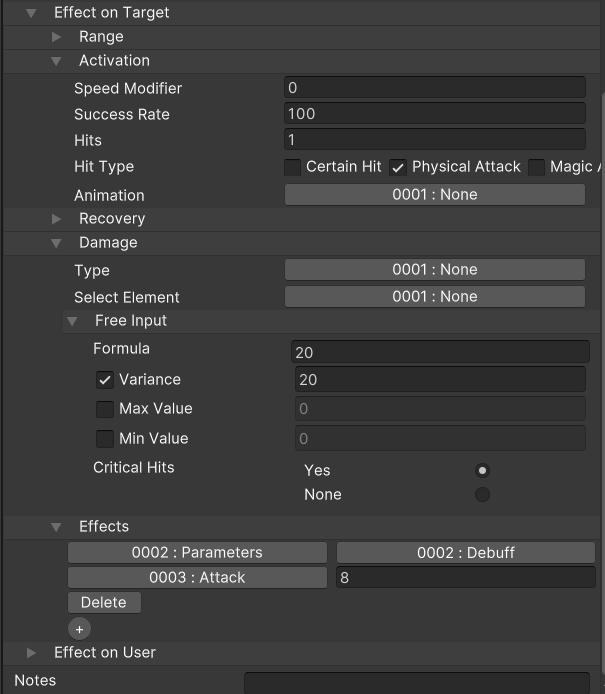
Here's an example of how to easily create a stronger version of regular magic.
First, we'll copy and paste an existing skill.
We'll use this as a base to do some modifications.
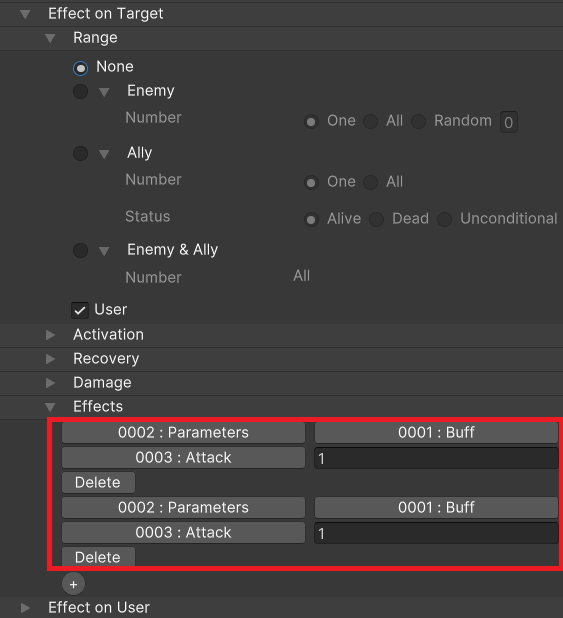
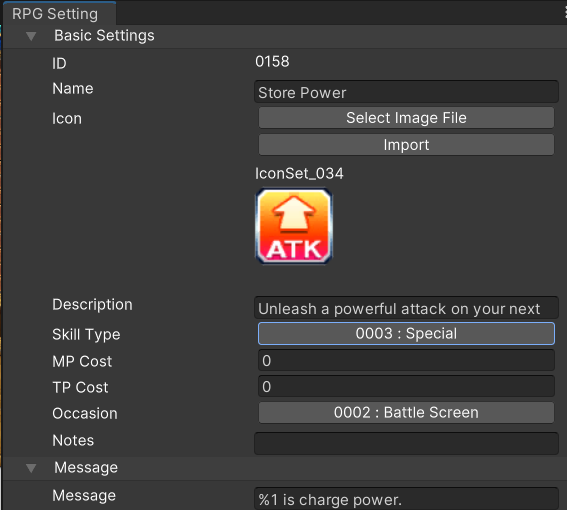
We'll create a skill that stores power for one turn to unleash an extremely powerful attack on the next.
We'll use this as a base to do some modifications.
This makes it so the skill user will have two attack buffs, which will result in an attack of 150% strength on the next turn.
State is a general term referring to a temporary change of state to a unit, such as "Poison" or "Sleep".
Not all state changes are bad. Some examples of good states are "Regen HP" or "Invincibility".
States can be configured in the previously discussed "Traits" section. States like "Poison (temporary damage over time)" and "Silence (unable to use magic)" are configured there.
On the other hand, because there are many configurations to try in "Traits", most of them are for specialized uses.
You could even say one of the pillars to using states well is how well you can use the "Traits" feature.
The other pillar that supports the "States" feature is the "Restriction" item. This feature is unique to "States" and we'll be discussing it below.
All state effects are made up of traits, restrictions, or a combination of both.
We've explained how states are temporary changes to a unit's condition.
Now let's see when and how these states are removed.
One of the effects skills and items can have is the ability to remove specific states.
Using a skill or item with that effect will remove a state.
You can also use event commands like "Recover All" to do this.
However, most states will be automatically removed after a certain time has elapsed.
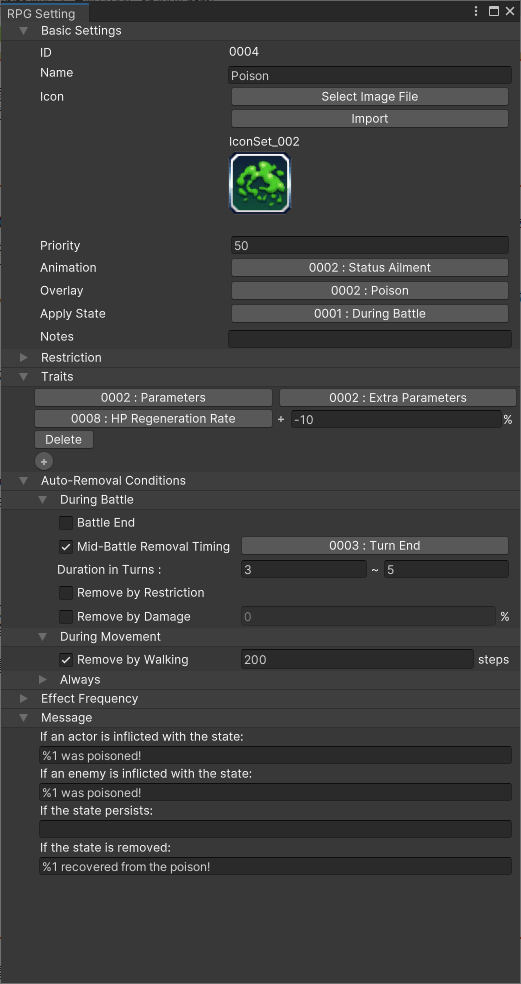
You can set the conditions for that in "Auto-Removal Conditions".
This option allows you to set conditions for the removal of a state, such as after a fixed number of turns have elapsed or when a battle has ended.
If there is nothing configured, the state will usually persist until it is removed by an item, skill, or event command.
However, there are exceptions, such as the removal of all states upon knockout or if Resistance > State Resist has been set up in "Traits".
Most of the remaining options you can configure for a state are related to how the state will be displayed on the screen. Let's take a look.
Navigate to Resource Manager > For SV Battle > State Overlay in the RPG Data Menu to set up these animations.
Many are confused about states, buffs, and debuffs because they all have icon indicators, but they are actually completely different in nature.
Below is an explanation of their main differences.
As previously explained, state effects are solely made up of traits and restrictions. This is true even of newly created states.
The examples here can be created simply by changing their traits. Of course, you can edit their removal conditions (turn duration, etc.) and screen elements (icons, etc.) if you like.
Do this to negate damage that would usually be inflicted when walking over damaging terrain like poisonous swamps or spiked floors.
Players will definitely want everyone in their party to have this state applied by using a skill or item if possible.
This will allow a character to jump in front of an ally who is low on HP in order to take damage on their behalf.
You may also want to set it up so a message is displayed when the skill or item is used. For example, "○○ is getting ready to cover for allies!"
Usually a state applied to stronger enemies, but giving this state to an actor allows them to input commands twice in one turn.
Weapons and armor can be given traits as well.
That means you can set up a variety of effects or side effects when a certain piece of equipment is put on.
Let's see what else we can do.
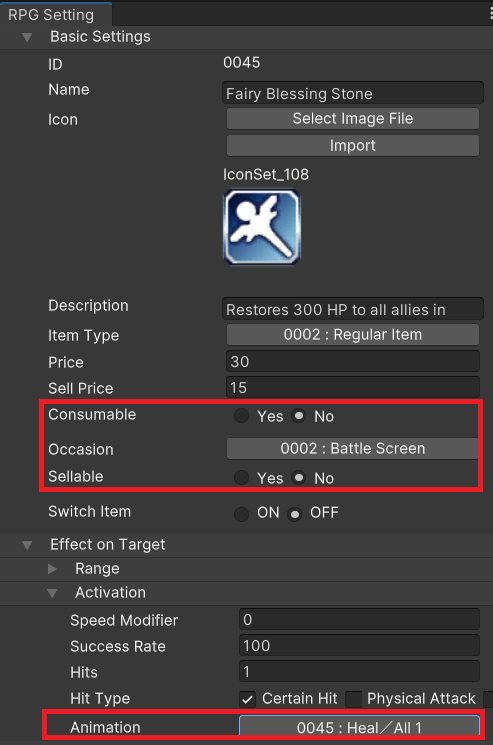
We'll need a name and icon first of all.
Next, decide whether it can be sold and for how much.
Here are some other important options to take note of.
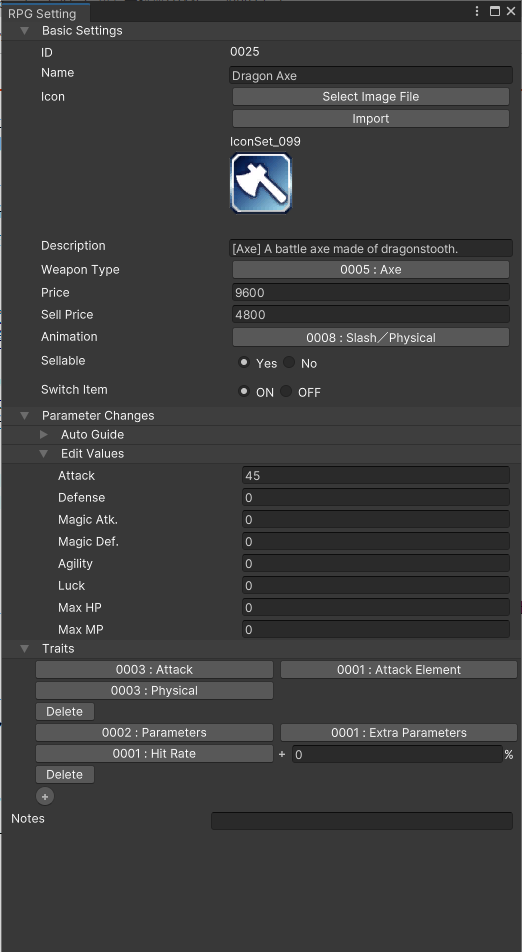
You can configure the increase for each parameter when putting on equipment like weapons or armor.
This includes parameters other than Attack and Defense,
and can be done for both weapons and armor.
Typically, we imagine that weapons increase attack strength and armor increases defense,
and the Autoguide (explained later) calculates parameter increases based on that as well.
However, you can change this by manually editing the values.
For example, you can set things up this way:
As previously explained, whether an actor can equip a certain type of weapon or not depends on what was defined in their class traits.
This also means you can specify which equipment an actor/class can put on by assigning a type to a weapon or armor.
Set the animation to be played on the target when attacking with this weapon.
Set up the animation by navigating to Battle Effects in the RPG Data Menu.
Set whether the weapon will also act as a switch.
Selecting "ON" will allow the weapon to be used as a switch for event conditions, etc. See "Event Editor" for more info on switch items.
You cannot set a negative value in "Parameter Changes".
As such, if you have an item that increases Defense, but is so heavy that you want it to decrease Agility, this cannot be accomplished using Side Effects.
However, Special Parameters such as Evasion Rate can be added under Traits, and these can have negative values.
Be sure to make good use of them to create the equipment you need!
Create something unique by adding traits to weapons or armor already in the database.
Add the following traits to an existing weapon or armor and see the effects!
We'll create a weapon that allows the user to cast Spark I when equipped.
Here's how to set the traits: 0004:Skills > 0002:Add Skill > 0080:Spark I
Configure various component types.
Examples are fire, thunder, and ice. They can be added to skills or equipment.
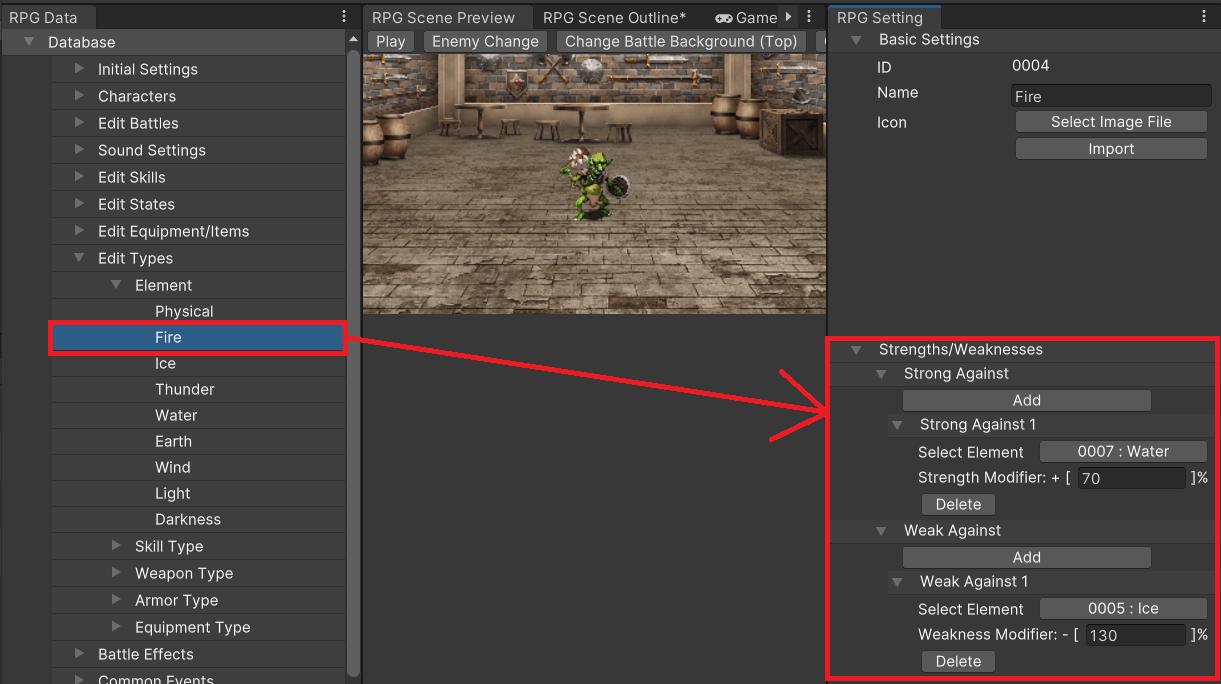
Configure an element to have either an "Advantage" or "Disadvantage" in the RPG Setting's "Compatability" option.
This works as follows:
For example, using the "Advantage" option, you could set water to have a 70% advantage.
This would result in 1.7x damage when the player uses a water weapon or skill against a fire-type enemy.
Using the "Disadvantage" option, you could set ice to have a 130% disadvantage.
This would result in 1.3x damage when attacking ice-type enemies with fire weapons or skills.
These settings can be configured in actor and enemy traits under Resistance > Element Rate as well.
However, this has to be done individually. If you want to apply the same elemental settings to all battlers,
this is the most convenient way to do it.
Elements can be assigned to weapons, armor, and skills, but each item may only be assigned one.
For example, when giving a weapon an element, only one applies. You cannot configure a weapon that has both
fire and thunder elements in the database.
Apart from magic and special moves, you can also set up new skill types like "Magical Sword".
However, the Autoguide does not take that into consideration, so if you intend to use it, it may be better not to add new types.
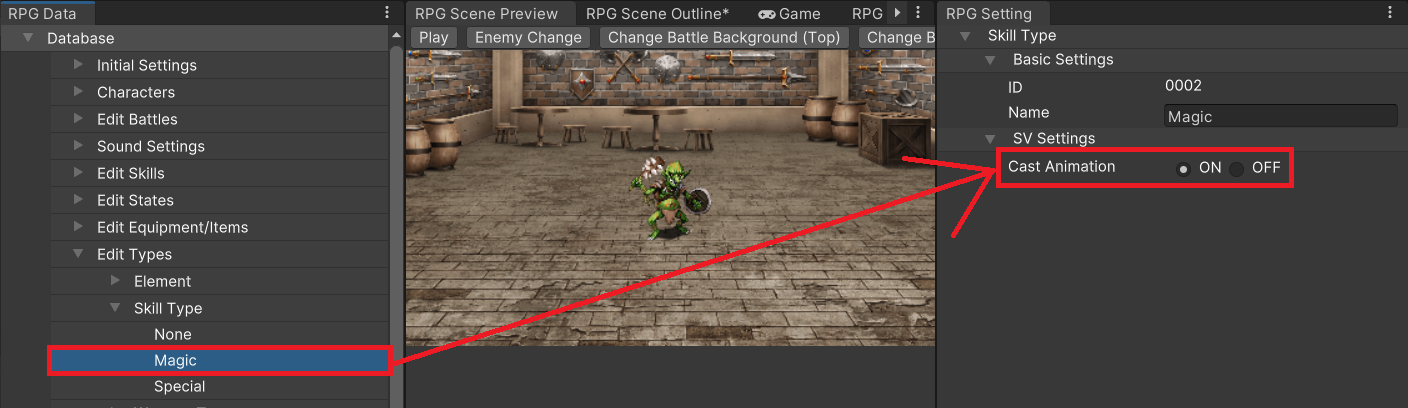
For side-view games, you can specify a "Casting Motion" in the RPG Setting that will play just before a skill is activated.
Magic spells are well-suited for this feature, so we recommend turning this ON for them. Turn it OFF for special moves, however, as they tend to look better with normal motions.
Each weapon has a weapon type. Multiple types can be assigned to one actor (class) to indicate which weapons they can equip.
The main types of weapons are swords, axes, and bows. You can also make equipping certain weapons necessary for certain skills.
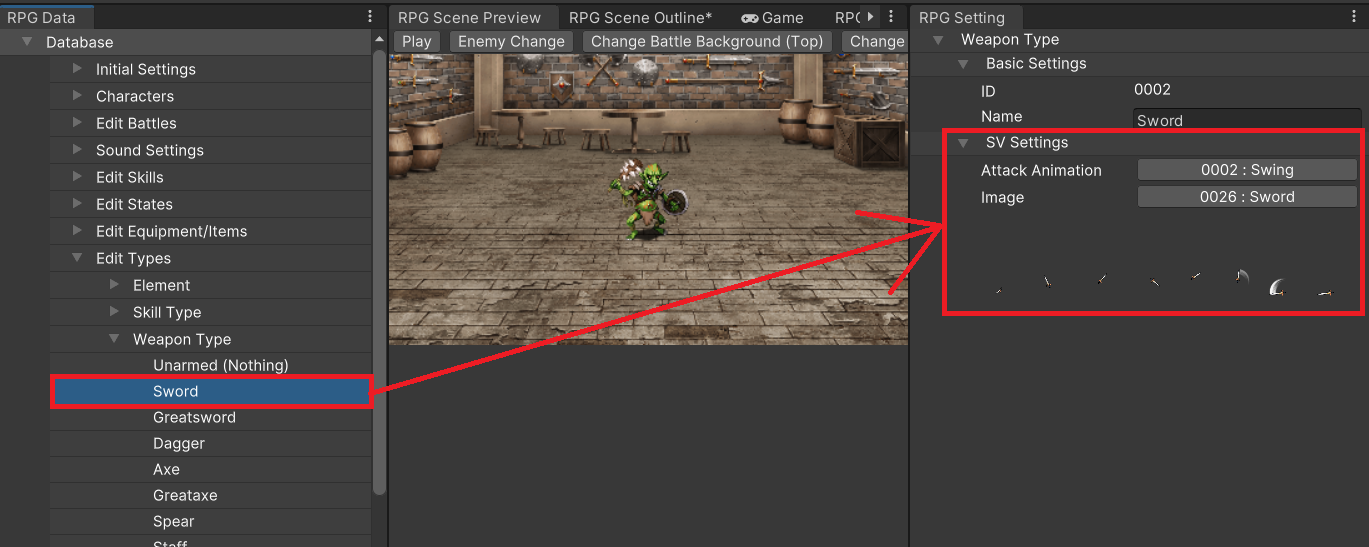
In a side-view game, the weapon's attack motion can be either "0001:Thrust", "0002:Swing", or "0003:Missile".
You can also set the animation under "Image".
Each armor has an armor type. Multiple types can be assigned to one actor (class) to indicate which armor they can equip.
Examples of armor types are general armor, heavy armor, and magic armor.
These are divided into categories such as "anyone can equip", "only strong classes like warriors can equip",
and "only magic classes can equip".
Edit this to determine the equipment slots available.
The top is for a weapon and everything else is for armor. For actors assigned the Dual Wield trait,
the second top slot is also for a weapon.
This option determines the number and type of equippable weapons and armor all actors can wear.
Proceed with the utmost caution!
This subheading explains the settings found in the RPG Data Menu's Edit Battle > Enemy and Edit Battle > Enemy Group sections.
Configure the enemies that the party will fight in a battle first. After that, when needed, configure the enemy group.
You have to do it this way because of how enemy units relate to one another when there is more than 1 unit in a enemy group.
Enemies are sometimes also called monsters.
They are most commonly known as enemies because that's what they were called in past Maker tools.
Also, the word enemy is used to reference them in the script.
Groups of enemies are referred to as Enemy Group for the same reason.
These are not official terms, but since many users of Maker tools have adopted them into their lingo, it may be a good idea to keep them in mind.
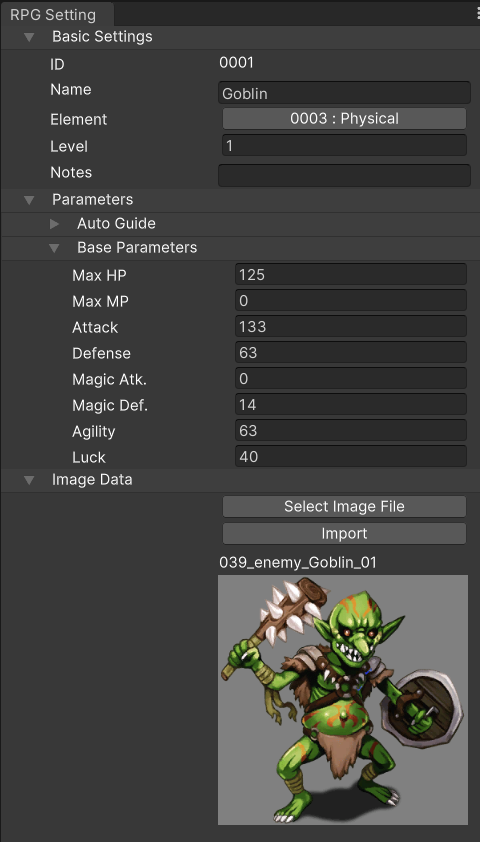
The following items in the RPG Setting are essential. We'll explain them one by one.
The name is set in "Basic Settings" on top. Change appearances by loading a file in "Image Data".
Choose between three display sizes: Small, Large, and Boss Battle.
If you have no preference, leave this set to "small".
This setting is very important for a side-view game, as we'll explain later.
If you select "Auto Adjust" in "Display Size", the enemy's image will
automatically resize itself to the most appropriate size.
This is configured under "Parameters". You can either set the values manually or
use the Autoguide (explained later) to calculate them automatically.
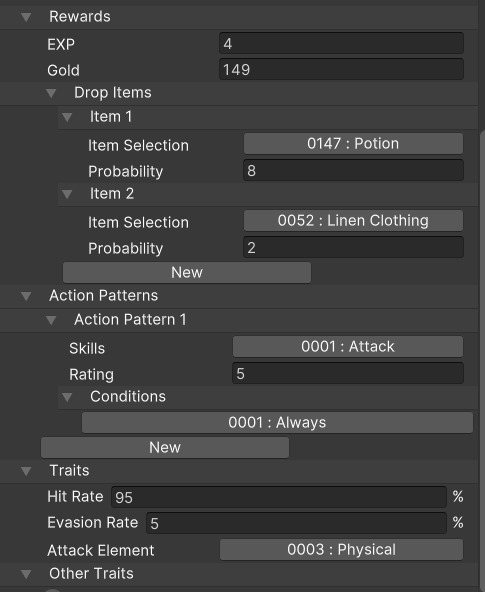
This is configured under "Action Patterns". You can set it to attack normally or have multiple skills. The enemy then chooses a random action from this pool of potential actions based on certain conditions.
This is an example of an action pattern setting.
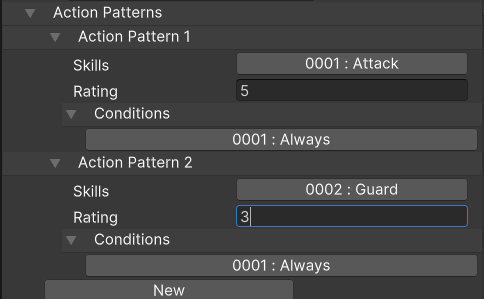
Because "Guard" has a Rating that is 2 points lower than "Attack", the chance of the enemy selecting "Guard" is 1/3 that of selecting "Attack".
That means it will have a 75% chance of attacking and 25% chance of guarding. (25% is 1/3 of 75%)
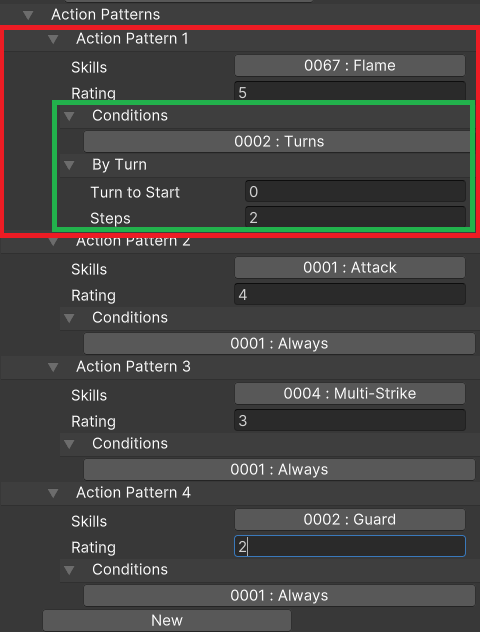
Action Pattern 1, "Flame I", is the only pattern with its activation condition set to "Turn" and "Step Count 2".
When you set "Turn" as a condition, the action is only adopted on turn counts calculated by the formula (Step Count)x(1,2,3..)+(Starting Turn).
Note that the starting turn has a value of 0. Therefore, in this case, the condition is considered fulfilled on turns 2, 4, 6, and so on.
This is configured in "Rewards".
Items will have a percentage probability of dropping. Input 4 for 4% - a 1 in 25 probability of this item dropping.Each drop item has its own drop rate. When there are multiple drop items configured,
it means each enemy has the possibility of dropping multiple items.
The item drop rate is assessed not just based on the last enemy to be defeated, but on every enemy in the battle.
In previous Maker tools, each surviving actor gains the full amount of EXP indicated.
This has been changed in Unite. Now, EXP is shared between surviving actors evenly.
For example, when an enemy with 24 EXP is defeated, each member of a 4-member party gets 6 EXP. In a 3-member party, each member would get 8 EXP.
As previously mentioned, hit rate, evasion rate, and attack element are required settings. Other traits should be configured as well, when needed.
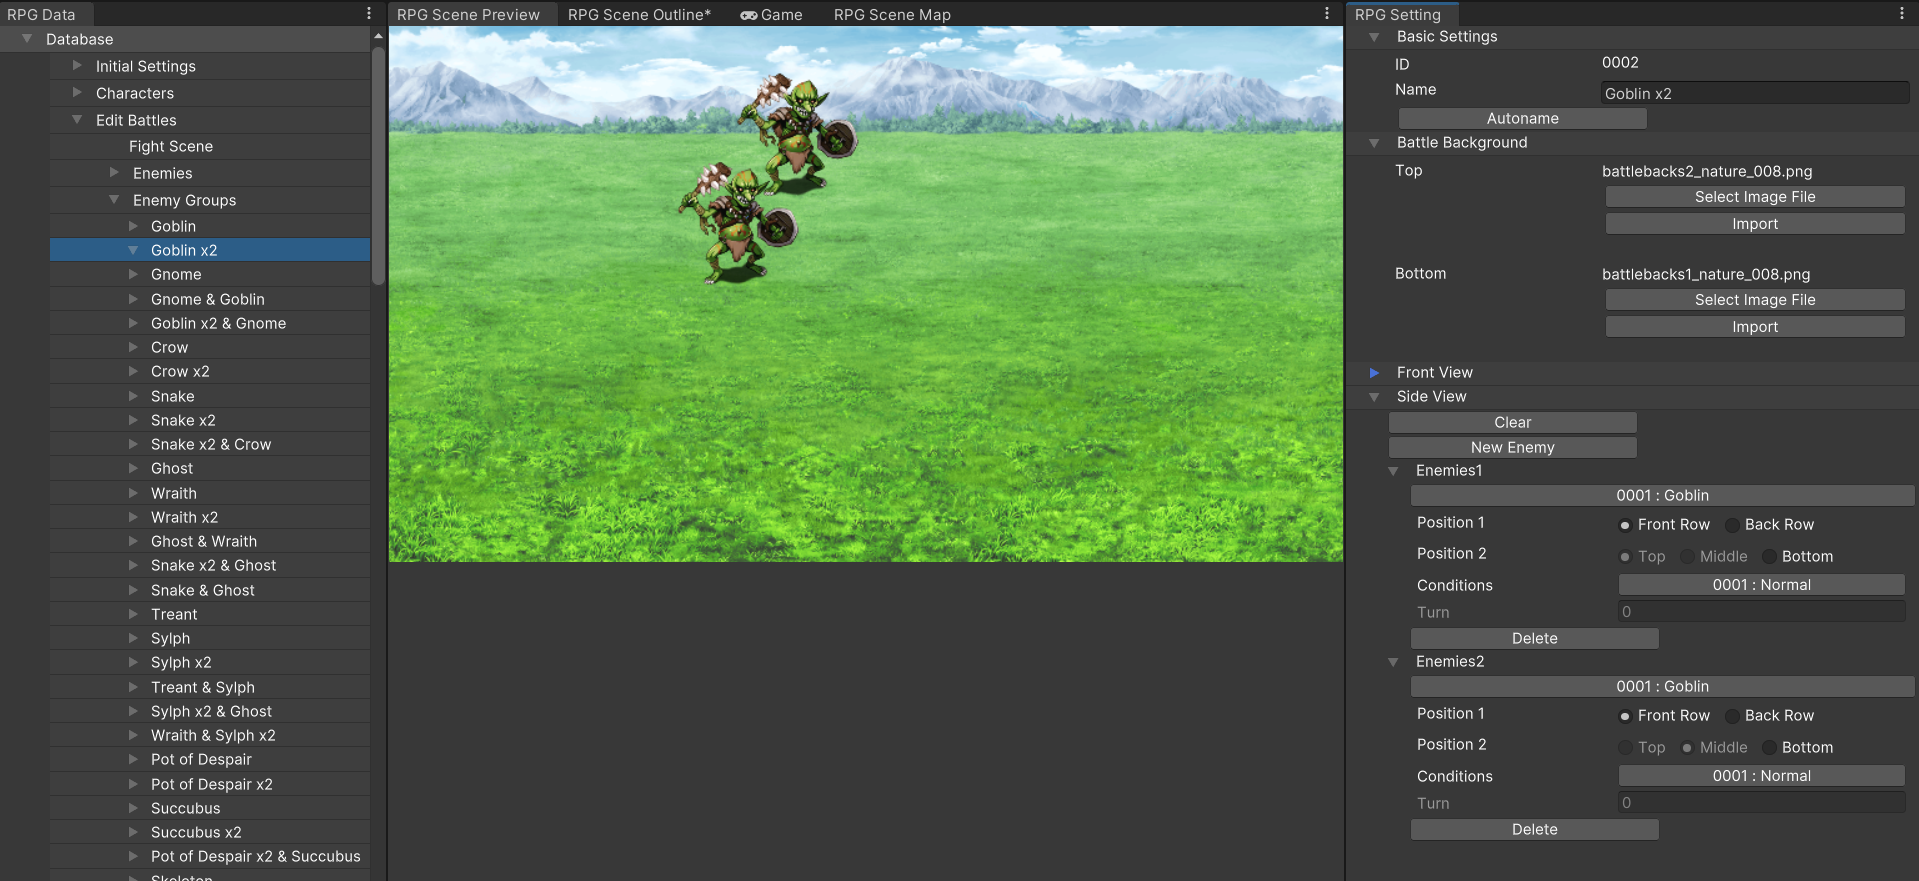
Mainly used for setting up more than one enemy unit and many other configurations.
You need to assign a name to each enemy group. This name isn't shown in the game, so choose something that is easy for you to understand.
Battle Background
Battle backgrounds are split into a top and a bottom, giving you the ability to try out different combinations.
Most of the time, battle backgrounds have already been set in "Maps". If the default works, just choose "Use Map Settings".
Settings from the RPG Data Menu's Edit Battle > Fight Scene > Basic Settings will be referenced.
In either case, this sets the display location of each enemy (monster).
The setup methods vary between front-view and side-view games.
You can place up to 8 enemies. No other special restrictions otherwise.
Up to 6 enemies can be placed as vanguards and rear guards in the top, center, or bottom locations.
However, there are a few restrictions here depending on the enemy's "Display Size".
Here are the layout restrictions in detail.
They seem somewhat complicated, but if you take care to place small enemies in the center, you can usually proceed without much problem.
Here are some possible enemy group layouts:
This setting determines whether the enemy will always appear or if there are conditions it must meet.
The usual setting is "Normal", but if the enemy is to appear midway through a battle, this must be changed.
Right-click the enemy troop component to access the New Event Page option.
This is known as a "Battle Event" and will be explained in detail later.
Setting up enemy group has been a requirement for battle processing in Maker tools so far,
but this is no longer the case in Unite.
More details will be provided later in the Creating / Implementing Maps section, but in brief, you can now randomize enemy group.
This allows you to test out battles without having to load the entire game. It will be very helpful when doing game balancing.
Battle tests can be conducted from the RPG Setting by navigating to Fight Scene > Battle Test in the RPG Data Menu.
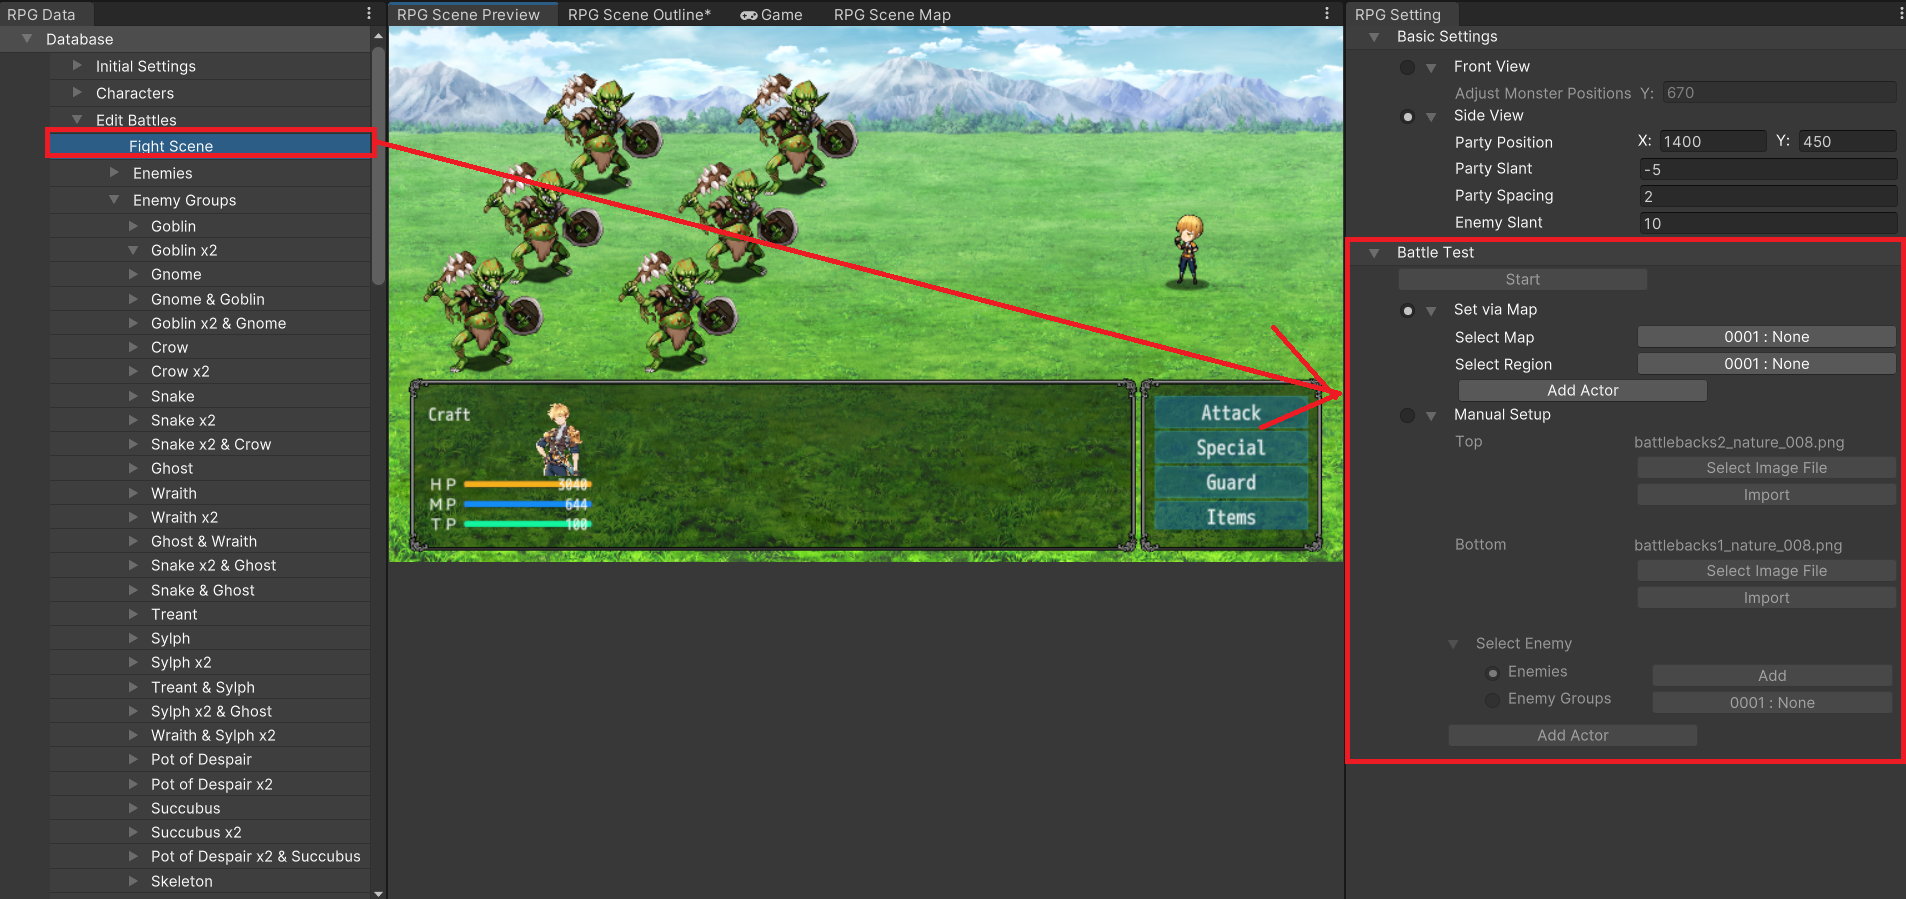
You'll need to set up an enemy group to battle as well as actors in the party in order to conduct a test.
Here are some things to take note of for the settings of other options.
A compilation of animations of actions to be shown during combat.
Other than Effekseer particles, Unity's standard particle system (Shuriken)
can be applied on any effects defined here as well.
Configure the game's BGM and sound effects here.
OGG and WAV files are supported.
However, note that the loop tag only supports WAV files.