 When used, this "book" will allow the player to read long passages of text.
We'll be making a few events relating to the database.
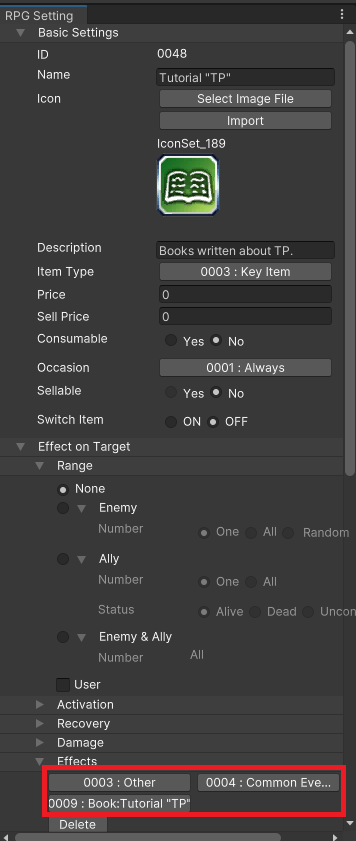
We've previously explained that it's possible to create an item or skill that, when used, will activate a common event through the "Effects" option.
Now let's actually create an item that does just that.
When used, this "book" will allow the player to read long passages of text.
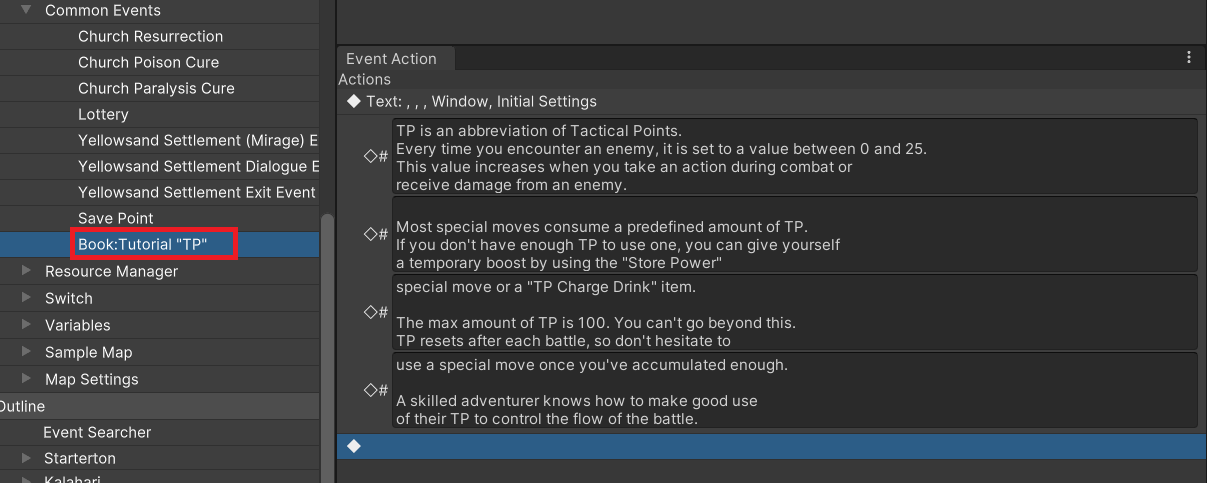
The following text is displayed by repeating the Message > Show Text event command.
TP is an abbreviation of Tactical Points.
Every time you encounter an enemy, it is set to a value between 0 and 25.
This value increases when you take an action during combat or
receive damage from an enemy.
Most special moves consume a predefined amount of TP.
If you don't have enough TP to use one, you can give yourself
a temporary boost by using the "Store Power"
special move or a "TP Charge Drink" item.
The max amount of TP is 100. You can't go beyond this.
TP resets after each battle, so don't hesitate to
use a special move once you've accumulated enough.
A skilled adventurer knows how to make good use
of their TP to control the flow of the battle.
Here's how to configure the settings:
We'll create an event that activates this common event when used.
Here's how to configure it:
You've probably noticed after reading the text that it isn't just something for the actors in the game, but serves as a tutorial section for the player as well.
Putting your game explanations in an item like this allows the player to have access to them within the game at any time.
Create an event that adds this item to the inventory. Once the party obtains the book, use the menu screen to check if the text is displayed properly.
The message window can display up to four lines, but letting the text run on without any consideration for formatting may make it difficult to read.
We recommend discussing just one subject per window for readability.
As you can see in the sample text, the third window only has three lines of text so as to make it easier to read.
It's sometimes better to break long text up into readable chunks instead of just using the maximum number of lines available.
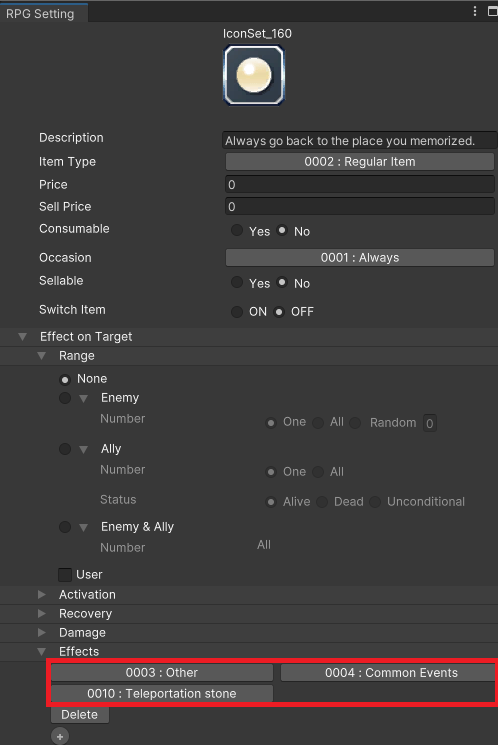
Now we'll make an item that remembers a certain location and can be used to return there anytime.
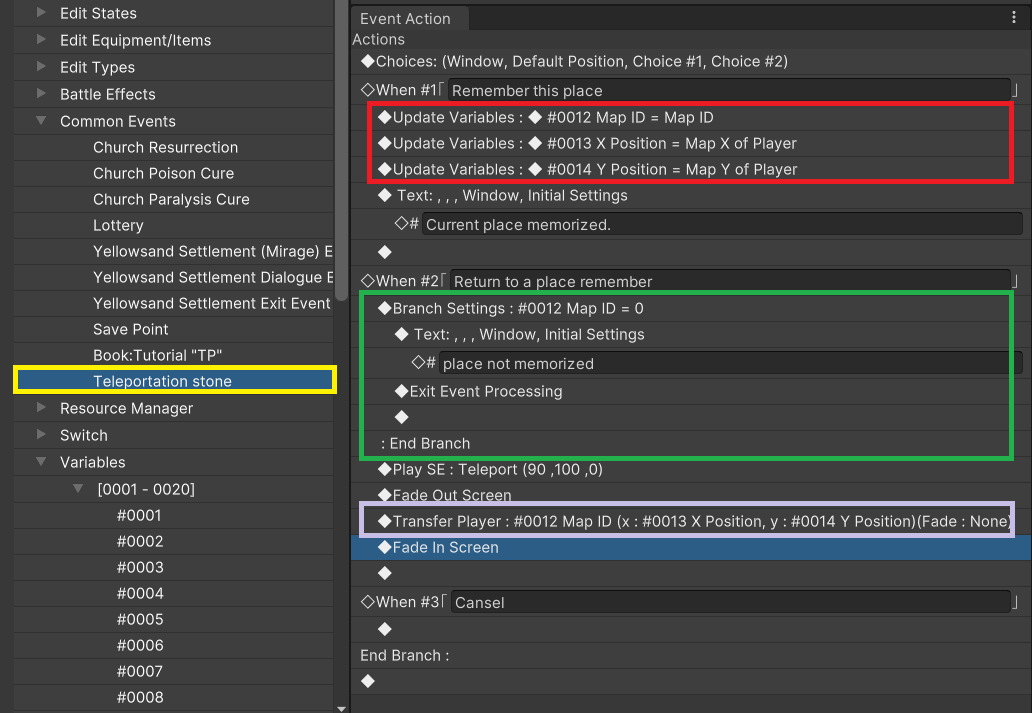
Under the Choices section, we will have the item display "Memorize this Location", "Return to Memorized Location", and "Cancel". "Cancel" is executed when the cancel button is pressed.
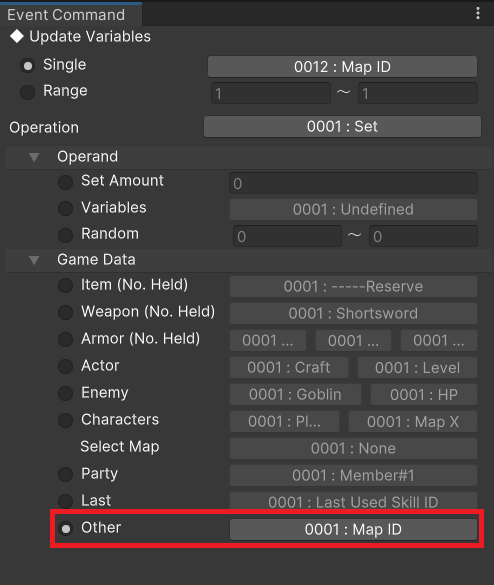
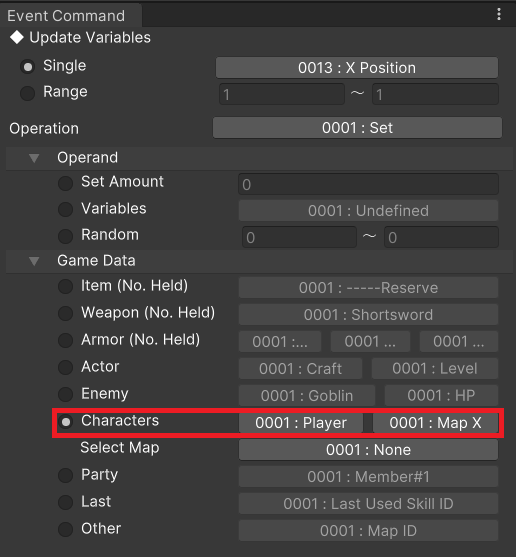
This assigns a map ID or coordinates to a variable, as you can see in the red frame.
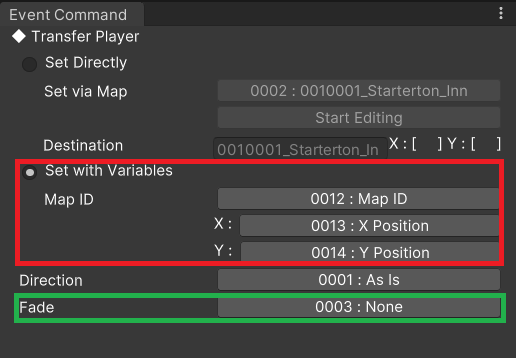
Set the destination in Character > Movement > Transfer to "Variable". This is the section outlined with the light blue frame above.
There is already a fade-in and fade-out effect in place before and after the movement, so set the Fade option to 0003:None as shown in the green frame below.
In the event "Memorize this Location" has never been triggered, the map ID value will still be set to 0. Therefore, when the portion in the green frame is executed, it will result in a "No Location Memorized" message.
Let's create an event that activates this common event when used.
We will then conduct a playtest.
What we've explained above is a very bare bones version of the function. It cannot be practically applied to an actual game. Take some time to think about how to improve the function with the following points below:
We'll create a skill that transports the player instantly back to a town or village they've visited before.
Executing this command will bring up a list of items of the designated type from the party's inventory.
The ID of the item selected by the player will be assigned to a designated variable. If the selection is canceled, the variable is assigned a value of 0.
Valid item types are: Regular Item, Key Item, Hidden Item A, and Hidden Item B.
Hidden items do not appear on the normal menu. Like the example mentioned here, they are often used for occasions when the player needs to select something other than an item.
In the RPG Data Menu, go to Equipment/Item Settings > Items and add an item of Hidden Item A type and name it after a destination.
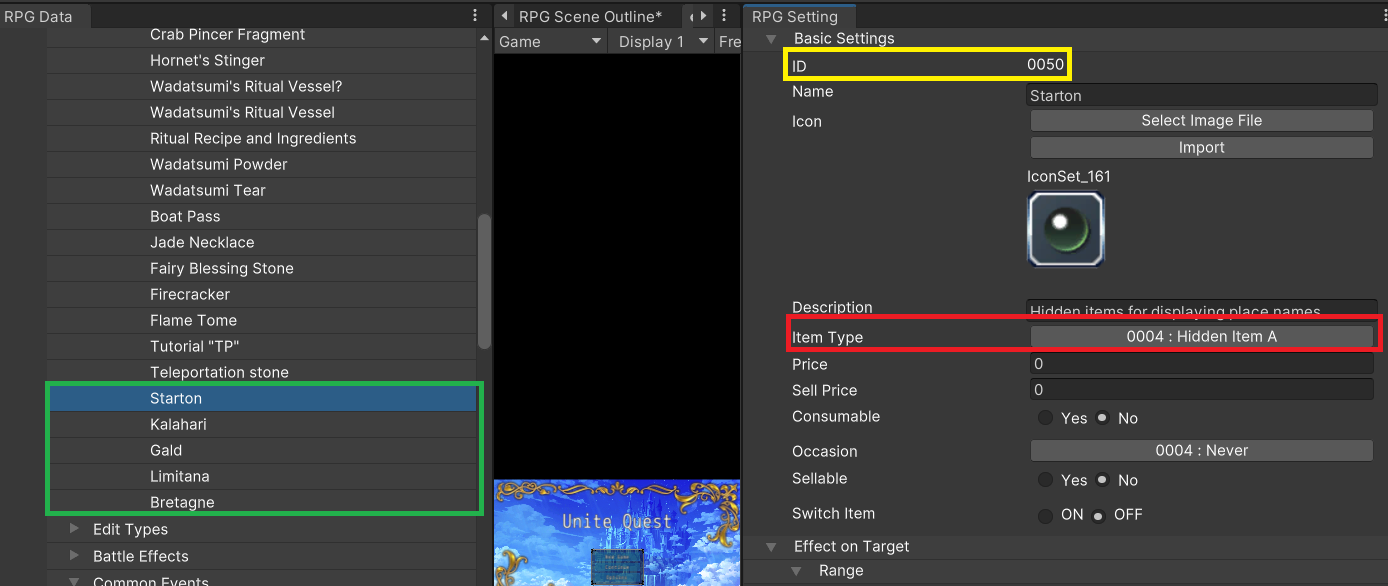
For this example, we'll be adding the five items in the green frame (Starting, Kalahari, Gald, Limiturner, Bruttanew). Try to remember that the IDs for these five items are 50 through 54.
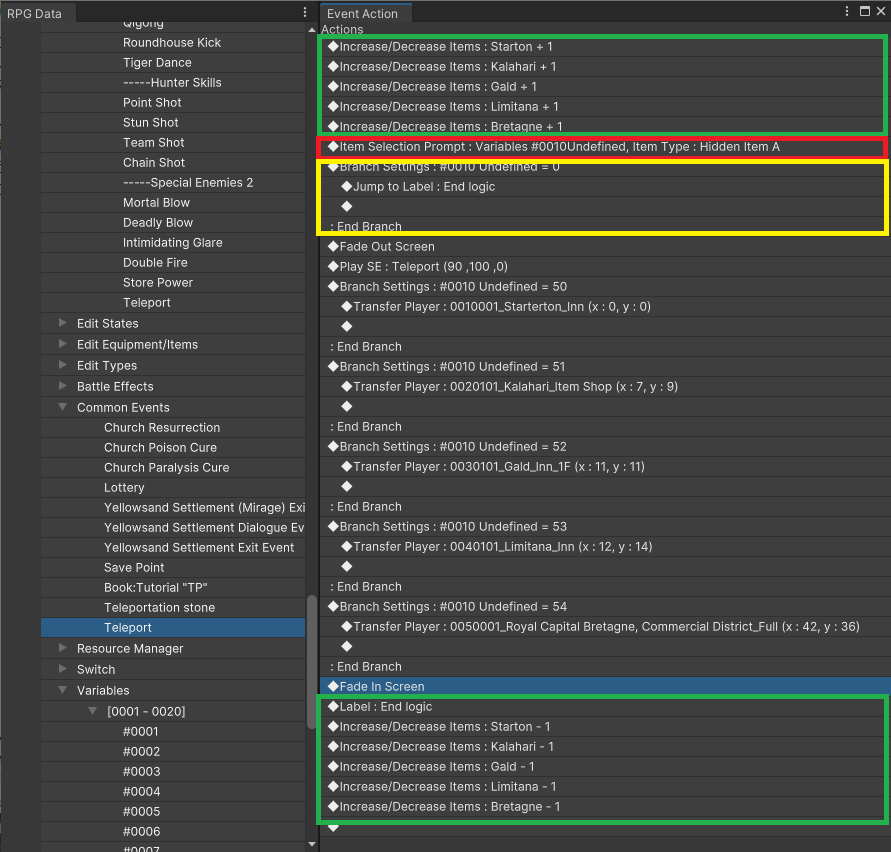
Running the Jump to Label command moves the player to the label position of the specified name. The game continues running from that position.
It doesn't matter whether you put the label before or after the event command.
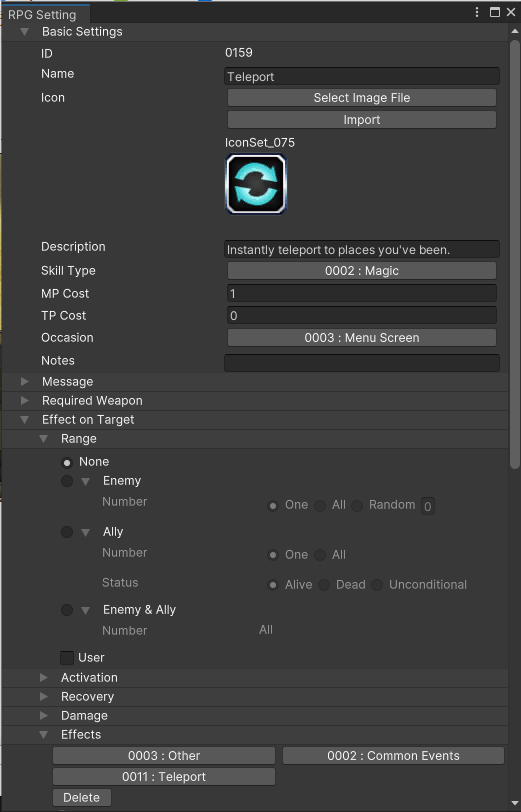
Just like in the item creation section, this can be done by setting a common event in the "Effects" section.
After that, make a random character learn this skill. There are several ways to do this, but for this example we'll use the event command Actor > Change Skill function.
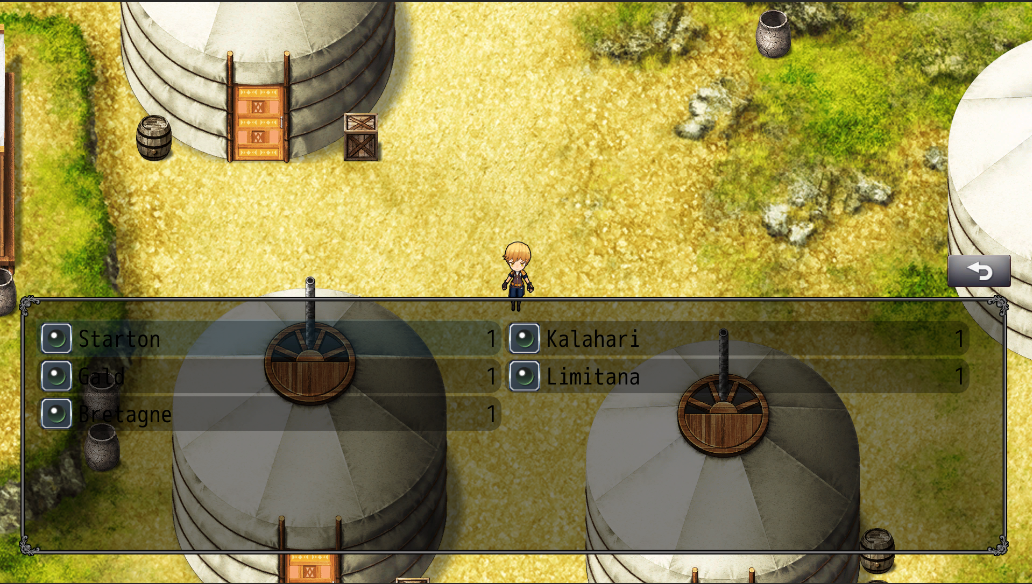
Select the learned Teleport skill from the menu screen. A list of the possible destinations will be displayed. Select a town to be transported there.
To ensure the teleport function is practical, make sure to add the following processes.
Right-click a random troop in Edit Battle > Enemy Group under the RPG Data Menu. The items
"New Event Page" and "Paste Event Page" will appear. These are what are known as "Battle Events".
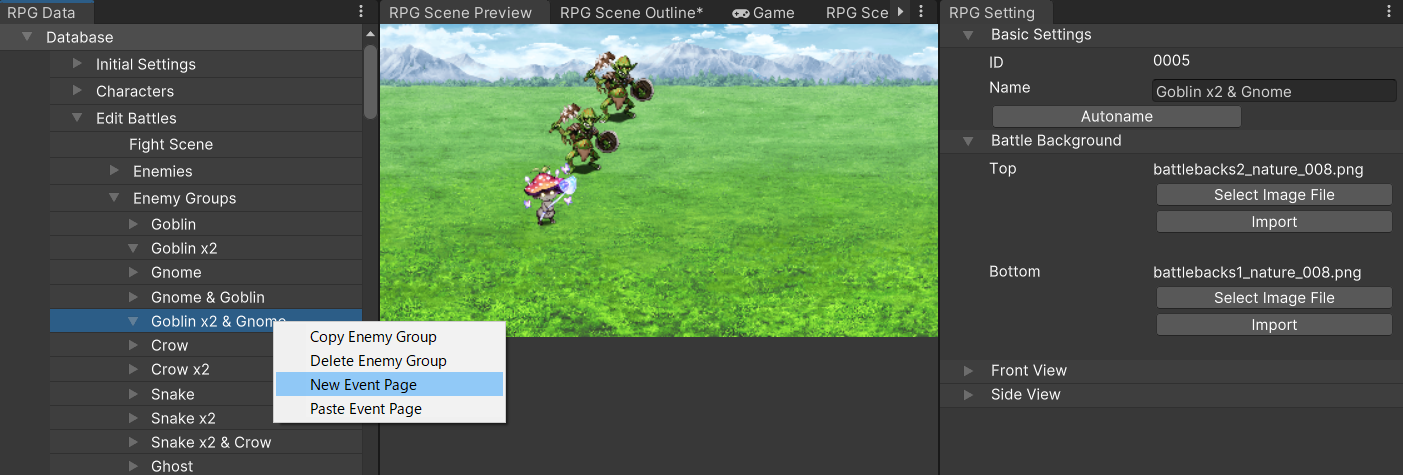
Add this to create a "Battle Event" item in the RPG Setting (green frame).
The project preview area will show the settings window for the contents of the event (yellow frame).
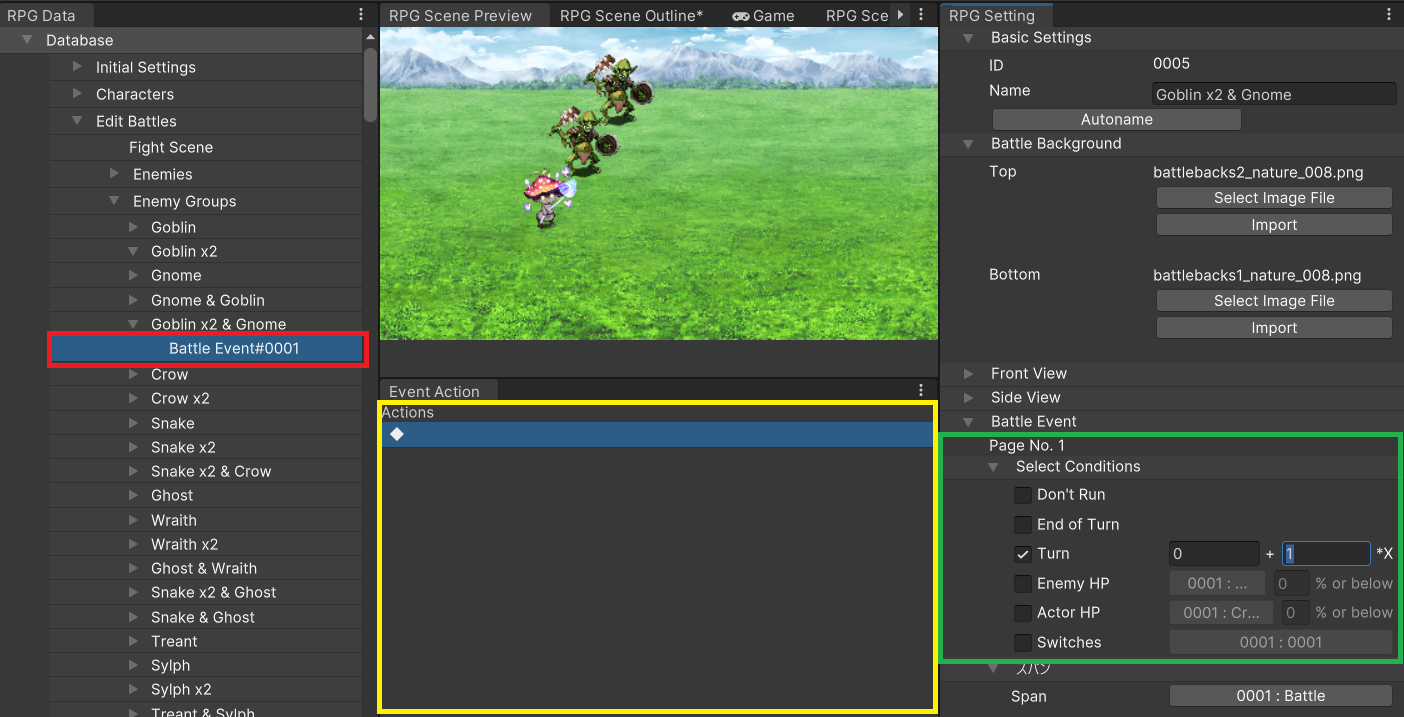
Once a battle event is executed, combat flow is paused and the event begins.
Battle events are like map events in that event commands are written one after another.
However, there are some differences, such as battle event-specific event commands.
Determines the timing to execute the command when the conditions under "Select Conditions" are fulfilled.
Battle events have conditions evaluated sequentially from page 1, which is the opposite of map events.
When specifying a turn, the formula is calculated as A+B×X(X=1,2,3...). If the value for both A and B is 0, it sets things up for a Turn 0 event.
Turn 0 refers to the duration from the start of the battle until the first command input.
Now let's see examples of some battle events.
This example uses Message > Show Text on turn 0 to get a goblin to say, "Come and get me!"
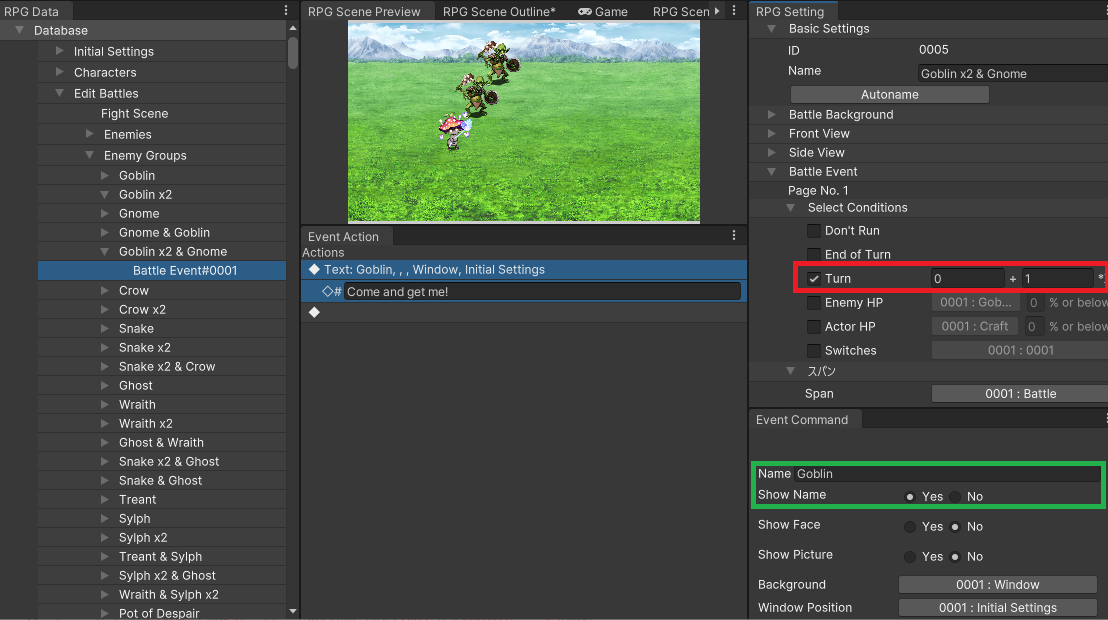
The "Turn" item in the red frame is set to turn 0. The green frame indicates the goblin's name.
Use the "Battle Test" feature to test battle events without having to start up the game every time.
Battle tests can be conducted from the RPG Setting after navigating to Edit Battle > Fight Scene in the RPG Data Menu.
Let's try testing out the event we just made.
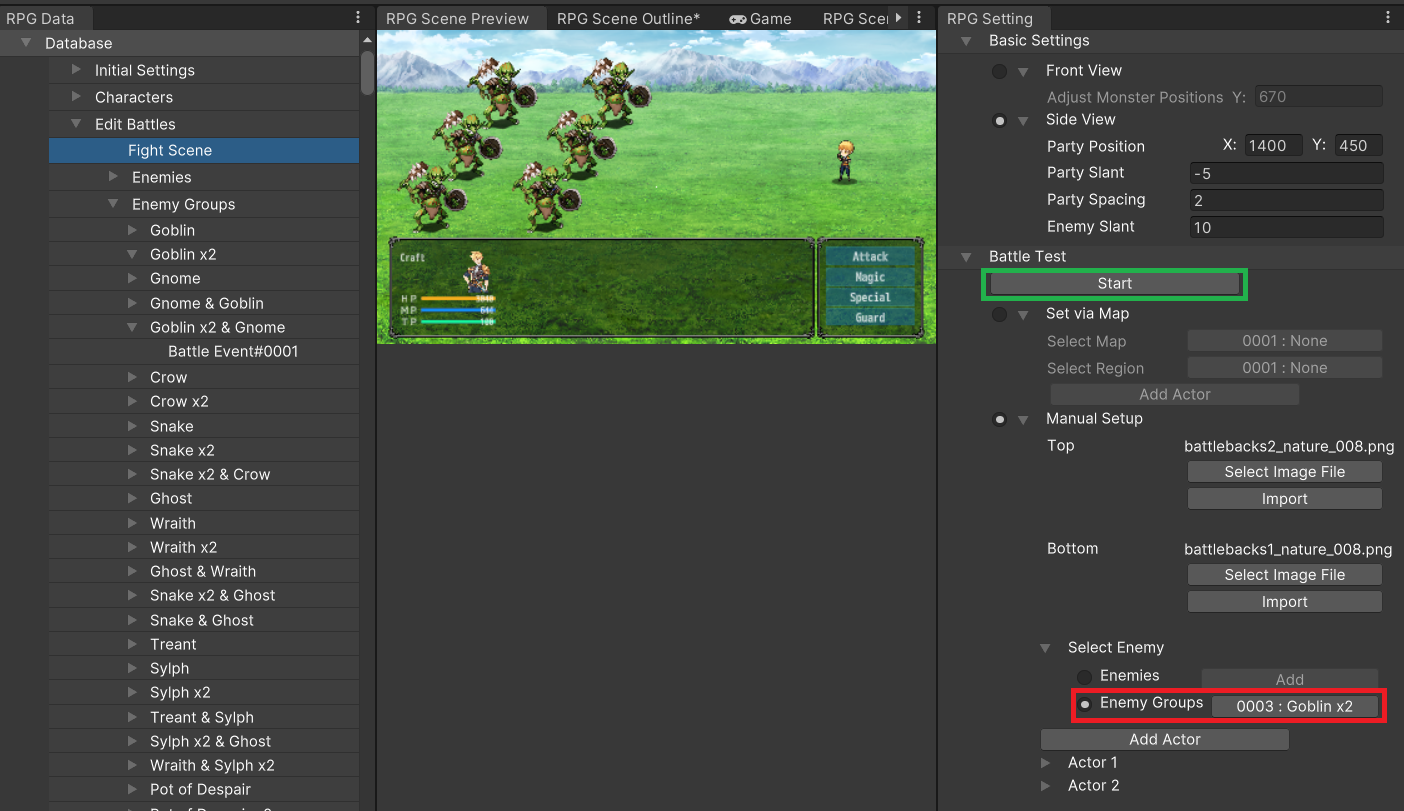
As shown in the red frame above, check the Enemy Group option in the RPG Setting under Battle Test > Specify Individually > Select Enemy
, then select the enemy group with the battle event.
Click on the "Start Test" button (shown in the green frame above) to start a battle against the specified enemy group.
It's possible to add new enemies to a battle partway through. This is done in the RPG Setting by using the Conditions option under Enemy Characters Settings.
Possible conditions are: 0001:Normal, 0002:Enemy Joins Mid-Battle, and 0003:Turn.
"Normal" means the enemy is present at the start. "Turn" means it appears after the number of turns indicated. "Enemy Joins Mid-Battle" means the enemy joins the battle via a battle event.
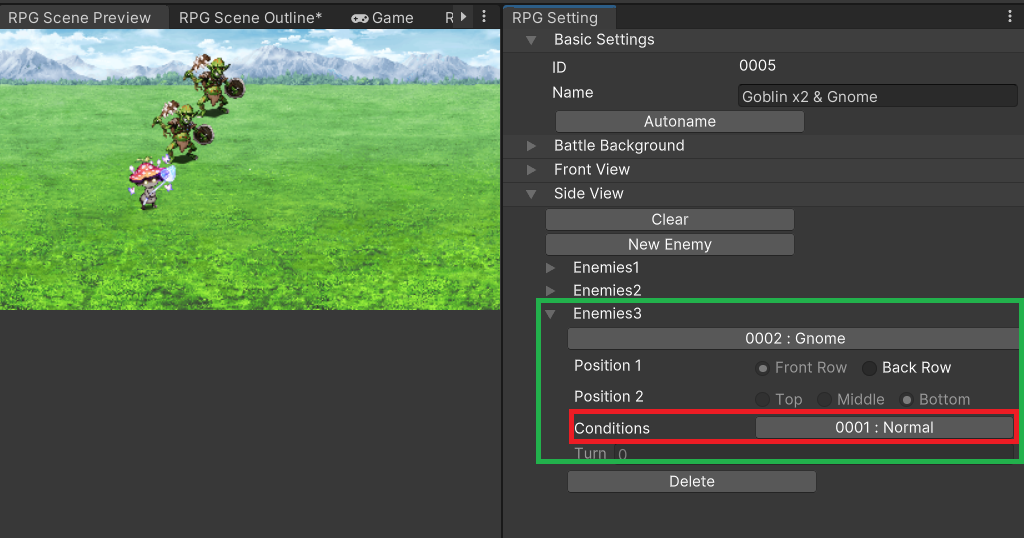
Set the condition for Enemy Character 3 (a gnome in this example) to 0002:Enemy Joins Mid-Battle.
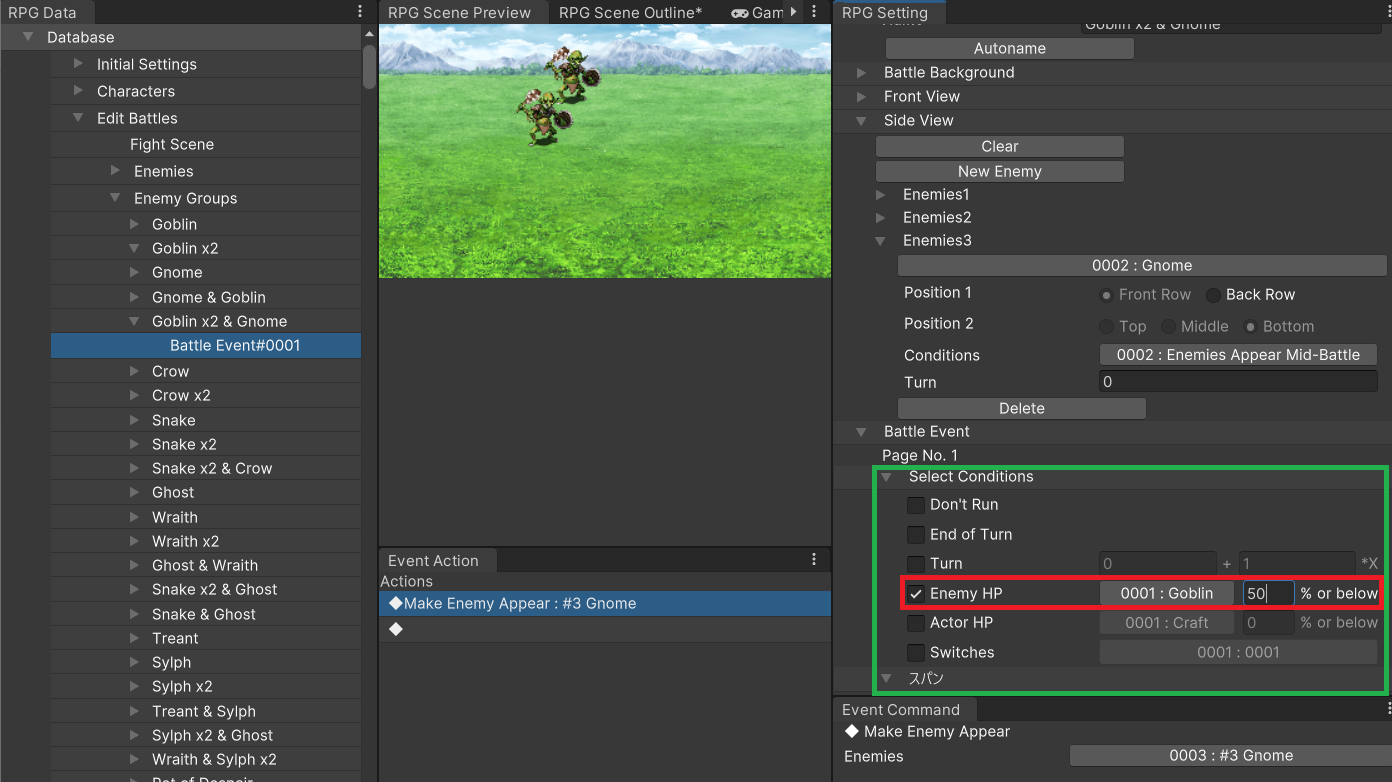
The gnome will disappear from the scene view. Execute the Battle > Make Enemy Appear battle event to make it show up.
The example here is configured to trigger the battle event when Goblin 1's HP falls below 50%.
It sounds natural to use a condition such as "Enemy HP below 0%" for this, but that would result in the battle ending before the event gets to execute. Therefore, a little creative thinking is needed.

● Page 1 - Assign the Immortal status to the unit.
On turn 0 (immediately after the battle starts), the enemy is made immortal. This means it will not die even when its HP drops to 0.
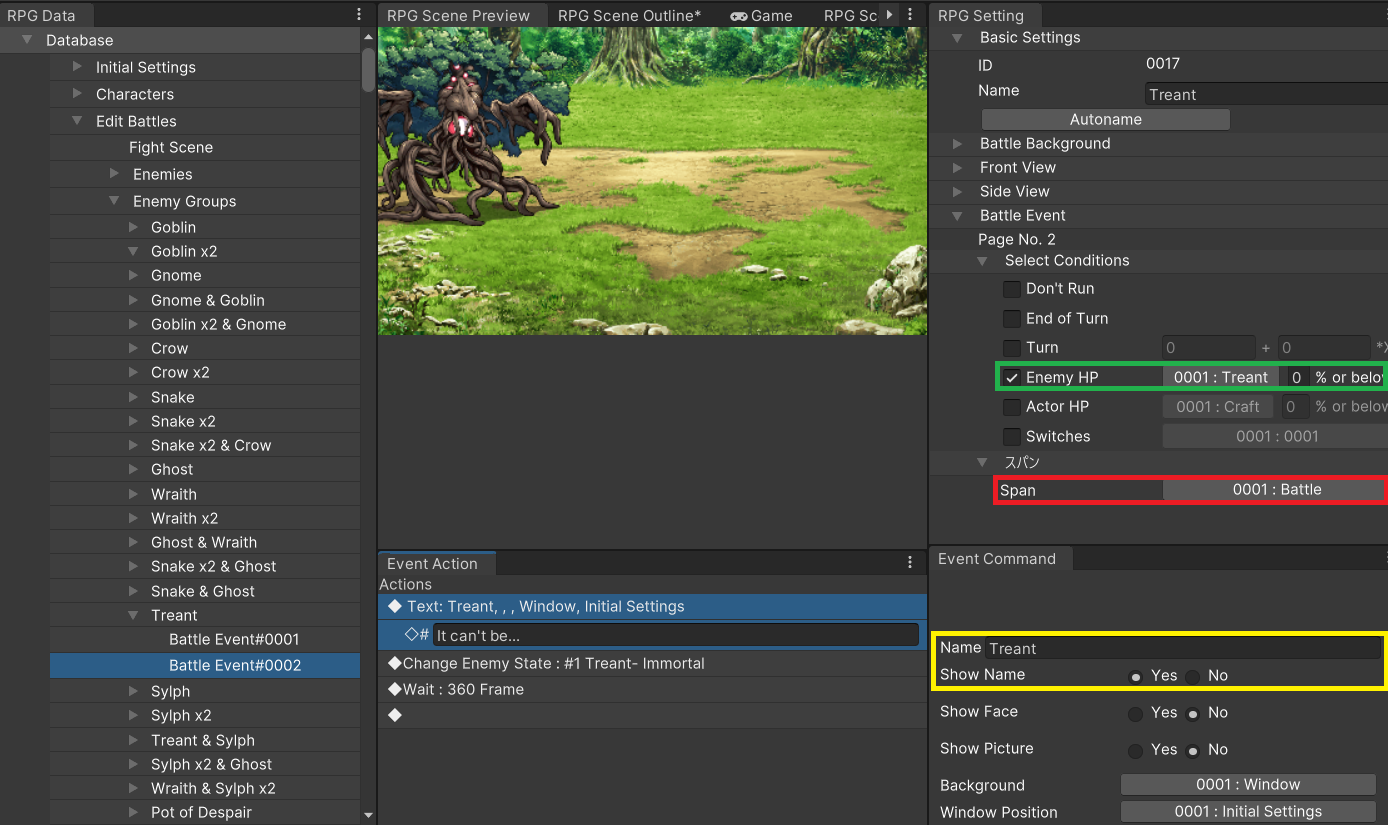
● Page 2 - Remove the unit's Immortal Status after its lines.
With an immortal enemy, the battle will never end, even once their HP drops to 0. Therefore, we need to execute this event page.
After running all the necessary processes to have the enemy say its lines, remove its immortal status and the battle will end.
Keep in mind that if a unit's immortal status is removed this way, the battle will immediately end the moment the Collapse Effect begins. This will look rather unnatural. To get around this, add a wait time to prevent the battle from ending before the effect can run its course.
We'll assume 0004:Other > 0002:Collapse Effect > 0002:Boss has been added to Traits, and add a 360 frame delay here.
We've covered Map Events, Common Events, and Battle Events. By now, you should have a decent understanding of how to create events for your game.
Keep trying to create the events you have in mind while using the examples here as reference or building on them,
learning and mastering the ins and outs of making events and common events as you go!