The Autoguide is designed to lighten the workload on tedious processes like combat balancing.
It allows you, for example, to set the game difficulty to automatically scale with projected level parameters, amongs other functions.
This is a brand-new feature of Unite that was not present in previous Maker tools.
The damage formula is the most important thing to consider at the start when using the Autoguide.
This has not been mentioned before, but whether you choose to use the Autoguide or not, you will still need to configure a damage formula for skills.

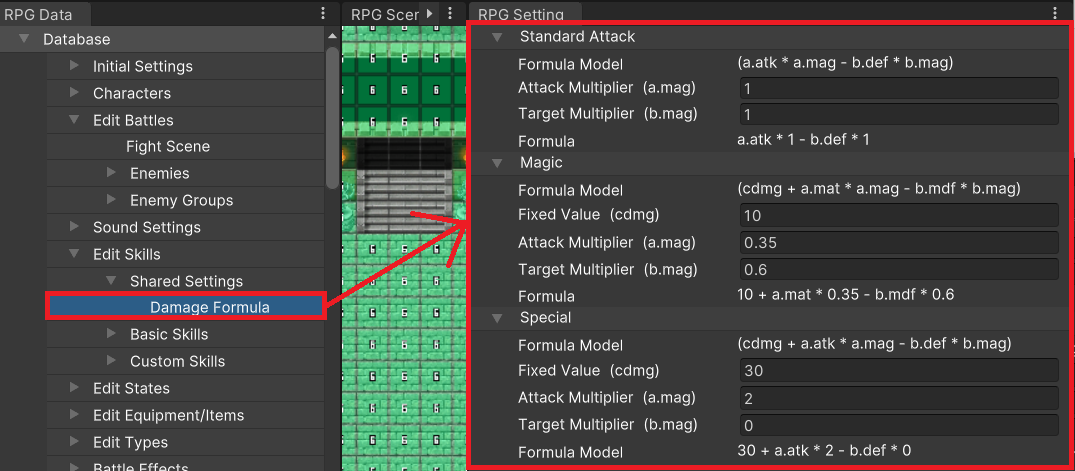
This is where you can input the base damage formula for "Normal Attack", "Magic", and "Special" moves.
Besides being important for the other Autoguide functions explained later, this also becomes the default formula many skills will be based on.
If you do not intend to use the Autoguide, you can still change the formula for individual skills.
Note that the values of moves that are not of Normal Attack, Magic, or Special skill type will not be affected by the Autoguide.
Therefore it would be prudent to think very carefully before setting up a new skill type!
What exactly are formulas?
We'll be using a few special terms to explain further, so let's go over those now.
Based on these values, the formula sets the following values.
If you look under Normal Attack, you'll see that the formula is Attack x a.mag - Defense x b.mag.
This formula is frequently used by many previous Maker tools and other popular games on the market.
Here are some examples of how the formula can be set.
Magic is more varied, so there's no one-size-fits-all formula here, but most spells will use fixed damage (cdmg) as a base.
As such, you'll find that many games set the same value for a.mag and b.mdf based on fixed damage (cdmg). For example, cdmg=50, a.mag=2, b.mdf=2.
The fixed value (cdmg) is only a guide and you can give each skill its own configuration.
You may also choose to only input a value for fixed damage (cdmg). Doing so is the equivalent of setting a.mag=0, b.mag=0.
Many popular RPGs also feature spells that deal a fixed damage without being affected by the unit's level or M.Attack.
Like normal attacks, special move equations use a.atk and b.def.
That means it is presumed that all special moves are physical attacks.
The difference between normal attacks and special moves is that you can set a fixed damage value (cdmg) for the latter.
This opens up the possibility of many different kinds of formulas. Here are some examples.
The value and multiplier of a special move can be changed as desired for each special move based on this formula.
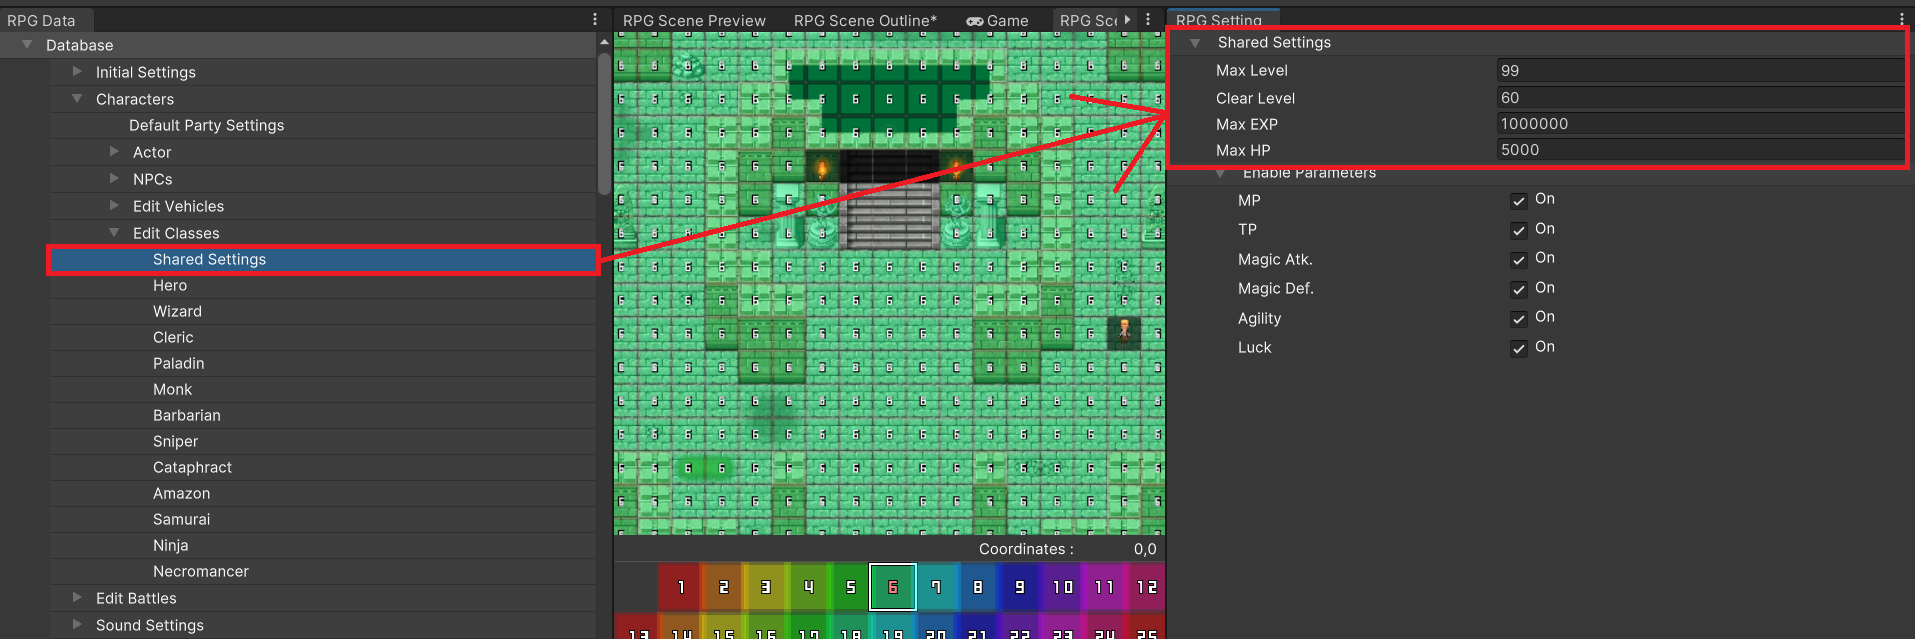
These are extremely important items because most functions in the Autoguide refer to the values here.
There's no need to change these default values if you have no special values in mind,
but it's important to remember these are the items that make up the heart of the Autoguide tool.
Growth speed changes depending on whether a unit is above or below the designated level.
Specifically, unit growth slows once they reach this level.
This is a required value, as the Autoguide simulates an actor's parameters based on it.
This sets the maximum amount of EXP obtainable. You can input any number between 1,000,000 and 9,999,999. This also affects the amount of EXP gained from enemy characters in the Autoguide.
You can input any number between 200 and 9,999. Most games set an upper limit of 1,000 or 5,000. However, the value you use will depend on the scale of your game.
Configuring the "Damage Formula" and "Shared Settings for EXP and Levels" enables usage of the Autoguide.
You'll need to configure the settings in the following order due to how the data references each other.
Below is an explanation of their configuration.
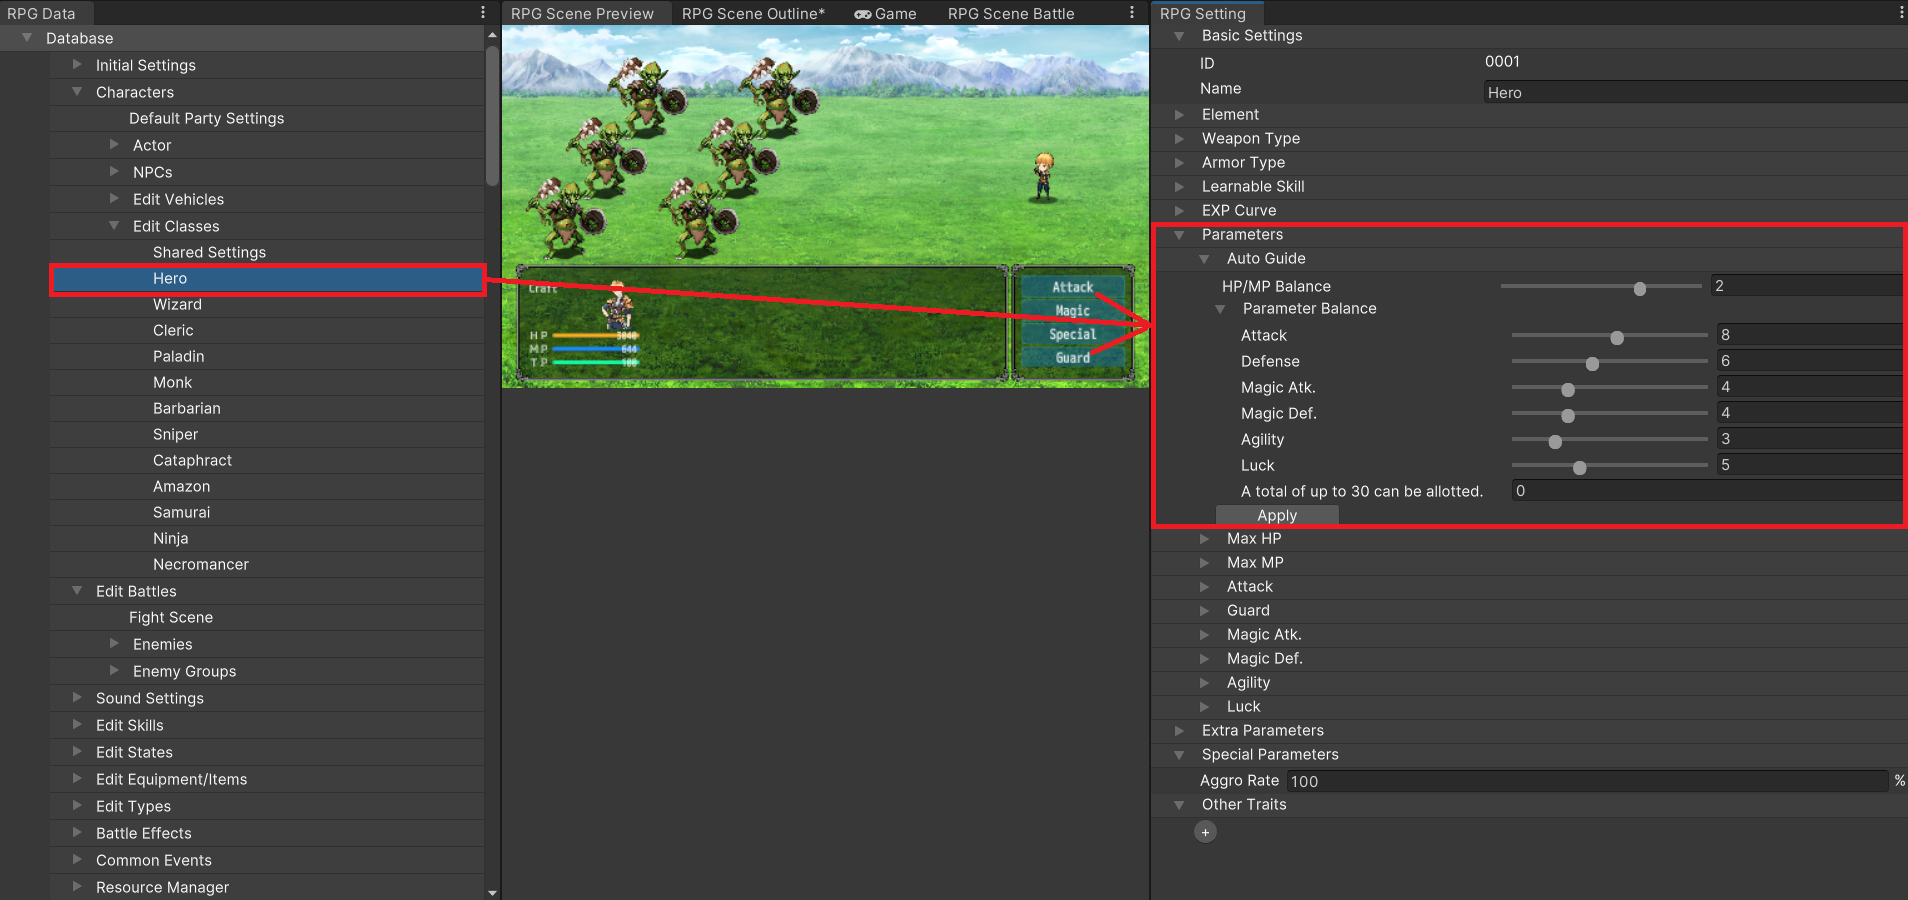
You'll see a settings screen similar to the one in the image where you can configure the balance of HP/MP as well as the other parameters.
After you click "Apply", you will see that each of the parameters has been changed.
In particular, you should notice a change in the gradients before and after the currently set Cleared Level.
This example highlights the importance of previous settings like Max Level or Cleared Level.
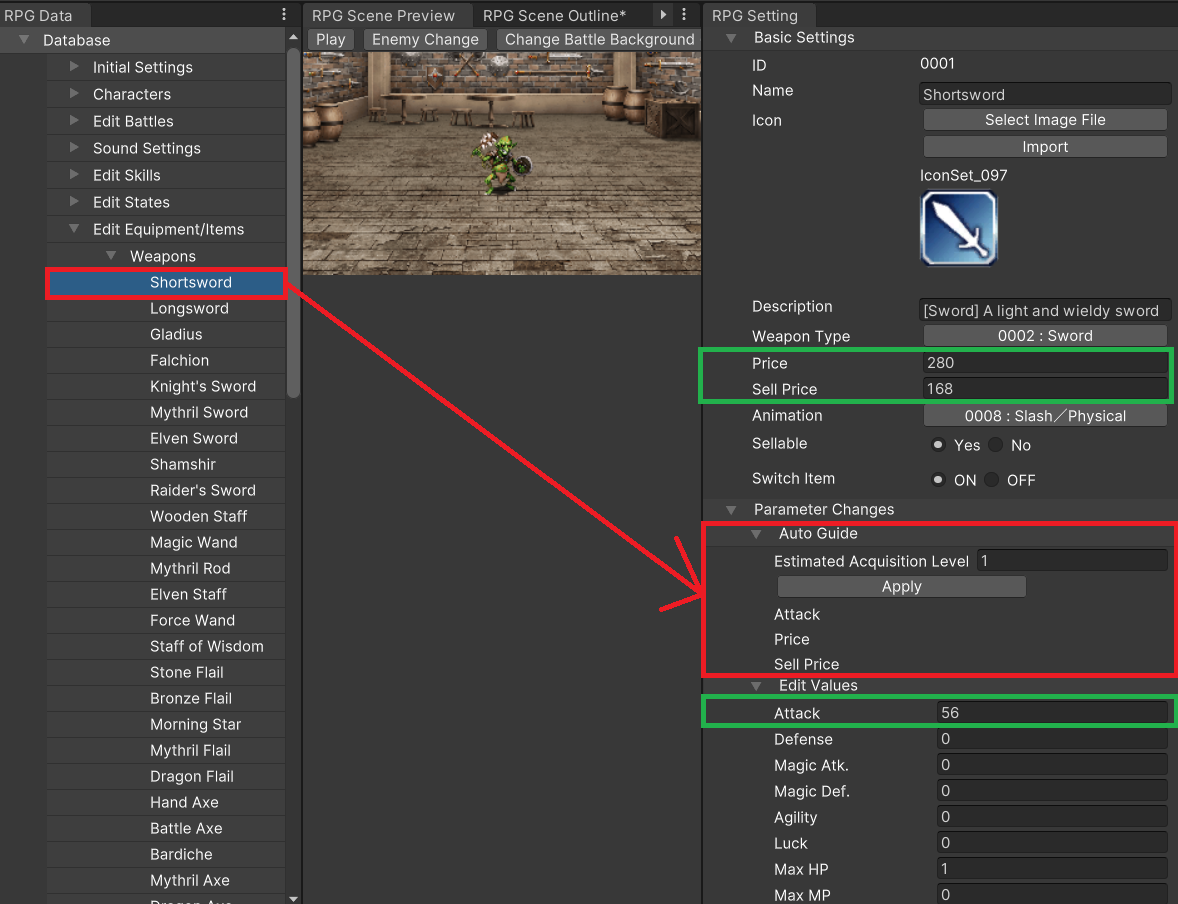
Configure the Autoguide's "Assumed Starting Level", then click "Apply" for an automatic calculation of parameters appropriate to that level.
This automatically inputs values for Price, Selling Price, Attack (Weapon), and Defense (Armor).
The values shown in the red frame are configured in the Autoguide. Those in the green frames show the applied values.
However, weapons are only assigned an attack value, while armor is assigned a defense value. If you wish to edit the other parameters, you may do so in the "Edit Values" section
once the Autoguide calculations have been applied.
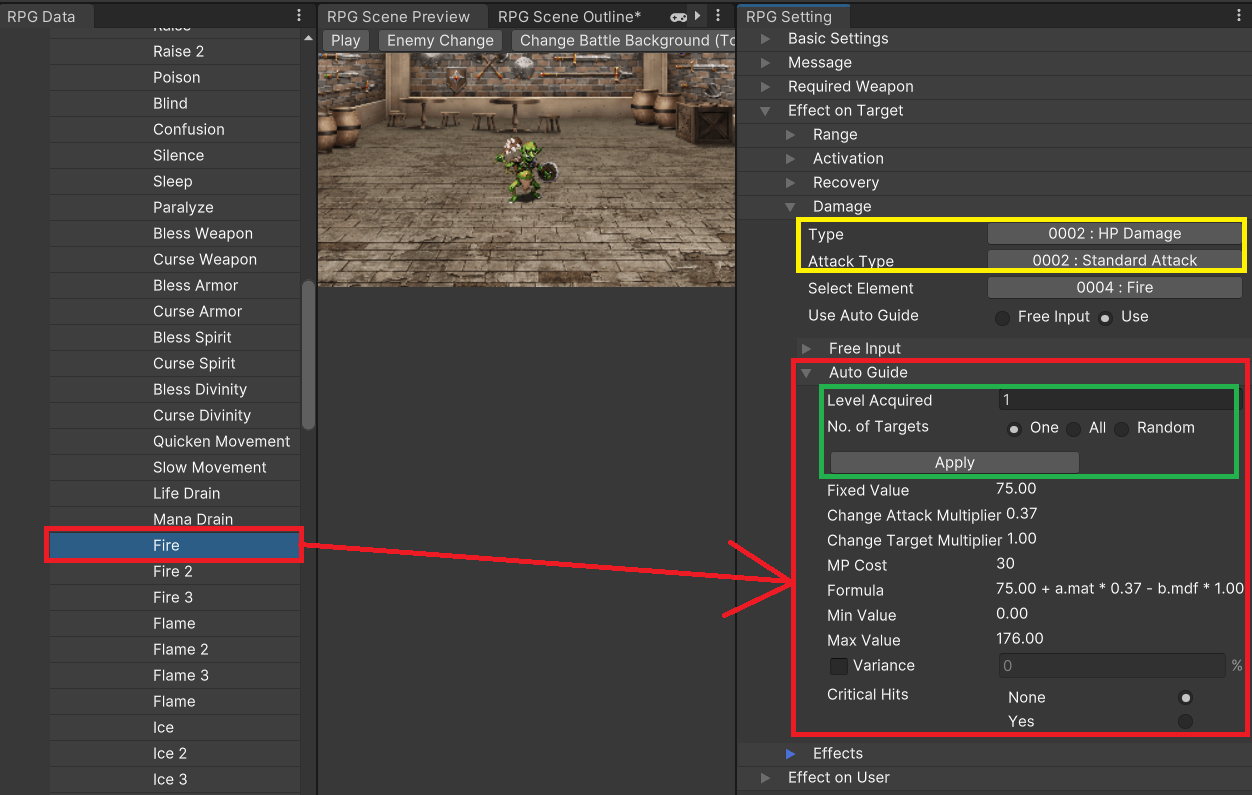
The Autoguide can only be used for custom skill damage when
Damage > Type is set to "HP Damage" and
Damage > Attack Type is set to "Magic Attack" like shown in the yellow frame.
Click on "Apply" after configuring the parameters in the green frame for the assumed level at which a skill is learned and the target units.
This will automatically calculate values such as MP Cost and Damage.
Along with the damage formula, both a minimum and maximum value for damage will be set.
Fixed damage (cdmg), attacker multiplier (a.mag), and target multiplier (b.mag) will all be set as well, which will update the damage calculation formula.
This becomes available after you have finished configuring Class, Weapons, Armor, and Custom Skills.
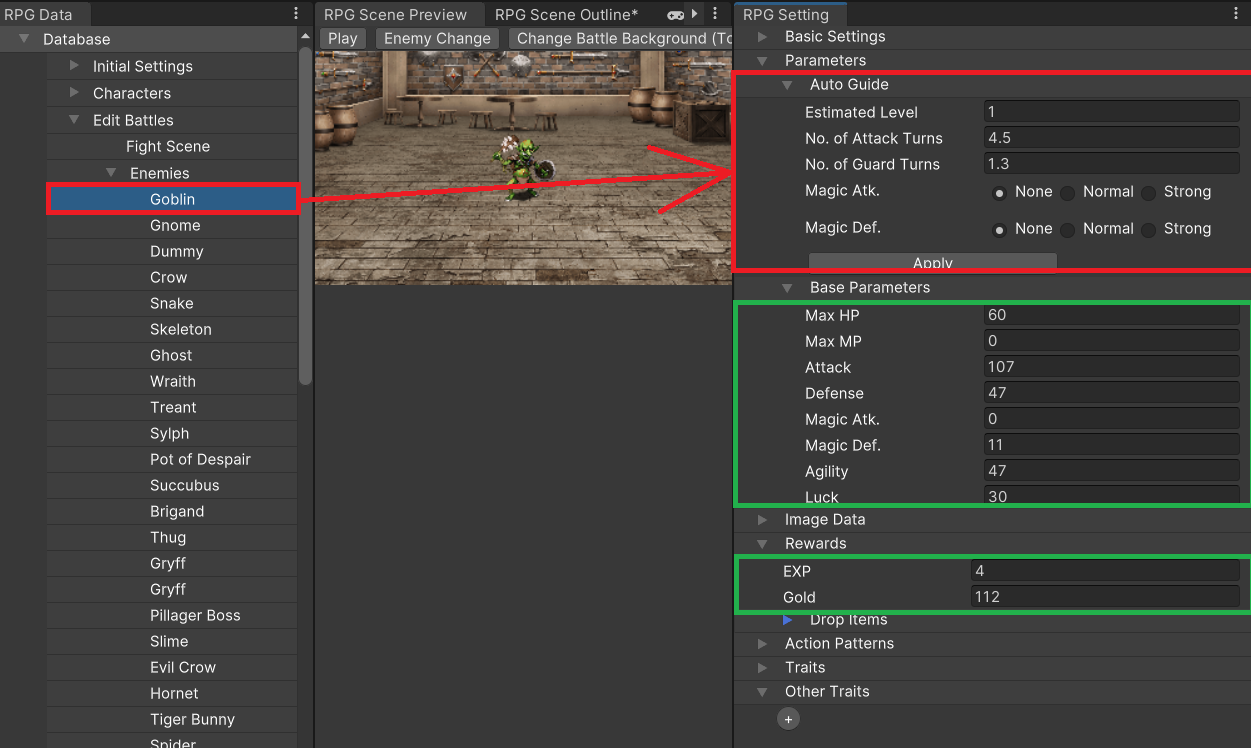
Set an assumed level for the actor at which they will fight this enemy. This will automatically generate parameters for the enemy such as Max HP, Attack, EXP Gained, and Gold.
Press "Apply" after setting the values in the red frame to determine the values found in the green frame.
Here is a further explanation of the items you need to configure for the Autoguide.
The assumed level of the party when this enemy is encountered.
Affects the Attack strength of the enemy.
The number of attacks the enemy needs to defeat an actor of the assumed level.
Much depends on the number of people in the party, but 5 to 8 for normal encounters and 3 to 4 for bosses is a good base.
Just keep in mind that the smaller this number is, the more powerful the enemy becomes.
Affects the HP of the enemy. Defense is automatically set to Attack x 0.5.
Specifically, this refers to the number of attacks the actor needs to defeat this enemy.
Normal encounters usually fall between 1 to 3. Input 1 for enemies to be beaten in 1 turn.
Decimal points are also allowed. For example, a value of 1.2 will make it so the actor needs 2 attacks to
defeat the enemy at the assumed level, but only 1 attack if they happen to be at a higher level.
Sets the strength of the enemy's magic attacks.
The base value is calculated such that the enemy will be able to use their magic to defeat an actor of the assumed level in the number of attack turns specified.
This value sets the multiplier for that base value. "None" means a multiplier of 0, "Normal" is 1, and "Strong" is 1.43.
If this is an enemy that doesn't use damage-dealing magic, use "None".
Sets the strength of the enemy's resistance against magic attacks.
The base value is calculated based on how many turns it takes to defeat the guarding enemy.
This value sets the multiplier for the above. "None" means a multiplier of 0, "Normal" is 1, and "Strong" is 1.2.
While the Autoguide assigns relatively reasonable values after referencing all the parameters involved, it is by no means perfect.
This is because it doesn't take into consideration variables such as party size, status changes (sleep, poison, skill sealing, etc.), parameter fluctuations (buffs and debuffs), skill usage, and so on.
Therefore, it would be best to view the Autoguide as an assistant to your game balancing strategy and always conduct the final fine tuning yourself using a playtest.
Nevertheless, we are confident the Autoguide will be of great help to your game-making process.
Many people using previous Maker tools may not have known where or how to start fine tuning their final game.
The Autoguide acts as an assistant by creating a working blueprint that can be used to kick-start the process.
This first step of creating a blueprint is likely one of the more difficult parts, and so the Autoguide alleviates your workload by shouldering the most tedious steps for you.