The Outline Editor is another new function in Unite
which makes it easier for you to visualize the flow of your scenario.
The scenario flow for a game of medium to long length can inevitably become quite complicated.
With concurrent plotlines, foreshadowing, revealing what was foreshadowed, and many other elements to consider, careful planning becomes a necessity.
What's more, scenario planning has to take place on top of actual game production. Spending all your time on the scenario can delay the other parts
and, in worst case scenarios, bring production to a complete halt.
Enter the Outline Editor. This function was implemented to help you by
alleviating the weightier parts of story planning and creation.
We'll first take a look at the settings of three elements in the Outline. Detailed explanations will follow.
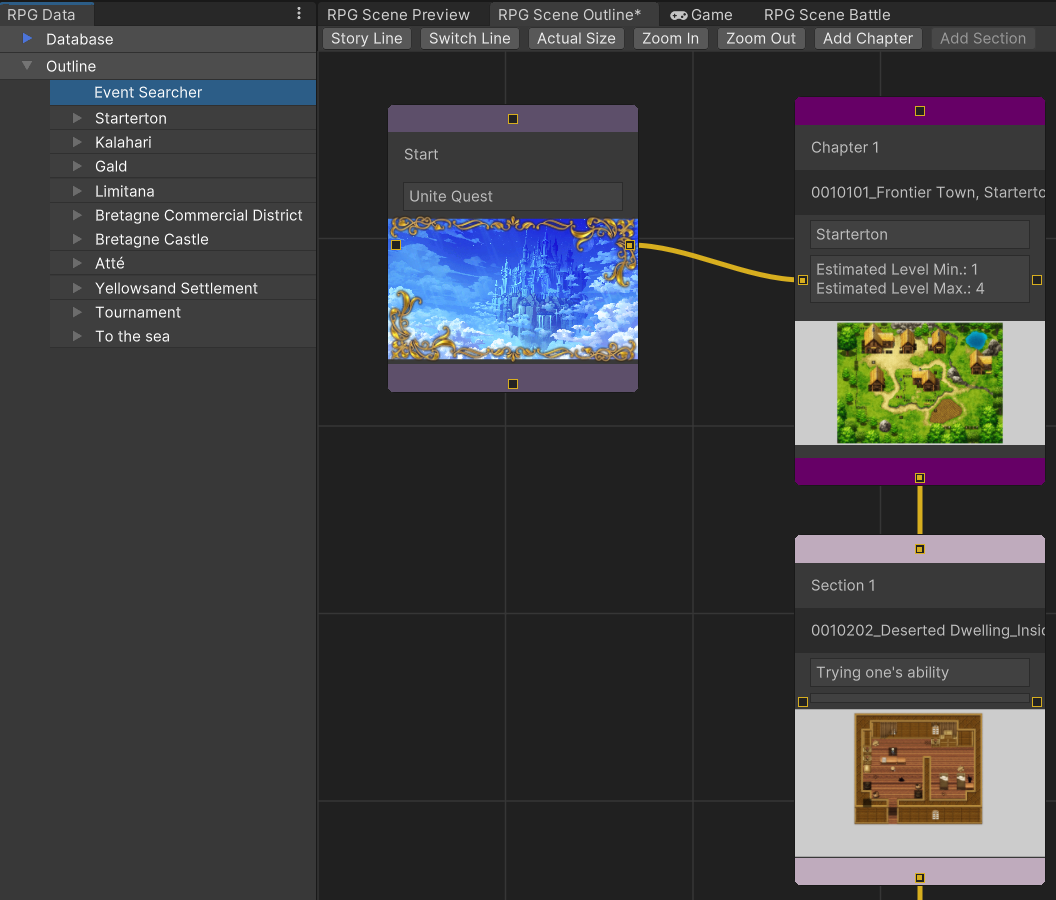
Here's an example of a skeletal framework for an outline.
As shown in the Scene View, the leftmost element connected by a line is the "Start". This is the very first scene that appears in the game, the title screen.
Click on it to display the settings for the title screen in the RPG Setting.
These will be the same settings found in the database's initial settings for the title screen.
Some of you may be wondering if the Outline Editor is something you'll even be using for the game you have in mind.
Perhaps you're planning for a shorter game or something with heavier focus on gameplay, such as something from the roguelike or hack-and-slash genres, and have decided you won't need to use this function.
Nevertheless, the title screen is handled by the "Start" slide, so be sure to at least set that up!
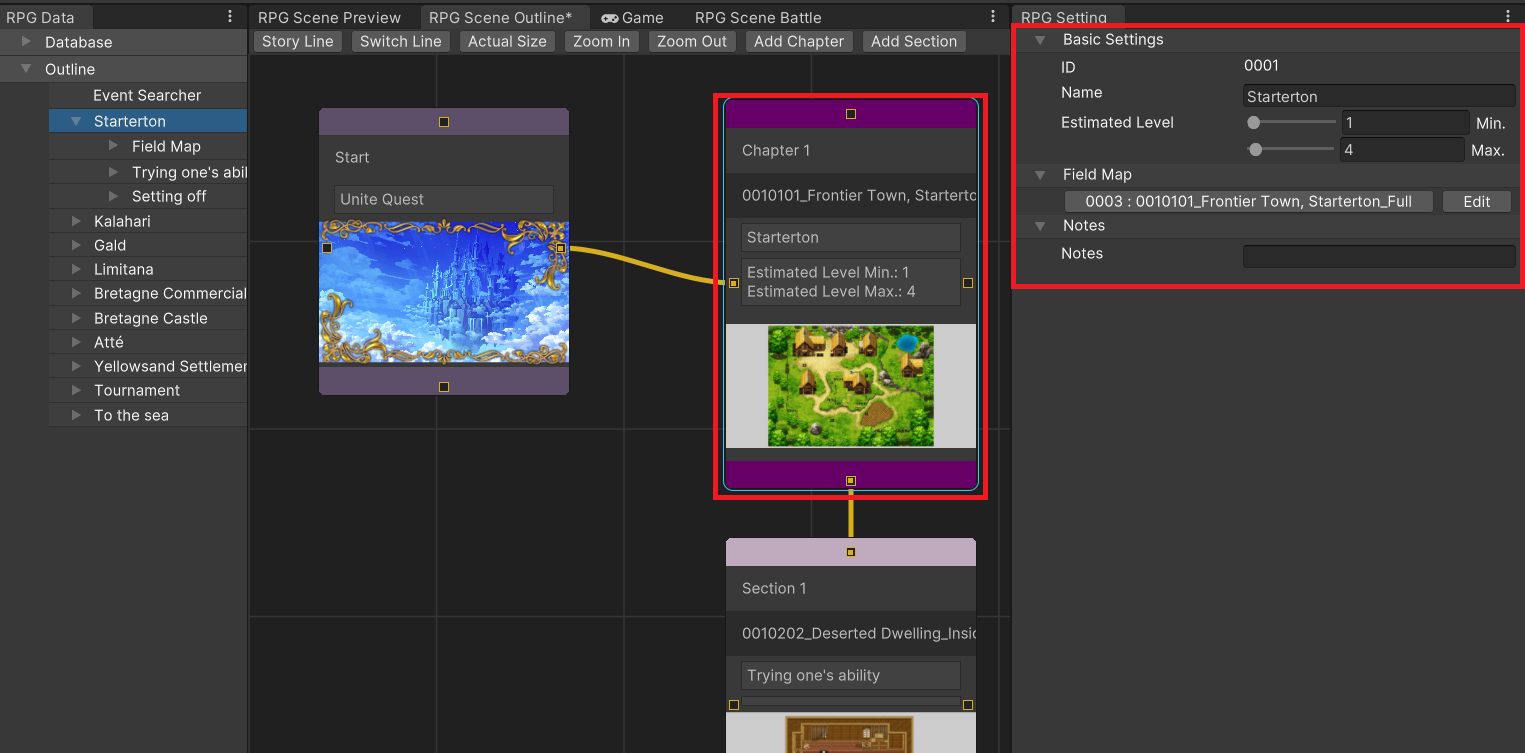
Story elements of the scenario are divided into chapters.
The following items can be configured in the RPG Setting.
Sets the name of the chapter. Use a name that describes the general flow of the chapter, something like "Departure" or "Goblin Attacks Town" for example.
The estimated level of the player during this chapter.
Select a map that is at the heart of the chapter (this is optional). Most of the time, this will likely be set to the town or village that serves as a base for that event.
Setting a field map here enables the "Edit Map" and "Edit Battle" options under that particular map's entry in the RPG Data Menu at Outline > (Chapter Name) > Field Map.
The effect is the same as navigating to that map from the hierarchy menu normally.
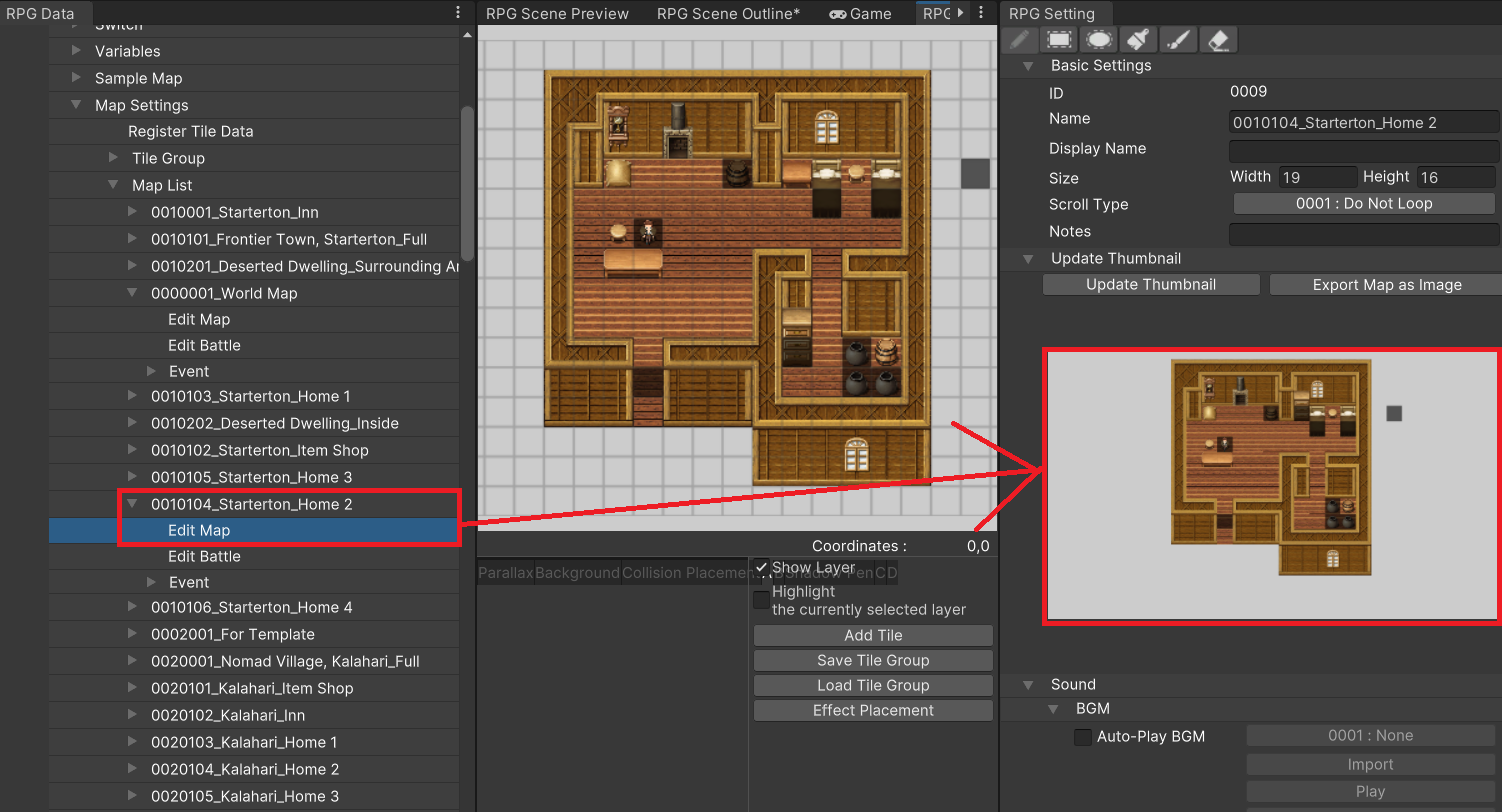
Map Thumbnail
To use a thumbnail for the map in the Outline, go to the
RPG Data Menu and select Map Settings > Map List > (Map) > Edit Map.
Click on "Update Thumbnail" under the basic settings of the RPG Setting to do the configuration.
We recommend having at least one chapter or section assigned to each map.
In previous Maker tools, maps were usually managed in a hierarchical tree diagram with parent-child relationships.
However, in Unite you are unable to create a tree diagram under Map Settings > Map List in the database section, and instead only get a list view.
As a result of this change, you may find it difficult to find the map you're looking for once you have a large number of them in your game.
This is where the Outline Editor comes in. By assigning maps to a chapter or section,
you'll be able to edit those maps or place events when editing the chapter's or section's "Field Map".
While adding each map to chapters or sections one by one may seem tedious at first glance,
you'll soon come to understand how convenient this method can be once you get used to it.
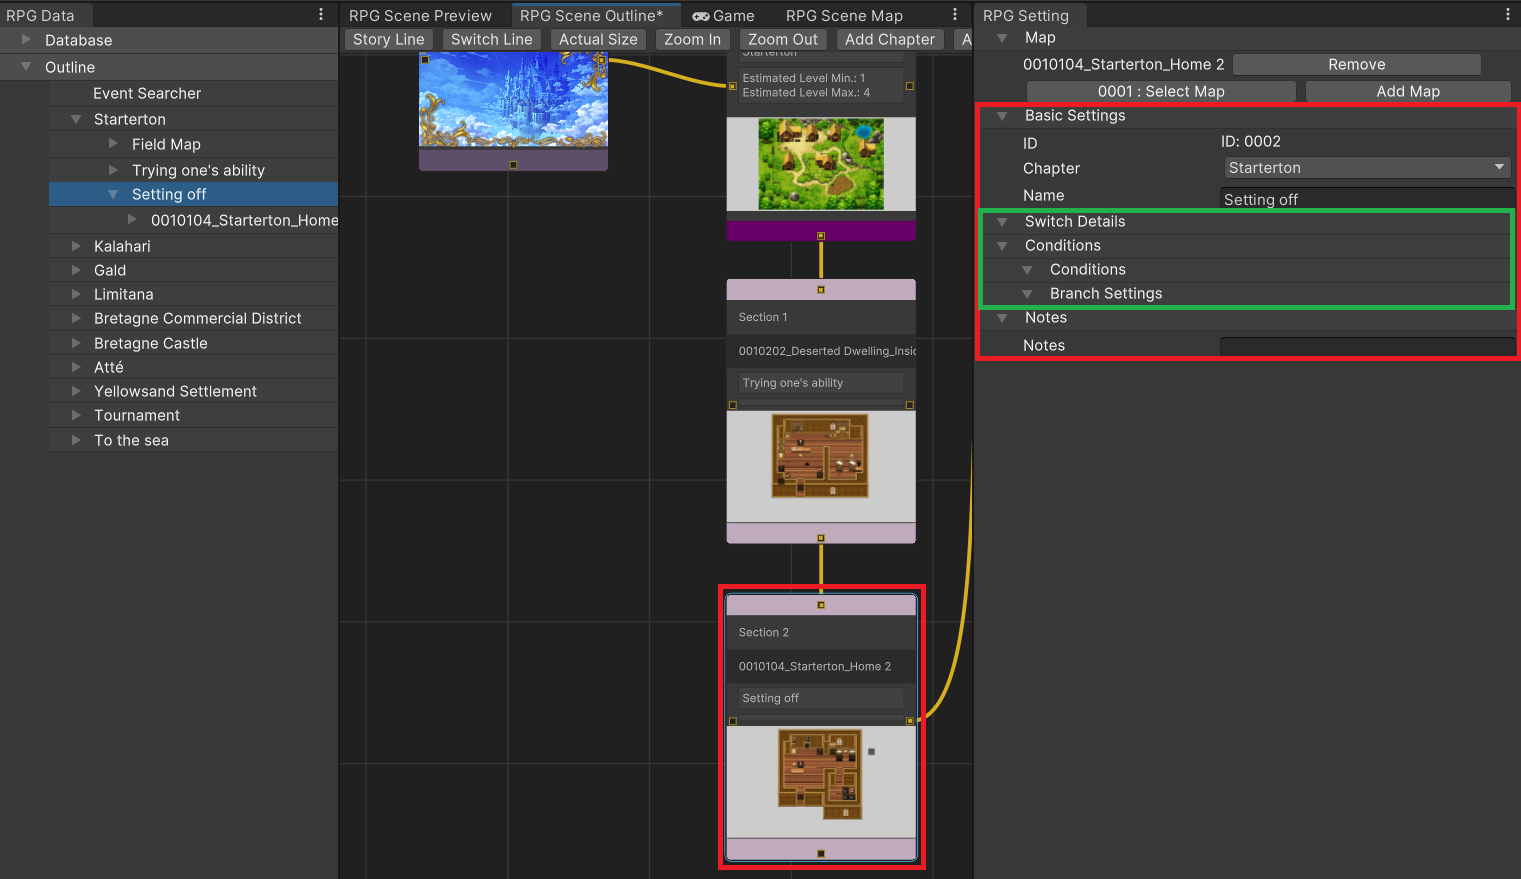
This is a child-item under a chapter.
Generally, chapters will be broken up into a few sections.
Sections are assigned with maps (especially those accompanied by events) that will appear in that chapter.
Specifically, dungeons, towns, or important facilities to be visited in that chapter will be registered as one section.
To make this process more versatile, the Outline Editor allows a section to be a child-item of multiple chapters
or even another section.
Here's an explanation of what you can configure in the RPG Setting.
You can give it the same settings as the chapter's field map.
Define which chapters the section will come under. This is done by drawing a line in the Outline Editor from the chapter to the section.
As mentioned above, one section can belong to multiple chapters. In such cases, you can choose any of the chapters to do the configuration in.
Bear in mind that this may complicate the Outline, so it may be best to assign each section to only one chapter to begin with.
If the section is linked to another section, it will inherit the chapter of the parent section.
These can be found in the section outlined in green in the image above. Relevant information from these segments will be displayed when you start configuring the "Switchline", which we will cover later.
The Storyline acts as a visualization of the scenario flow.
This allows you to quickly take stock of how the scenario, which consists of chapters and sections connected in a line, is designed to progress.
Now let's jump right in and learn through experience by actually trying out the Outline Editor!
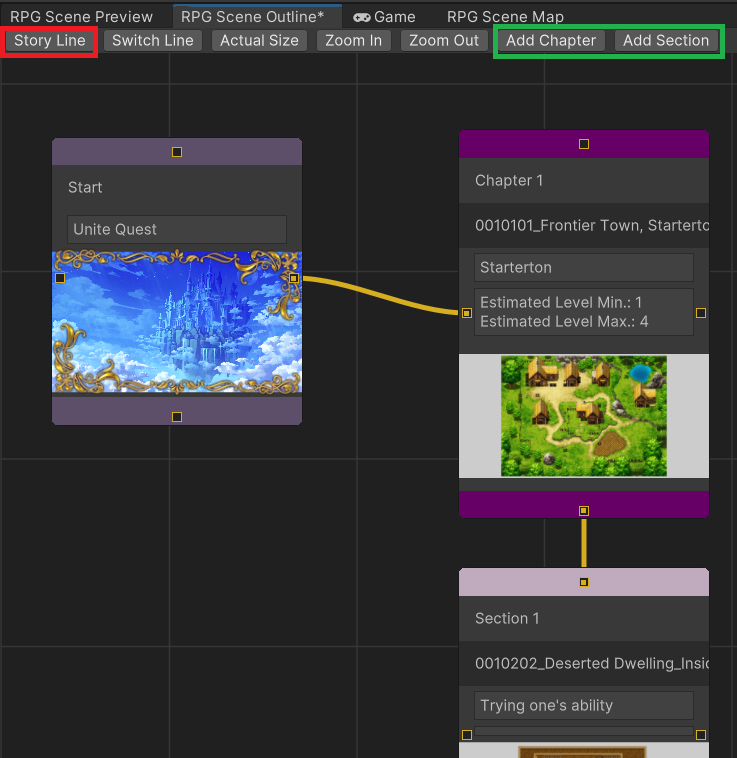
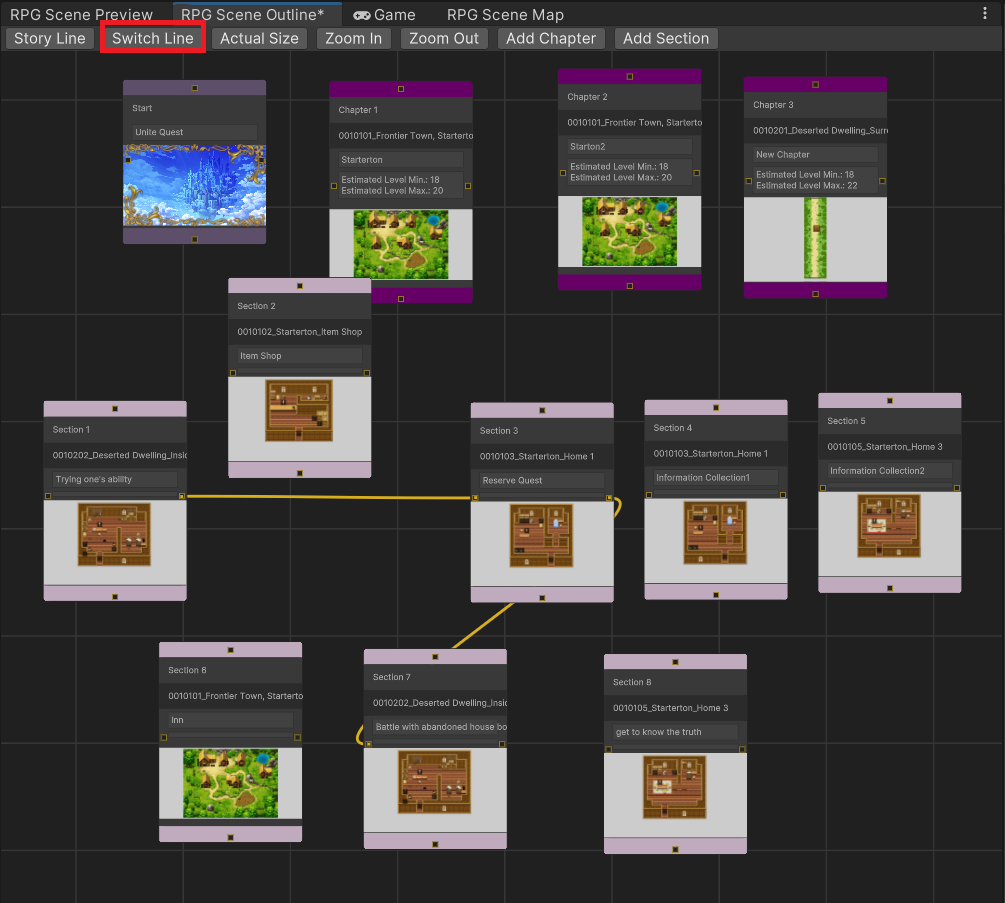
First of all, go to the "RPG Scene Outline" tab and select "Storyline" as outlined in red above. This brings up the storyline editor mode.
The editor is where you add new chapters and sections, and draw lines to connect them.
These controls become essential as you add more items, so keep using them until you become familiar with how they work.
To add new chapters or sections, click on the buttons outlined in green in the image above.
We'll add a few chapters and sections to give it a go.
You can drag and drop new elements directly into an appropriate position. Put them in positions that feel intuitive to you.
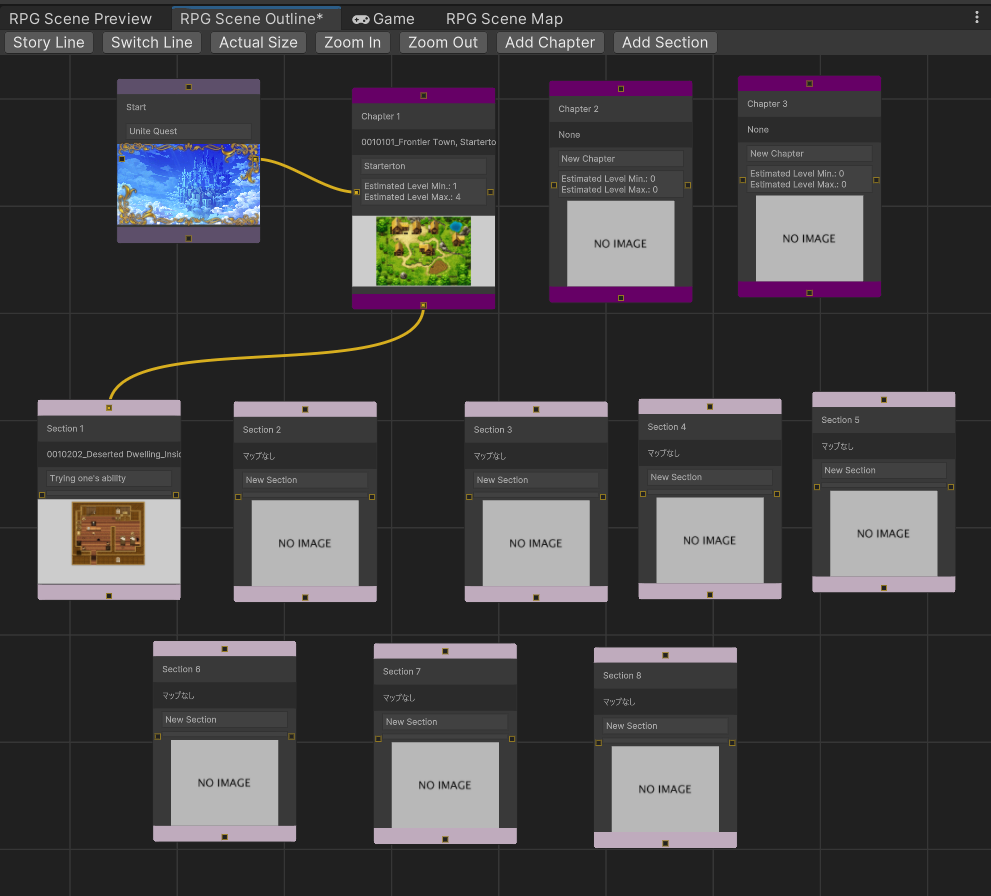
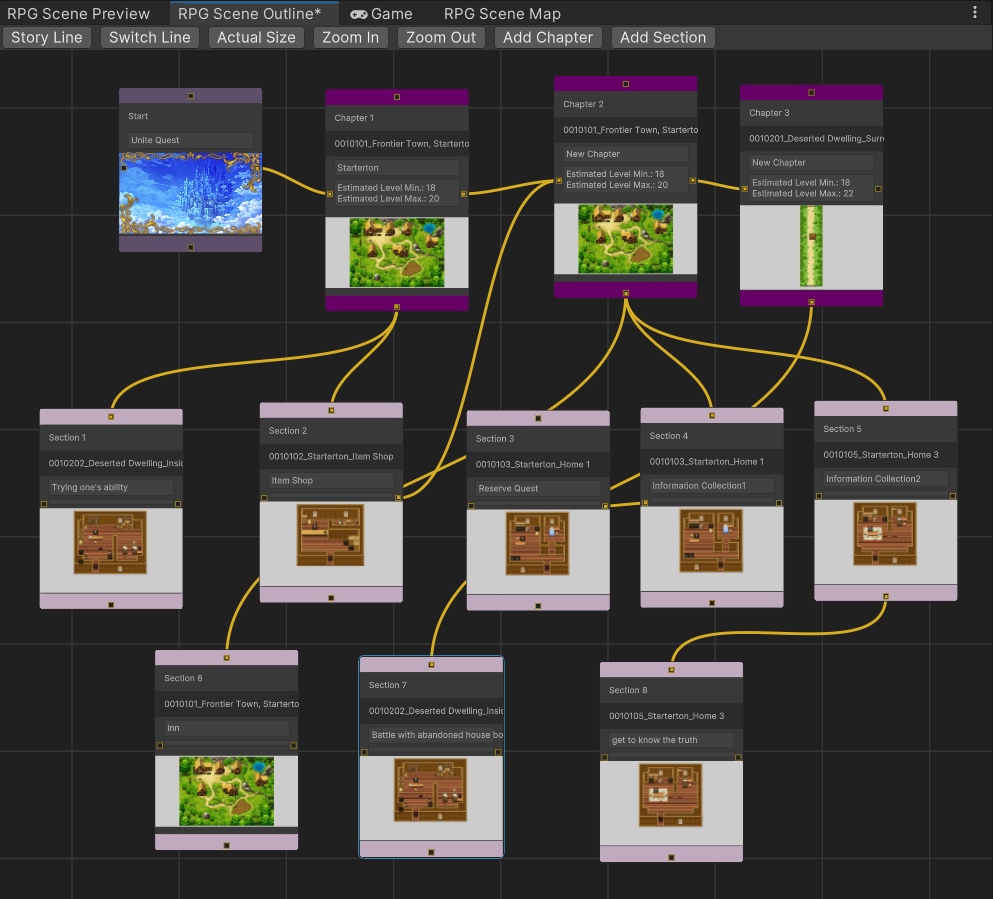
As you can see, we've added an additional two chapters and seven sections here.
Each element needs to be configured, but we'll do that later.
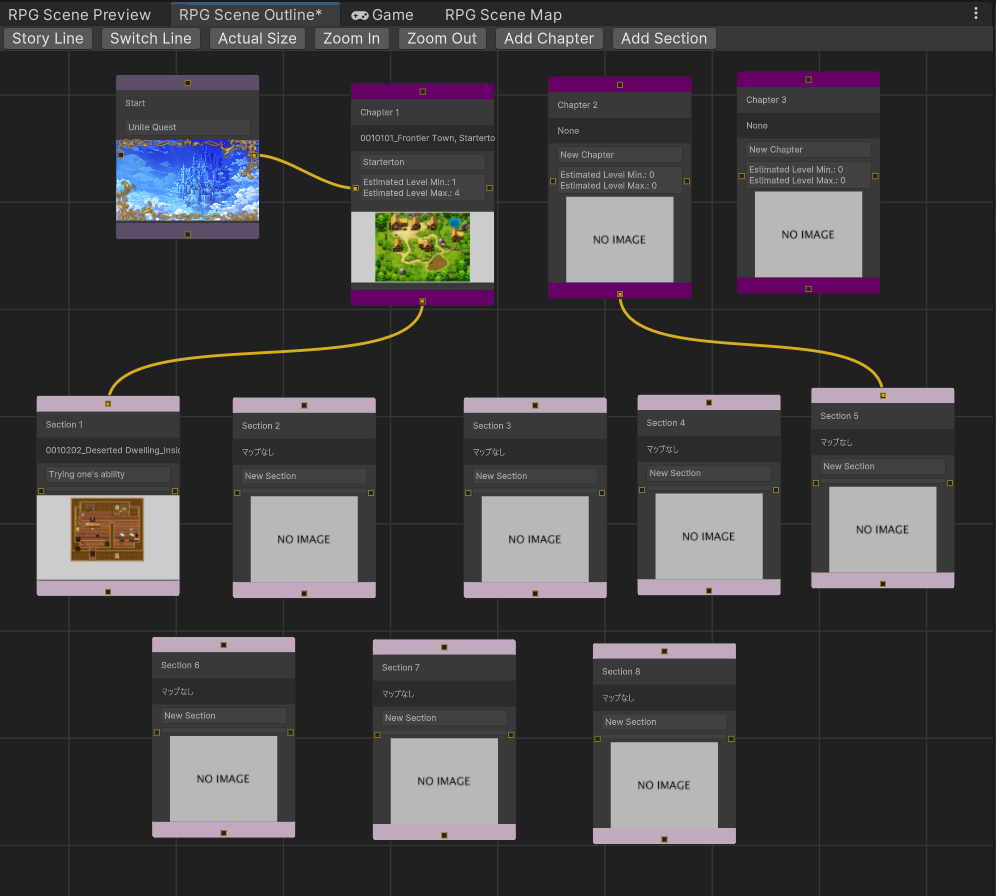
Now we'll connect the chapters and sections to other elements.
On the top, bottom, left, and right sides of chapters and sections you will see small squares which you can use to draw lines.
Click and hold one these squares, then drag the cursor to a square on the target element to draw a line.
Give it a go by connecting Chapter 2 to Section 5.
Do the same for the other elements. See the image below for an example of how we connected everything.
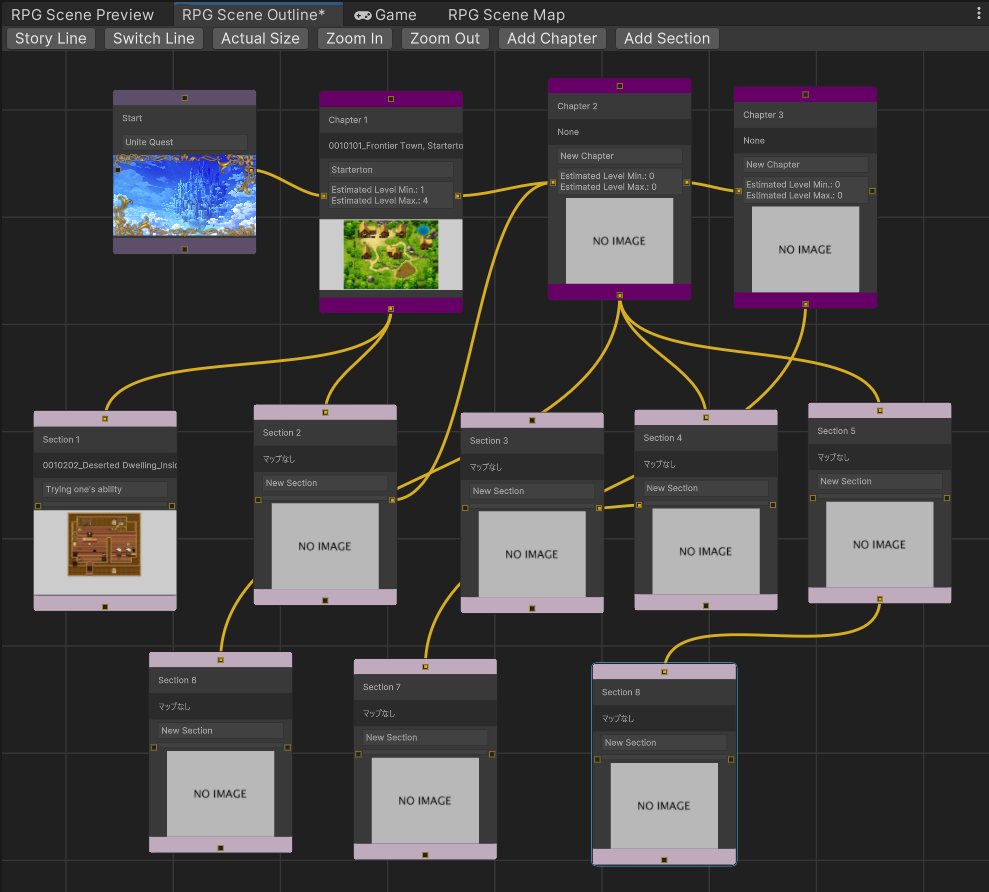
You can immediately understand a few things with this.
Now let's configure the new chapters and sections using the method explained earlier. Here's an example of what we did.
Once you've finished setting up the storyline, it's time to move on to the switchline.
We've previously explained that there are "Chapters" and "Sections" on the Event Page. Their settings are used here.
Many games have special segments of a story that are only accessible after clearing a prelude story in advance.
A switch is used in such cases to determine whether the prelude event has been completed.
However, the larger the game becomes, the more switches you'll have to manage, and this can become quite the tedious task.
By connecting a section that turns the switch on, such as accepting a quest, to the section where the quest is actually carried out, you'll have a visual guide on the general event flow.
The conditional switch can be applied to items as well.
For example, when you need a special item to open the sealed door to a dungeon.
This can be visualized by connecting the "Obtain Event Item" section with the "Use Event Item" section.
This is the sort of visualization that the switchline is meant to help with.
This can be done with the following steps.
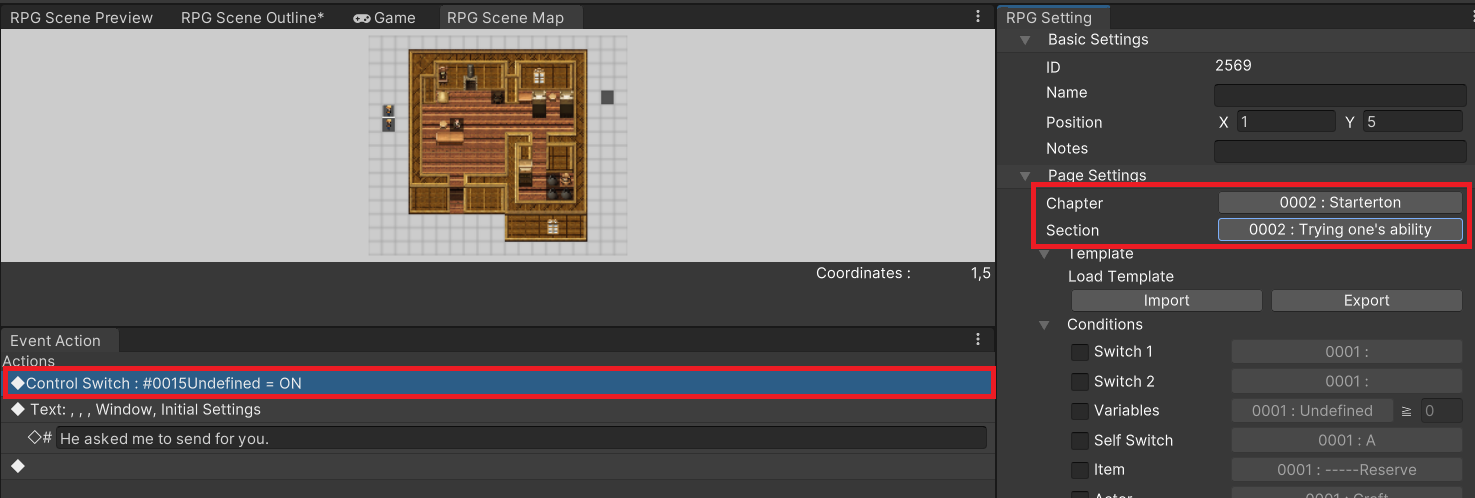
Turning ON switch 15 of Craft House (Section 1)
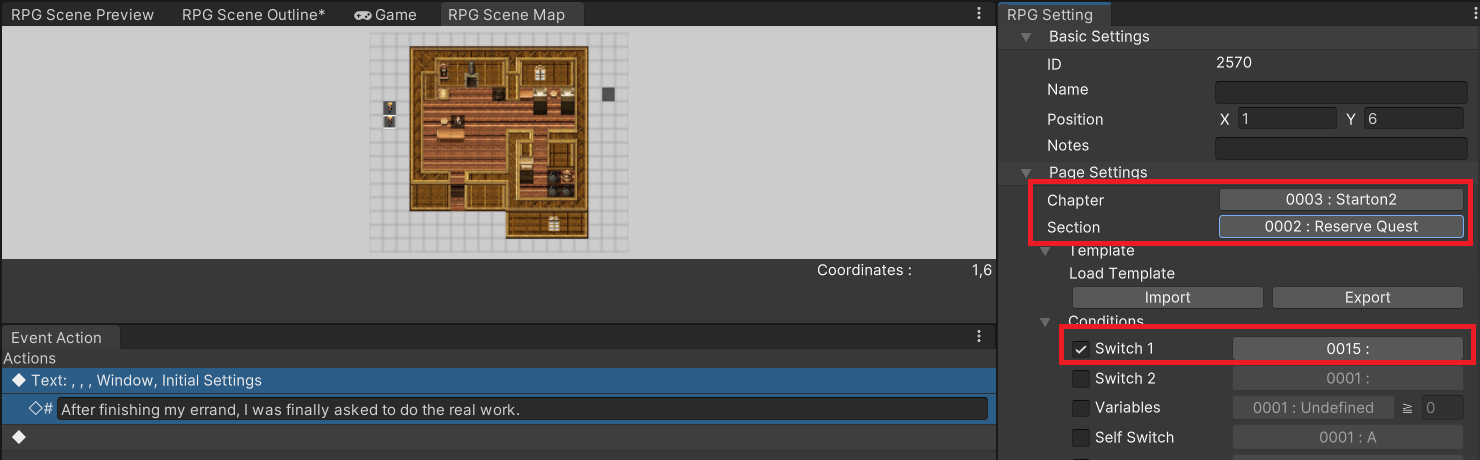
An event in Section 3 that uses Switch 15 as its condition.
After doing all that, select the Switchline to connect the two sections and you're done.
Give the switch an easily understood descriptive name, such as the name of a hint.
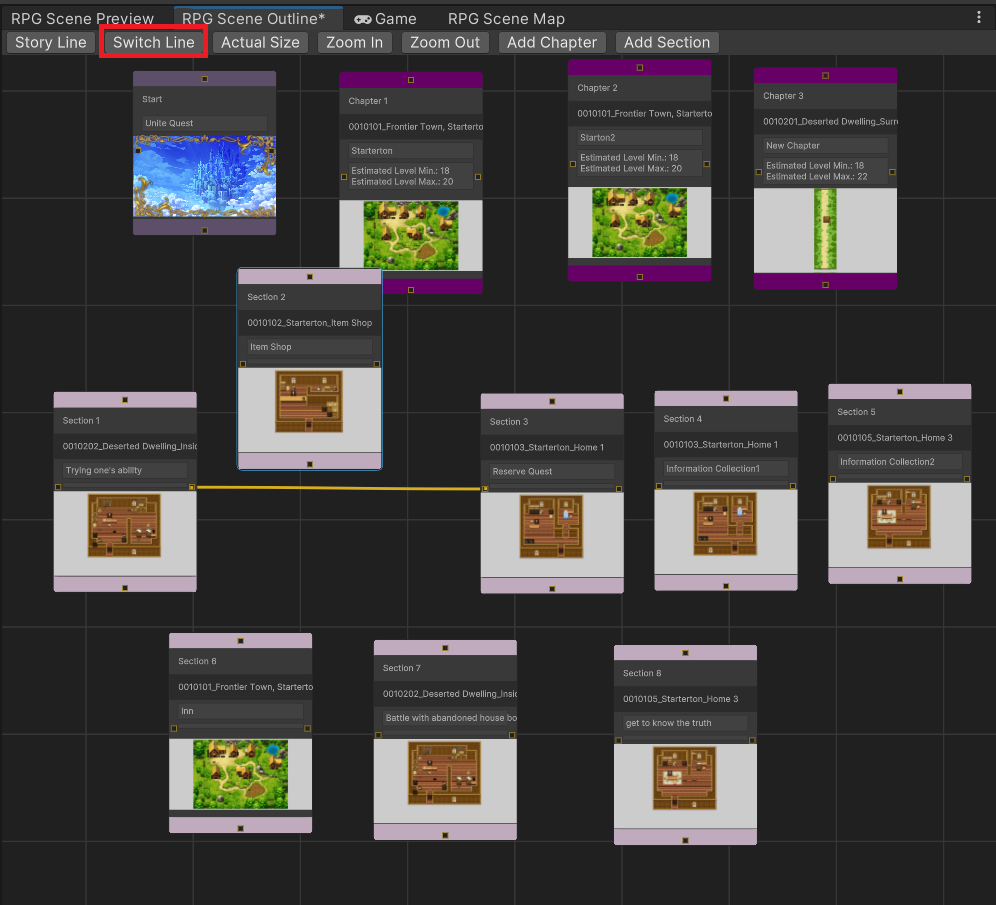
Section 1 and Section 3 are connected on the Switchline
This method is generally the same as setting a normal switch, but with some differences which we'll go over here.
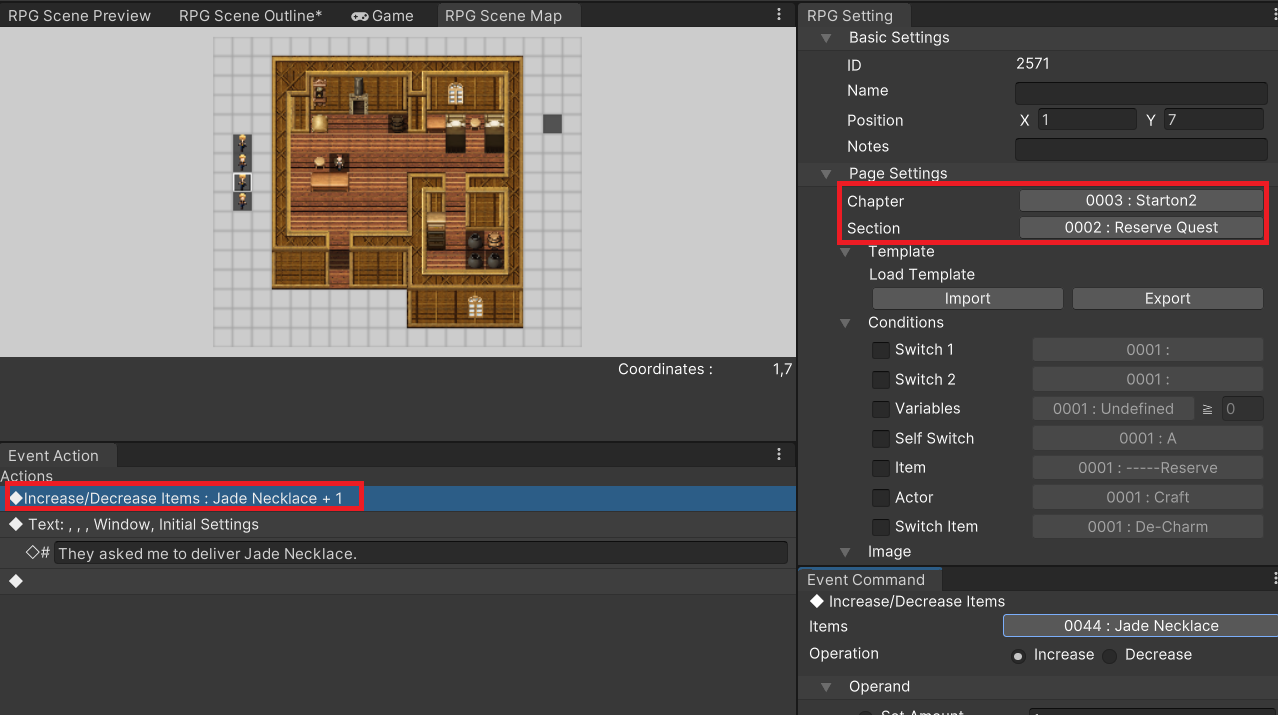
Obtain a Jade Necklace in Section 3
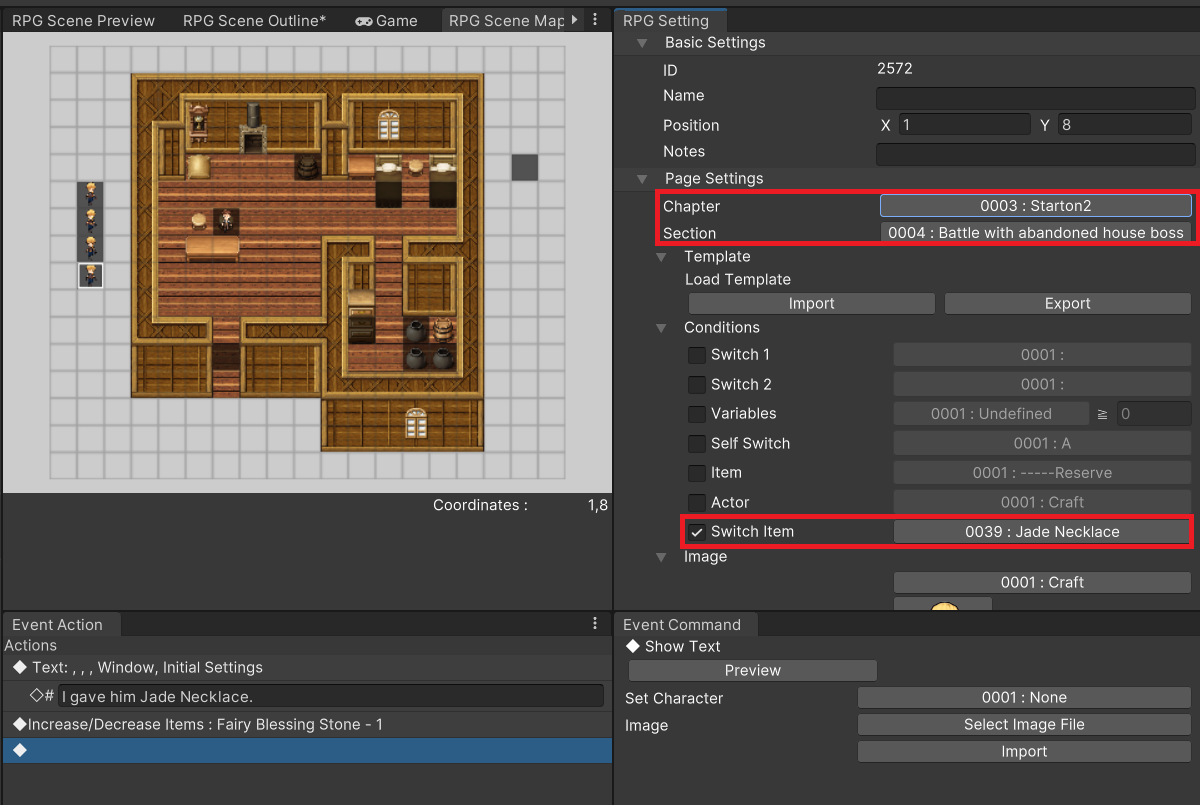
The Jade Necklace becomes a trigger event in Section 7
After doing all that, select the Switchline to connect the two sections and you're done.
Section 3 and Section 7 are connected on the Switchline
We hope this has been helpful. This can be a lot to remember right off the bat, so it may take a while before you get used to it.
However, as you grow familiar with these methods, you'll slowly realize how handy they can be.
We absolutely recommend developers planning for a mid-length game utilize the Outline Editor and see for yourself just how convenient it can be.